Level 3 - Customization via Css with resources
You can perform the following customization via a custom CSS file with additional resources:
- Changing the icons used in the header and navigation panel ( eg. user icon, favorite icons, timeslot icon, etc.)
- Changing some icons used in components displayed in the content area ( eg. checkbox, radio, sort, etc.)
Required skills
- Audit project configuration
- CSS syntax
- Working with zip files
Referencing additional resources in CSS
To reference additional resources in CSS, use the url() syntax for the css properties to change.
- To change the image of an icon button, set the background-image css property for that button class
For example, to change the image of the timeslot button in the navigation panel :
Button.timeslot[PUSH] {
  background-image: url(resources/frame/timeslot_btn_16.png);
}
- To change the icons of a two-state button, you need to set the background image for both normal and selected states.
For example, to change the icons in the navigation favorites menus:
Button.nav-favorites[RADIO][FLAT] {
   background-image: url(resources/frame/nav_fav_off_20.png);
}
Button.nav-favorites[RADIO][FLAT]:selected {
  background-image: url(resources/frame/nav_fav_on_20.png);
}
- Two states buttons have the
[CHECK]style if alone or[RADIO]style if grouped - Icon-only buttons have the
[FLAT]style so that they have no borders or background.
You can also change images used in base components.
For example you can change the icons used in a check-box with the following css:
Button-CheckIcon {
  background-image: url(resources/theme/checkbox-unselected.png);
}
Button-CheckIcon:hover {
  background-image: url(resources/theme/checkbox-unselected.png);
}
Button-CheckIcon:selected {
  background-image: url(resources/theme/checkbox-selected.png);
}
Button-CheckIcon:selected:hover {
  background-image: url(resources/theme/checkbox-selected.png);
}
Browse through the theme_custom_template.css file attached to the previous chapter to know which components images can be overridden.
Building a custom theme with css and image files
Packaging your custom CSS and image files
The paths in the CSS url() properties are relative to a specific internal package inside the portal web app directory.
It cannot reference files outside of this directory or in the Audit project itself ( as is the case for the custom logo file).
For this reason, you need to package your additional resources along with the css file in a special ZIP file known as a JAR Bundle file , so that it's accessible to the web application.
To package your images files into a JAR bundle, do the following:
- download the
com.brainwave.theme.template.css_images.jarfile attached below - give it a different name (eg. mycompany.customtheme.jar)
- using a zip utility, such as 7-zip , add your image files in the resources/ folder of the jar file
- modify the theme/theme.css file with the customized image css entries and update it inside the JAR package
You can find an example of customized CSS+resource package attached as com.acme.theme\_css\_images\_1.0.0.jar, which replaces the white outline menu icon by a black one.
JAR directory and file structure
META-INF/
  MANIFEST.MF

resources/
  frame/
    burger_bk_20.png

theme/
  theme.css

fragment.xml
theme/theme.css
Button.nav-main-menu[PUSH][FLAT] {
   background-image: url(resources/frame/burger_bk_20.png);
}
Use case: customizing the browser "fav-icon" for Identity Analytics web portal
The browser fav-icon is the icon that is displayed in the browser's tab or title bar for each web site.
![]()
To customize the fav-icon for the Identity Analytics Web application, for example to match your company's logo, do the following:
- download the
com.brainwave.theme.template.css_favicon.jarfile attached below - give it a different name (eg.
mycompany.customtheme.jar) - provide an icon file to use as the favicon (typically 32x32 .ico file, but a regular PNG image file of size 32x32 will work as well )
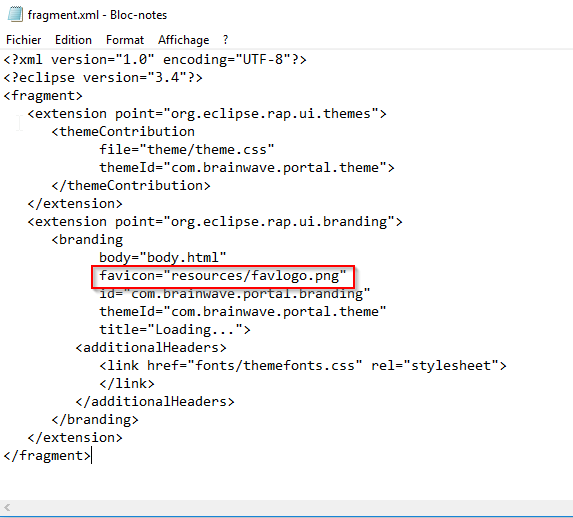
- Make sure the favicon image file is NOT named favicon.png, for example name it favlogo.png .
- using a zip utility, such as 7-zip or win-zip , copy your image file in the resources/ folder of the jar archive
- using a zip utility, update the file fragment.xml at the root of the jar archive so that it references your fav image file,
for example:

You can of course add more customizations to your theme jar file ( css, images ,etc..).
Once you are done , proceed to the next section using your updated theme jar archive.
Using the theme JAR bundle in your web application
To use the theme JAR bundle file (with the CSS and image files) in your application do the following:
- Check Use custom theme extension option in the Web Portal tab of the configuration
- Select *.JAR (Theme Bundle JAR file) as the file type, then select your custom jar file to use.
- Generate the web-portal so that the jar bundle file is included in the web app
- Redeploy the web app to the web server

Fine tuning your custom JAR bundle
As it is the case for the css files, it's unlikely that your custom JAR bundle will be satisfactory at the first deployment.
As such, you will most likely have to try successive changes and verify their impact on the display until you are finished.
To fine tune your JAR bundle, the initial steps are similar to when working on a css file:
- Check Activate debug mode in the web portal tab of the configuration
- Select the custom JAR bundle to use as described above.
- Generate the web portal and deploy the web server
The difference with the css file is that you cannot modify directly the JAR bundle in the project. When exporting and deploying the portal the theme JAR bundle is unzipped in the work directory of your Tomcat installation:
<TOMCAT_HOME>\work\Catalina\localhost\<PROJECT>\portal\plugins\com.brainwave.portal.theme.custom
All changes done to modify the theme should be applied to this folder:
- All icons must be added to the resources folder
- All modifications applied to the theme must be done in the file
theme\theme.css
Shutting down the tomcat server will cause you to loose all the modifications applied.
Once you are satisfied with the results, to make your changes permanent, you must, before shutting down the server, zip the com.brainwave.portal.theme.custom folder and modify the file extension to .jar to have your custom JAR bundle. As explained above you can also rename the resulting file and save it outside of the work folder.
Download file
com.acme.theme_css_images_1.0.0.jar
com.brainwave.theme.template.css_favicon.jar
com.brainwave.theme.template.css_images.jar
theme_custom_template_level3.css