LDAP dynamic groups in Global Identity Builder
If a source used in the Global Identity Builder contains identities that are associated with LDAP dynamic groups, and you plan on using the Global Identity Viewer to search for identities and groups, use RadiantOne to create a virtual view of the source that automatically evaluates the dynamic groups, and then add this view as an identity source into the project. This section provides guidance on how to achieve this.
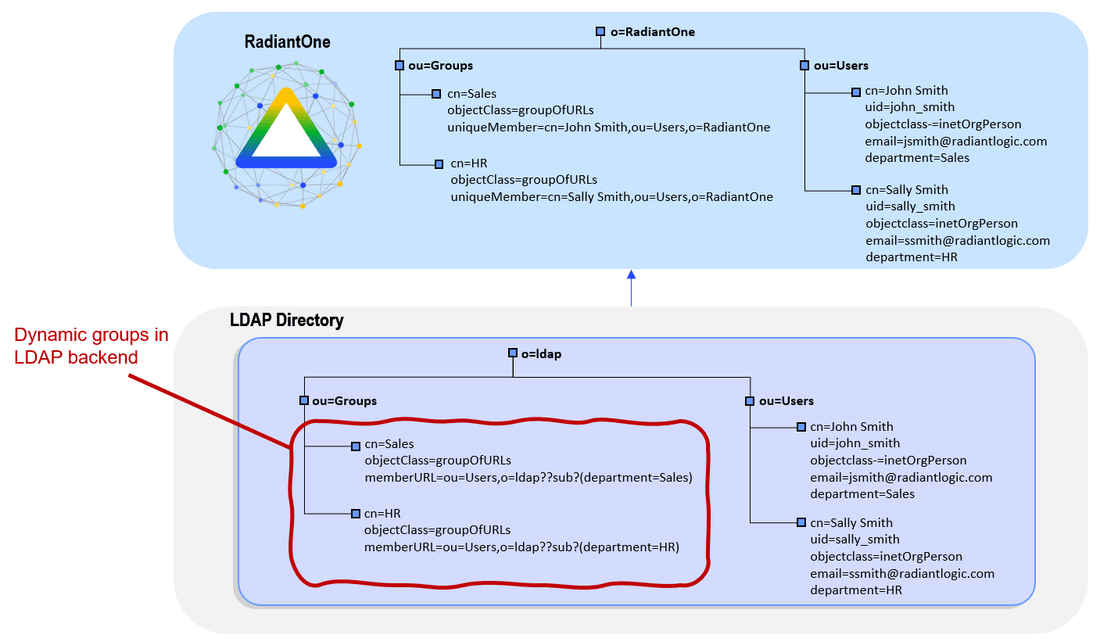
In the diagram below, the LDAP directory contains a dynamic group named HR. In the virtual view, the dynamic group members are evaluated the cached as a standard group.
- Configure a virtual view to the directory backend that contains the dynamic groups. This can be a simple proxy view. Use Suffix Branch Inclusion or Exclusion to return the desired branches. If you need help with creating a proxy view or defining suffix branch inclusion/exclusions, see the RadiantOne Namespace Configuration Guide.
- From the Main Control Panel > Settings Tab > Interception section > Special Attributes Handling sub-section, locate the Dynamic Groups section on the right side.
- Choose either
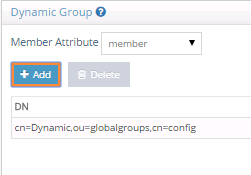
memberoruniquememberfrom the Member Attribute drop-down list. This will determine the attribute name that will contain the members of the dynamic groups. - Select the Add button.
- Select Choose to browse to the container where all dynamic groups are located. If only a few groups are dynamic, you can select and add them individually. An example of adding a single group named Dynamic is shown in the figure below.
- Check the option to Enable Caching.
- Select OK.
- Select Save in the top right.
- Configure DN Remapping for the memberURL attribute. From the Directory Namespace tab, select the node where the proxy is mounted below the Root Naming Contexts section.
- On the Attributes tab on the right side, select ADD.
- Enter
memberURLfor the Name and Virtual Name properties. - Check the DN Remapping option.
- Select OK.

- Select Save in the upper right.
- Configure the virtual view for persistent cache. From the Main Control Panel > Directory Namespace tab, select the Cache node.
- Select Browse to navigate to the naming context you want to cache.
- Select Create Persistent Cache.
- On the Refresh Settings tab, select the type of cache refresh strategy you want to use and select Save. For details on the different refresh options and how to initialize the cache, see the RadiantOne Deployment and Tuning Guide.
- After the persistent cache is configured, select the cached branch below Cache and on the Refresh Settings tab, select Initialize.
- If you selected a Real-time refresh strategy, configure the connectors accordingly and start them. For details, see the Connector Properties Guide and the Deployment and Tuning Guide. If you selected a periodic cache refresh approach, configure the refresh interval. For details, see the Deployment and Tuning Guide.
- From the RadiantOne Main Control Panel > Wizards tab, select the Global Identity Builder.
- Add RadiantOne as an identity source. Remember to provide a meaningful data source name so you can identify the actual underlying data source. The Base DN should point to the persistent cached view of the actual backend data source.