Parametrization
Proxy configuration
Proxy configuration in web portal is quite sensitive, and a bad configuration may break html widgets'.
If your are not familiar with what a proxy is, see Wikipedia.
In short: A proxy acts as an intermediary between the clients and the server
The proxy is setup in the technical configuration's Web portal page:
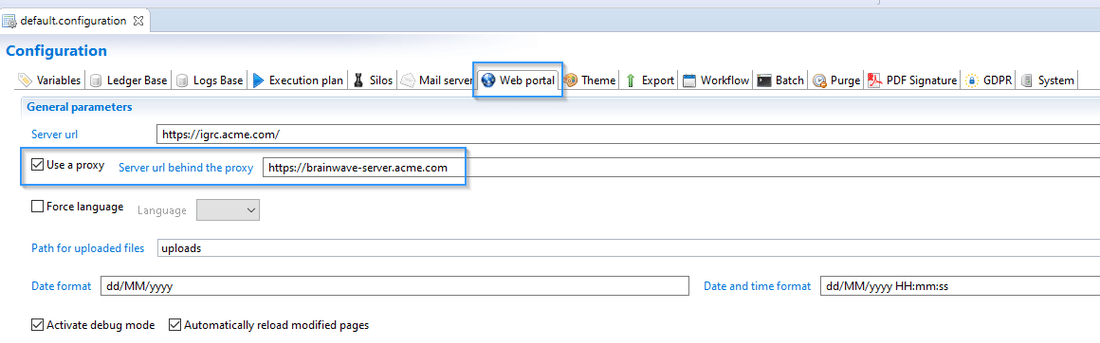
Here are some guidelines to correctly set proxy url in brainwave configuration:
- do not forget protocol (
http://orhttps://) - use the frontal web server (proxy) name (not the ip adress)
- do not add a final
/ - do not specify port
- if you edit the
config.propertiesfile, do not forget to escape:with a\.
Here is a sample configuration for a config.properties file:
proxy.url=https\://brainwave-server.acme.com
JNDI configuration
In order not to include the database connection credentials in the WAR file you can choose to configure it to use an external JNDI source. For this you have to choose the option use a JNDI data source™ in the technical configuration window.

Generating the JNDI file
The .xml file that includes the database credentials is generated by clicking the disk icon outlined in the figure above. You will then be asked to select the destination folder. The generated file will have the following format:
<?xml version="1.0" encoding="UTF-8"?>
<Context override="true" path="/demo-jndi">
    <Manager pathname="" />
    <Valve className="org.apache.catalina.authenticator.FormAuthenticator" landingPage="/portal"/>
    <Resource
        name="jdbc/BRAINWAVEDB"
        auth="Container"
        type="javax.sql.DataSource"
        maxActive="15"
        maxIdle="5"
        maxWait="5000"
        testOnBorrow="true"
        testOnReturn="false"
        testWhileIdle="false"
        validationQuery="SELECT 1"
        validationInterval="30000"
        autoReconnect="true"
        driverClassName="com.microsoft.sqlserver.jdbc.SQLServerDriver"
        username="igrc"
        password="__PASSWORD__"
        url="jdbc:sqlserver://localhost:1433;databaseName=QA_sqlserver"
    />
    <Resource
        name="jdbc/BRAINWAVEWORKFLOWDB"
        auth="Container"
        type="javax.sql.DataSource"
        maxActive="15"
        maxIdle="5"
        maxWait="5000"
        testOnBorrow="true"
        testOnReturn="false"
        testWhileIdle="false"
        validationQuery="SELECT 1"
        validationInterval="30000"
        autoReconnect="true"
        driverClassName="org.postgresql.Driver"
        username="activiti"
        password="__WFPASSWORD__"
        url="jdbc:postgresql://localhost:5432/activiti"
    />
</Context>
The first <Resource> bloc corresponds to the options and credentials used to connect to Brainwave's iGRC database. The second <Resource> bloc details the credentials and the settings of to the activiti database used within the workflow option. If workflows are not set up the second bloc will not be added.
A JNDI connection allows activation of additional parameters, such as automatic reconnection to a database (autoReconnect="true").
Generating the web application
The JNDI file will also be generated if you click on Generate web portal:

Both files will be generated in the output directory:

Deployment
In addition to the modification of the technical configuration, the following steps, to be performed in the tomcat instance, are required to use the JNDI configuration:
- Shut down the
Tomcatservice - Copy the previously created '.xml' into your tomcat instance, in the folder
conf/catalina/localhost/

- Update the connection password(s)

- Add the relevant driver to tomcats
/libfolder to allow connection. The drivers to use are available in theplugins\com.brainwave.iaudit.database.drivers_1.0.0\driversof your igrcanalytics home folder

- Move or copy the web application (
.war) to the Tomcat'swebappfolder:

- Start the Tomcat server and verify that the login page is shown
Note that in the log files, the information regarding the Ledger and Workflow databases are not shown when using the JNDI connection:

For the JNDI configuration to work it is important that the name of the .xml file corresponds to the name of the web application.
In addition the hibernate.dialect defined in the Ledger base tab of the technical configuration during the creation of the datasource in the studio is NOT overridden by the JNDI configuration.
As such, it is important to KEEP the value provided by the Product either in the studio or in the generated datasource.properties file.
For more information on JNDI connectors please refer to Tomcat's documentation, section JDBC Data Sources : https://tomcat.apache.org/tomcat-8.5-doc/jndi-resources-howto.html
Encrypt passwords
Digest method
For Basic form AuthN using a flat file, the password is set in clear in the tomcat-users.xml file, which is not a good practice for security purposes.
However, a hash of this password can be configured and put in this file.
To do that, here is the steps to follow:
- Under the
$tomcat_home/conf/server.xmlTomcat configuration file - In the
UserDatabaseRealmrealm, add theCredentialHandlerelement with appropriate configuration
<Engine name="Catalina" defaultHost="localhost">
   <Realm className="org.apache.catalina.realm.LockOutRealm">
      <Realm className="org.apache.catalina.realm.UserDatabaseRealm"
               resourceName="UserDatabase"/>
         <CredentialHandler className="org.apache.catalina.realm.MessageDigestCredentialHandler" algorithm="sha-256"/>
      </Realm>
   </Realm>
</Engine>
- In a shell console
- Use the digest utility (located under
$tomcat_home/binfolder) to generate the SHA-256 hash of the password:
./digest.sh -a sha-256 -h org.apache.catalina.realm.MessageDigestCredentialHandler <YOUR_PASSWORD>
Note:
Hash algorithm must be consistent between the Tomcat configuration and the digest utility execution
Extension of digest utility depends on the OS (digest.bat on Windows, digest.sh on Linux)
Extension of digest utility depends on the OS (digest.bat on Windows, digest.sh on Linux)
The output should show the hash result of your password:
<YOUR_PASSWORD>:93ab5662ab2c66561d2e8af2402534efbc60f9811e770a307aee2d7684767881$1$aa0b6c1be9d8b1b86a60dbef5e0440f3f41a7872681303504d95baa446577096
- Copy/Paste the hash result in the
$tomcat_home/conf/tomcat-users.xmlflat file for the appropriate user
<?xml version='1.0' encoding='UTF-8'?>
<tomcat-users>
   <user username="ACKER11" password="93ab5662ab2c66561d2e8af2402534efbc60f9811e770a307aee2d7684767881$1$aa0b6c1be9d8b1b86a60dbef5e0440f3f41a7872681303504d95baa446577096" roles="user,igrc_administrator"/>
</tomcat-users>
- Restart the Tomcat process to take the modification into account the changes
JNDI Datasource Encryption
A method has been developed to allow the encryption of the passwords used in the JNDI data source.
This method is included in the tomcat add-ons developed by Brainwave. The JAR file bw-tomcat-XXX-addons.XXX.jar must be added to the \lib folder of the tomcat installation (<TOMCAT_HOME>)
The following steps should only be done when you deploy initial version of Web Portal or if you need to update key (in that case don’t forget to encrypt your password again with the new key)
Encryption Key creation
- Connect to the web server
- Go to folder
<TOMCAT_HOME>\liband open a command-line window - Create encryption key for your Tomca instance using the following command line:
java -jar bw-tomcat-addon.jre8-2.0RC4.jar generateKey AES 256 <TOMCAT_HOME>\conf\db.key
This key will be used to encrypt passwords of datasource and used by Tomcat to decrypt database service account password. Ensure that your setup appropriate security on the location of the key.
Encrypt Tomcat Datasource passwords
- Navigate to the folder
<TOMCAT_HOME>\lib - Use the previously generated key to encrypt password of your database access using the following command line. Do this for both, Identity Ledger & Workflow service account passwords.
java -jar bw-tomcat-addon.jre8-2.0RC4.jar encryptPassword <clear password> AES ECB PKCS5PADDING <TOMCAT_HOME>\conf\db.key
The encrypted value will be used in next steps.
Update datasource with encrypted credentials
Copy the automatically generated <webapp>.xml to the folder <TOMCAT_HOME>\conf\Catalina\localhost
The deployment descriptor that contains JNDI data source information from generated iGRC Studio looks like this:
<?xml version="1.0" encoding="UTF-8"?>
<Context override="true" path="/webapp">
   <Manager pathname="" />

   <Valve className="org.apache.catalina.authenticator.FormAuthenticator" landingPage="/portal" characterEncoding="UTF-8" />

    <!-- Identity Ledger Database connections pool -->
    <Resource
        factory="org.apache.tomcat.jdbc.pool.DataSourceFactory"
        name="jdbc/BRAINWAVEDB"
        auth="Container"
        type="javax.sql.DataSource"
        maxActive="15"
        maxIdle="5"
        maxWait="5000"
        testOnBorrow="true"
        testOnReturn="false"
        testWhileIdle="false"
        validationQuery="SELECT 1"
        validationInterval="30000"
        autoReconnect="true"
        driverClassName="com.microsoft.sqlserver.jdbc.SQLServerDriver"
        username="__USER__"
        password="__PASSWORD__"
        url="jdbc:sqlserver://__HOSTNAME__:__PORT__;databaseName=__DATABASE__"
    />

   <!-- Workflow Database connections pool -->
    <Resource
        factory="org.apache.tomcat.jdbc.pool.DataSourceFactory"
        name="jdbc/BRAINWAVEWORKFLOWDB"
        auth="Container"
        type="javax.sql.DataSource"
        maxActive="15"
        maxIdle="5"
        maxWait="5000"
        testOnBorrow="true"
        testOnReturn="false"
        testWhileIdle="false"
        validationQuery="SELECT 1"
        validationInterval="30000"
        autoReconnect="true"
        driverClassName="com.microsoft.sqlserver.jdbc.SQLServerDriver"
        username="__USER__"
        password="__PASSWORD__"
        url="jdbc:sqlserver://__HOSTNAME__:__PORT__;databaseName=__DATABASE__"
    />
</Context>
Edit this file to change/add parameters corresponding database information:
factory: com.github.ncredinburgh.tomcat.SecureDataSourceFactoryconnectionProperties: algorithm=AES;mode=ECB;padding=PKCS5PADDING;keyFilename=<TOMCAT_HOME>/conf/db.keyusername: change with the appropriate values (one for Identity Ledger and one for workflow)password: copy paste the encrypted values from command described hereurl: the url to the database including the__HOSTNAME__: your database server name,__PORT__: your database listen port, and__DATABASE__: your database instance name
After update, you should have deployment descriptor that looks along the lines of:
<?xml version="1.0" encoding="UTF-8"?>
<Context override="true" path="/webapp">
   <Resources cachingAllowed="true" cacheMaxSize="512000" />
   <Manager pathname="" />

   <!-- Identity Ledger Database connections pool -->
   <Resource
      factory="com.github.ncredinburgh.tomcat.SecureDataSourceFactory"
      name="jdbc/BRAINWAVEDB"
      auth="Container"
      type="javax.sql.DataSource"
      maxActive="15"
      maxIdle="5"
      maxWait="5000"
      testOnBorrow="true"
      testOnReturn="false"
      testWhileIdle="false"
      validationQuery="SELECT 1"
      validationInterval="30000"
      autoReconnect="true"
      driverClassName="com.microsoft.sqlserver.jdbc.SQLServerDriver"
      username="__USER__"
      password="__ENCRYPTED_PASSWORD__"
      url="jdbc:sqlserver://__HOSTNAME__:__PORT__;databaseName=__DATABASE__"

      connectionProperties="algorithm=AES;mode=ECB;padding=PKCS5PADDING;keyFilename=<TOMCAT_HOME>/conf/db.key"
    />

   <!-- Workflow Database connections pool -->
    <Resource
      factory="com.github.ncredinburgh.tomcat.SecureDataSourceFactory"
      name="jdbc/BRAINWAVEWORKFLOWDB"
      auth="Container"
      type="javax.sql.DataSource"
      maxActive="15"
      maxIdle="5"
      maxWait="5000"
      testOnBorrow="true"
      testOnReturn="false"
      testWhileIdle="false"
      validationQuery="SELECT 1"
      validationInterval="30000"
      autoReconnect="true"
      driverClassName="com.microsoft.sqlserver.jdbc.SQLServerDriver"
      username="__USER__"
      password="__ENCRYPTED_PASSWORD__"
      url="jdbc:sqlserver://__HOSTNAME__:__PORT__;databaseName=__DATABASE__"

      connectionProperties="algorithm=AES;mode=ECB;padding=PKCS5PADDING;keyFilename=<TOMCAT_HOME>/conf/db.key"
    />
</Context>
Once all modifications applied restart the tomcat service.
GPortal Access
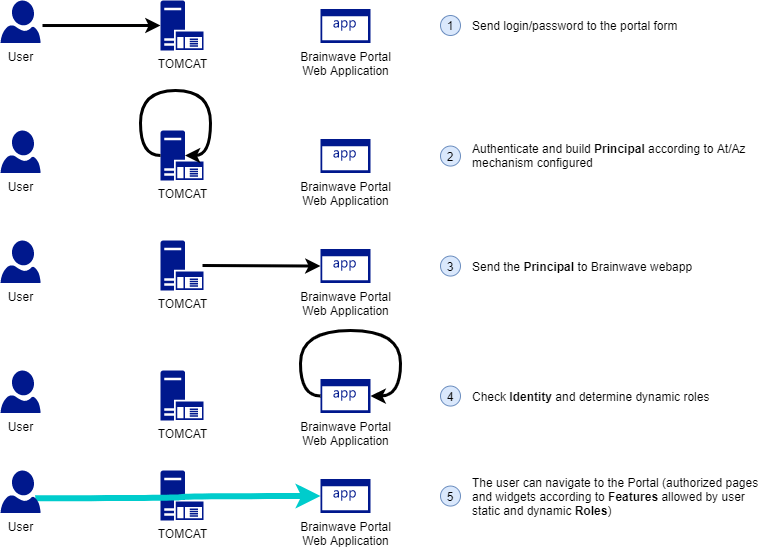
To login as a user in the Brainwave's portal, it needs to retrieve a Principal provided by the Tomcat server hosting the Portal.
Basically, this Principal is a structure containing:
- An identifier for the user, typically a
samaccountnameor alogin - A list of roles
More information can be found about the Principal here.
Retrieving all of the above informations to build the Principal is the Tomcat's work and depends on the configured authentication/authorization mechanism.
In all cases, the final goal is to:
- Authenticate & Authorize the user
- Build the Principal (i.e. retrieve user login and user static roles)
- Pass it to the Portal (Brainwave webapp hosted by the Tomcat)
From this Principal, the Portal will be able to:
- Check the existence of the user in the Ledger
- Determine his roles
- Allow the navigation to allowed resources
AuthN/AuthZ mechanism
When integrating Brainwave Identity GRC in your environment, you will be faced with the authentication topic:
- How to authenticate your web users?
- What is/are the valid identity sources?
AuthN mechanism of Portal users is delegated to Tomcat (aka the container) by implementing and configuring JAAS Tomcat service.
Depending on the AuthN repository, it can be:
- A database
- An LDAP directory
- A flat file (not recommenced, to be used in DEV purposes only)
The AuthN mechanism can rely on several protocols to communicate with the AuthN repository:
- SAML
- LDAP
- JDBC
AuthZ mechanism rely on the role notion (aka container role). These roles are set after the AuthN step. They are obtained using the authorization process, which can be the same as the authentication one, statically or dynamically.
Dynamic roles are set using business rules based on data from Ledger and are prioritized over static roles.
The user role is mandatory to access the Portal.
Apache foundation provides standards Tomcat components to authenticate and authorize. Brainwave exploits some of them:
Portal Identity
Once the user is authenticated and the Principal is built and sent to the Brainwave webapp, the next step is to check the existence of the user in the Brainwave Ledger.
To do so, from the Principal, the login is passed on to the view defined in the user.principal.view property in the technical configuration's webportal tab (br_portalidentity by default).
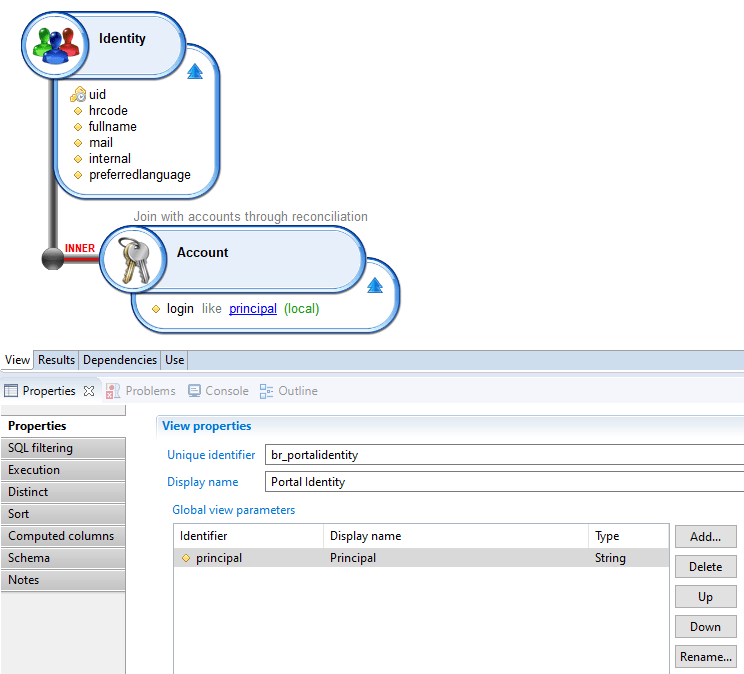
This view is used to retrieve the Identity associated to the Account returned from the Principal login, so that the dynamic roles can be computed (roles are based on identities, not accounts), according to role configuration (see .role files), and added to the list of static roles contained in the Principal.
Notes:
- This can be a business view;
- If multiple identities are returned, the first one is kept (not recommended!).
- The fields returned by this view can be used in Pages, using
Principal.fieldname.
preferredlanguage contains the user's language (either collected or set via the settings in the portal).
Features & Roles
Once the user Identity is retrieved from the Portal Identity view, the next step is to determine dynamic roles (static roles are granted accordingly to the configured access).
To do so, the role configuration declared in the project will be used (located under /webportal/features folder).
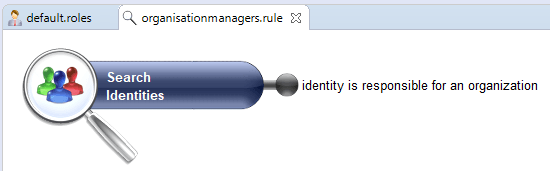
All dynamic roles are linked to a Rule defined in the Identities in role field which determines a list of Identities based on a specific rule (for example, all Identities which are Managers of an Organization).
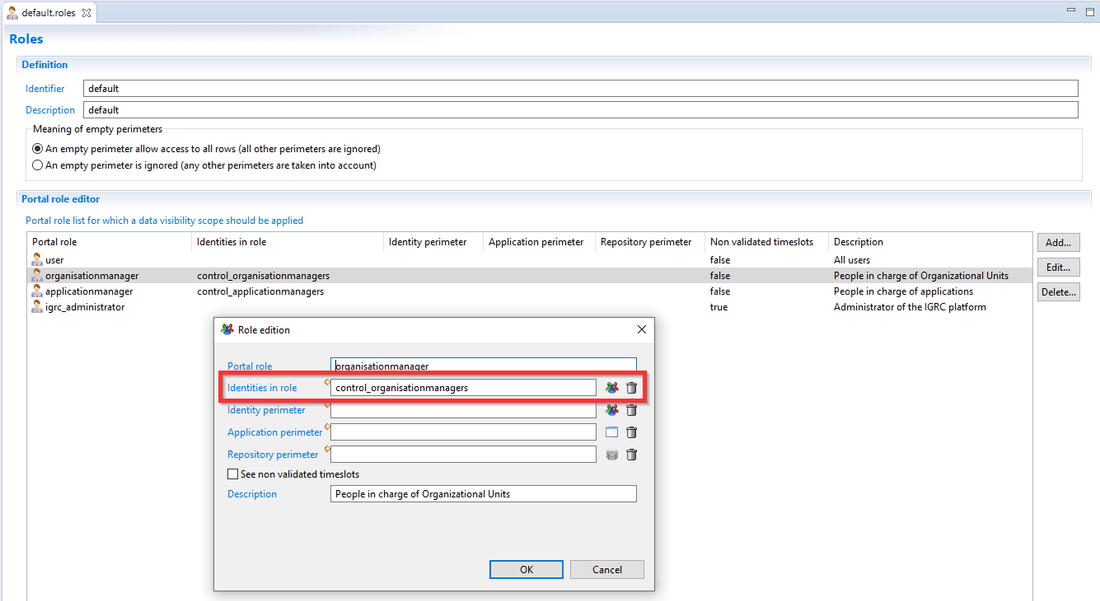
If the Identity is contained in the list returned by the Rule, the dynamic role is granted to the user.
Notes: A dynamic role is prior to a static role. It means that, if a role can be determined statically (i.e. from the Tomcat) and dynamically (i.e. from Brainwave configuration), the dynamic configuration is applied.
Once dynamic roles are determined, this list is concatenated to the static user roles list and the user is allowed to navigate on the Portal, through all allowed resources (Pages and Widgets) according to Features granted by his Roles.

More information about Roles and Features can be found here.