Level 2 - Customization via CSS
You can perform the following customization via a custom CSS file:
- Change the font style (family, size and weight) of the header title
- Change the font style (family, size and weight) of the user name in the header
- Change the font style of the navigation menu items , in both normal and selected states.
- Change the global font used in the portal
- Change some style aspects ( font, background and text colors, border styles ) of various components displayed in the content area (tables, combo box, labels, tabs, etc..)
Required skills
- Audit project configuration
- CSS syntax
Custom CSS file syntax
Brainwave web portal internally uses a web framework known as Eclipse RAP (Remote Application Platform ).
Eclipse RAP is an open-source project supported by the Eclipse foundation (https://www.eclipse.org/rap/).
Basically, Eclipse RAP leverages Eclipse Java SWT (Standard Widget Kit) coding to automatically produce state-of-the-art HTML5 web application that can be run on any browser.
Like HTML applications, Eclipse RAP applications uses CSS files to control the appearance of widgets in the browser.
However, these CSS files are not passed as is to the browser, they are processed on the server side to compute the actual appearance of widgets.
Eclipse RAP CSS uses a specific syntax which closely resembles HTML CSS3 with the following similarities:
- Element selectors
Button {
   color: #000000;
   background-color: blue;
   font: bold 13px arial;
}
- Class selectors
.nav {
   border: 1px solid gray;
}
- common set of css properties
color, background-color, font, border, background-image, opacity, etc
- Pseudo classes:
Text:hover
Button:selected
and differences:
- cascading classes are not supported
.nav .selected /*is not supported*/ - special state syntax for SWT widget styles
Button [PUSH] {
   border-radius: 3px;
}
- sub-elements to control the appearance of widgets sub-elements
Button-CheckIcon { }
Grid-GridLine { }
- Completely different set of elements that matches SWT standard widget classes rather than HTML standard elements
Button, Label, List, Menu, Text, Composite, Display, etc...
- font is supported , but not font-family , font-size and font-weight properties. Any change to a font must include the font family, size and style
Text {
  font: 12px roboto,sans-serif;
}
Text.important {
    font: bold 12px roboto,sans-serif;
}
Read more on Eclipse RAP theming and CSS here:
https://www.eclipse.org/rap/developers-guide/devguide.php?topic=theming.html
The comprehensive reference of Eclipse RAP Widget CSS describing all themable elements, properties and states can be found here:
http://download.eclipse.org/rt/rap/doc/3.1/guide/reference/theming/index.html
Common CSS customization use cases
- Changing the header title font
Label.header-title {
 /* color: is defined in the configuration*/
  font: bold 18px  roboto,sans-serif;
}
- Changing the user name font
Button.header-user {
  font: bold 16px  roboto,sans-serif;
}
-
Changing other elements in the header
- Download the attached theme_custom_template.css file below
- Refer to the section "header styles" towards the end of the file
- Extract the css entries that you want to modify to your custom css file
-
Changing other elements in the vertical navigation panel ( when Default theme is selected)
- Download the attached theme_custom_template.css file below
- Refer to the section "vertical navigation panel" towards the end of the file
- Extract the css entries that you want to modify to your custom css file
-
Changing other elements in the horizontal navigation panel ( when Classic theme is selected)
- Download the attached theme_custom_template.css file below
- Refer to the section "horizontal navigation panel" towards the end of the file
- Extract the css entries that you want to modify to your custom css file
-
Changing the default font for the application
- Download the attached theme_custom_font_template.css file below
- Search for the occurrences of roboto in the file and replace them with your custom font family.
- Save to a different css file and use it as a custom file extension for your theme, or in complement of other css changes.
-
For any other change, please refer to the comments inside the theme_custom_template.css file
Using a custom CSS file in the web portal
To use a custom CSS file in the web application, do the following:
- Check Use custom theme extension option
- Select
*.cssas file type, then select your custom css file to use - Generate the web-portal so that the css file is included in the web app
- Redeploy the web app to the web server

Fine tuning your custom CSS file
It's unlikely that your custom css file will be satisfactory at the first deployment.
So you will have try successive changes and verify their impact on the display until you are done.
To fine tune your css file, do the following:
- Check Activate debug mode in the web portal tab of the configuration
- Select the custom css file to use as described above. The initial content of the file does not matter
- Generate the web portal and deploy to the web server
- Open the web portal in your favorite browser and log in
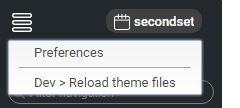
- Notice that the main menu has an item "Dev > Reload theme files"

- Each time you make a change to the css file (and save), select Dev > Reload theme files and the page will be reloaded with the new css values.
- If there are any errors in the css, a message box will be displayed.
For example, there is a space between 24 and px
Label.header-title {
font: 24 px Broadway ;
}

- Once you are done with the CSS, and to make the changes permanent,
you need to make one last web portal generation and deployment ( and turn off "Debug mode" by the way)