Powershell extraction configuration
Identity Analytics offers a PowerShell script called bw_data_collector.ps1 to help extract the following data:
- Users and groups from Active Directory.
- Identities from Active Directory accounts.
The powershell script can also retrieve files from local or shared storage and package them with extracted files. This feature is helpful when dealing with data that cannot be exported with extractors ex (HR, custom Application, ....).
The PowerShell script is signed, any modification of the script will make it ineffective unless the local security parameters are changed in order to authorize the execution of unsigned scripts.
Please note that this modification can lead to potential risk.
The PowerShell script generates a ZIP file that can be uploaded to the Identity Analytics platform.
When creating the ZIP file, the PowerShell script also adds some files generated by other processes. This is done using a configuration file in JSON format. This configuration file describes all the data sources to be included in the ZIP file.
Extraction Package Installation
Download the bw_data_collector.zip using the following direct link:
https://repository.brainwavegrc.com/Brainwave/-/packages/generic/brainwave_data_collector/1.4
bw_data_collector.zip should be unzipped in a folder that has write access as the PowerShell script generates the output, along with temporary files, inside the installation folder.
The most important and mandatory action to do after unzipping the package is to rename the file config.json.example to config.json.
At the root of the installation folder, there are 2 files:
bw_data_collector.ps1: the main script to launch the extraction and create the output ZIP file expected by Identity Analytics Platform.config.json: the configuration of each data source to extract. This was the fileconfig.json.examplein the installation package.
Out of the box, the file config.json contains some sample configurations. It should be edited in order to describe how to extract the different data sources before trying to run the script bw_data_collector.ps1. The content of this file is explained in the next chapter.
Once the configuration is done, the script can be executed. Two new folders are created after the first execution:
tempcontains the output files for each data sourceoutputcontains the ZIP file to upload to Identity Analytics Platform.
The bw_data_collector.ps1 scripts builds the output ZIP that can be uploaded to the Identity Analytics platform either manually or automatically.
Extraction Package Upgrade
To upgrade the extraction package, follow these steps:
- Download the newest extraction package from the Cloud service.
- Unzip the file inside the installation directory to override all the script files of the previous version.
The config.json is not overwritten because it is not part of the extraction package. Instead, there is config.json.example file. If the upgrade contains some new features there may be new configuration blocks in the config.json.example file.
If new features need to be activated then the corresponding configuration blocks should be copied to the customized config.json.
Prerequisites
Main script
The script bw_data_collector.ps1 requires the following prerequisites in order to run:
- PowerShell 5.1 or greater
- .NET Framework 4.5 or greater
Active Directory
The Active Directory needs to be executed using a domain user account with at least "read" privilege on attributes.
Event logs
The script bw_data_collector.ps1 can write events to windows event log. In order to activate event logs, a new source should be created in the event log.
Open a Powershell as Administrator and run the following command:
New-EventLog -Source "Identity Analytics Extractor" -LogName Application
Extraction Methodology
The first step is to identify all the sources to be extracted:
- Which directories are referenced in applications? Are the directories of type Active Directory? Each directory will have to be extracted to retrieve users and groups.
- where are the data sources to find organizational information about employees and contractors?
The second step is to decide with which account to perform the extractions on the platform. This choice has to be made now.
The extraction script can be launched manually in a command window or automatically in the Windows Task Scheduler or any other task launching tool. The different extractions as well as the zip file upload to the Identity Analytics platform require credentials that need to be encrypted on the extraction platform. The encryption depends on the account used and the machine. If you perform all credential encryption operations with a personal account, the extraction script will only work if it is run with this same account (to allow it to decrypt the credentials). Once the configuration has been fine-tuned, it is a good idea to add the script to the Windows task scheduler to run it on a regular basis (once a week for example). If a service account is used for this automatic launch, the script will fail because it will not be able to decrypt the credentials that have been encrypted with the personal account.
All credentials will have to be re-encrypted with this service account. It is therefore preferable to encrypt all credentials with the service account from the start. To do this, all the operations described in this documentation must be performed in a powershell linked to the service account using the following command (example with the login user1 from ACME domain):
runas.exe /user:ACME\user1 powershell
The third step is to set up all the extractions following the documentation. Generally speaking, this consists in encrypting the credentials that will be used and setting up the extraction in the config.json file:
- Set the credentials for the Active Directory extraction and then configure the extraction.
- Prepare the HR extraction either from an HR source or using Active Directory if no HR source is available.
The fourth step is to test the extraction by running the bw_data_collector command. The result is a zip file that you can open to see what was extracted. If the zip is complete (AD or LDAP, HR), then you can proceed to the next step.
The fifth step is to connect to the Identity Analytics platform and upload the zip to load it into the data cube. You can then browse the portal to check the data quality.
The sixth step is to automate the data upload to the Identity Analytics platform. To do so, you will have to authorize the upload in the config.json file as well as in the Identity Analytics platform. After that, each run of the bw_data_collector command will produce the zip and send it automatically to the Identity Analytics platform.
The seventh and final step is to schedule the execution every week. To do this, you need to add the execution of the bw_data_collector command to the task scheduler.
Command line
The PowerShell script bw_data_collector.ps1 has no parameter as the configuration is read from the configuration file config.json.
To run the extractions and get the output ZIP file, open a PowerShell console, change the current directory to the installation folder and type the command:
bw_data_collector
Do not forget to run the command in a powershell window run as the desired service account.
The script will execute the extractions described in the config.json file and create a ZIP file in the output folder.
Configure automatic upload
To activate automatic upload of the extracted files you need to configure Powershell script authentication to the Identity Analytics platform, to do so, please follow these steps:
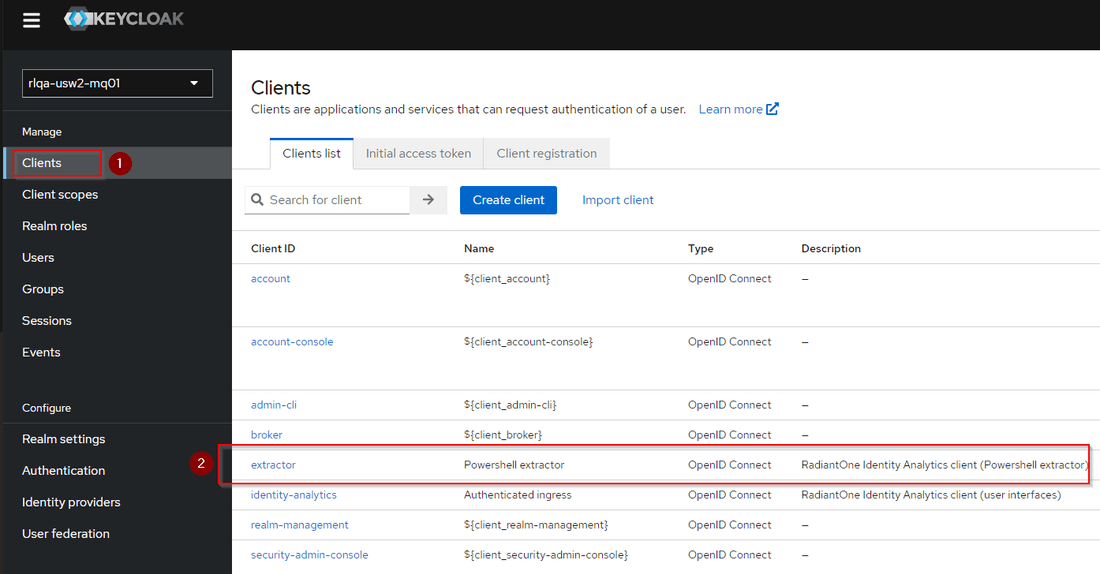
- Go to
https://{{HOSTNAME}}/authand login withsetupaccount - Select
Clientsmenu, then click onextractorclient id in the shown list
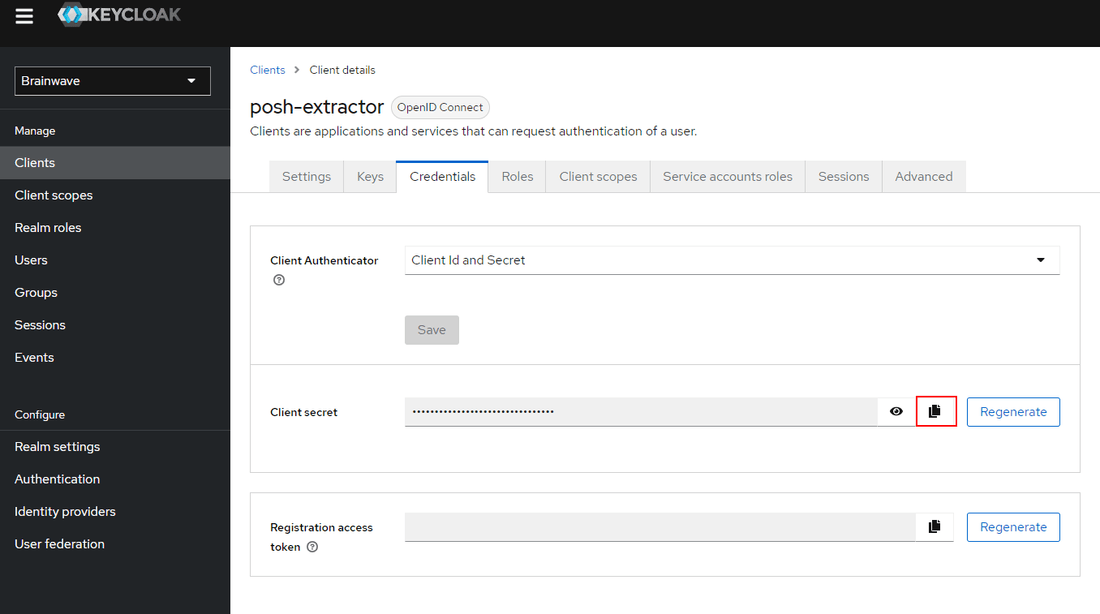
- Go to
Credentialspane and copyClient secret
Navigate to the place where you unzipped bw_data_collector.zip file and open a terminal in that location.
Execute the following command to add authentication attributes to config.json and create a secure file containing the copied Client secret from Keycloack.
.\bw_data_collector.ps1 -createCreds $true -hostname "HOSTNAME" -realmname "brainwave" -tls $true -clientid "extractor"
Copy paste Client secret to the terminal when requested.
The commend will:
- Store the
Client secretincreds.xmlas a PSCredential object in the same directory asbw_data_collector.ps1 - Add
hostname, realmname, tls and clientidparameters to theconfig.jsonfile - Set
disableUploadparameter to false if it value is true
- Value of
hostnameparameter should not containhttporhttps. - To disable ssl set
-tlsparameter toFalse. creds.xmlcan only be used by the user session and the machine where the file was created, to runbw_data_collector.ps1under another user account you should provide thecreds.xmlagain to allow the script to creation a newPSCredentialcompatible with the desired user account.
Configuration file
The script bw_data_collector.ps1 reads a file called config.json containing all the actions to execute.
Here is a sample of a configuration file:
{
  "auth_hostname":  "localhost",
  "auth_realmname":  "brainwave",
  "auth_tls":  false,
  "disableUpload":  true,
  "outputDirectory":  "C:\\Temp\\onezip",
  "notificationEmail":  "[email protected]",
  "notificationLang":  "en",
  "proxyUri":  "",
  "proxyCredential":  "",
  "zipOutputFiles":  true,
  "forceUpload":  false,
  "configs":  [
    {
      "name":  "hr-1",
      "enabled":  true,
      "file":  "C:/Applications/OneZip/tests/data_copy/hr/*",
      "csv_converter_config":  "./tools/bw_csv_converter_*/hr-template.properties",
      "folder":  "hr",
      "action":  "copy"
    },
    {
      "name":  "application-1",
      "enabled":  true,
      "file":  "C:/Applications/OneZip/tests/data_copy/applications/*.csv",
      "folder":  "applications",
      "action":  "copy"
    },
    {
      "name":  "merge-1",
      "enabled":  true,
      "file":  "./tests/data_copy/zip/Data.zip",
      "action":  "merge"
    },
    {
      "_comment":  "Extract AD data of the current forest with the current Creds",
      "name":  "ad-1",
      "enabled":  true,
      "script":  "ad",
      "folder":  "ad",
      "credential":  "C:/Applications/OneZip/tests/creds/acme_credential.xml",
      "servers":  "C:/Applications/OneZip/tests/config/domain_controller.txt",
      "action":  "script"
    },
    {
      "_comment":  "Use AD as HR source, get users list using ad script",
      "name":  "ad-hr-1",
      "enabled":  true,
      "script":  "hr",
      "folder":  "hr",
      "credential":  "C:/Applications/OneZip/tests/creds/acme_credential.xml",
      "servers":  "C:/Applications/OneZip/tests/config/domain_controller.txt",
      "csv_converter_config":  "./tools/bw_csv_converter_*/adhr-template.properties",
      "action":  "script"
    }
  ]
}
The main configuration parameters are:
auth_hostname: Hostname of the server on which to upload the files. This is the server running the selfmanaged solutionauth_realmname: The authorization realm name as defined in Keycloak. By default this value should be set tobrainwaveauth_tls: Upload using https. This is the recommended parameter to use un a Prod environmentdisableUpload: boolean value to disable zip upload, should be false to activate upload.outputDirectory: path where the zip will be generated, by default the zip will be stored in root directory underoutputfolder, this parameter should be set on decentralized extraction environment to be able to move the generated Zip file to a desired directory (ex:a shared folder).notificationEmail: Email of the person to notify in case of success or failure of the uploadnotificationLang: Email notification language. Supported locals arefrandenzipFileName: parameter to set the Zip file name without the extension, default value isDataFile.proxyUri: parameter to set a proxy URL if needed.proxyCredential: parameter to set a PScredential file path for proxy authentication if needed, if not set current user credential will be used.zipOutputFiles: Boolean to toggle the creation of a Zip archive of on uploadforceUpload: Force the upload of the importfiles even if an extraction failed.
In the case of an instance running the script to upload to an EOC environment changes are required in the config.json file:
auth_hostname: The base URL to the EOC environment. For example:"auth_hostname": "ia-rlqa-usw2.dev01.radiantlogic.io",auth_realmname: The environment name that is used to provision the authorization realm. For example:"auth_realmname": "rlqa-usw2-mq01",
An additional parameter is required to allow to upload the files to the correct authorization context:
auth_context: This value should be set to the environment name. For example:"auth_context": "rlqa-usw2-mq01",
The config.json should contain different sections under configs block:
- HR data files to copy.
- LDAP data file files to copy.
- AD extraction parameters.
Each JSON block describes an action to perform by the script bw_data_collector.ps1.
The action attribute is mandatory and can be:
copy: it requests the scriptbw_data_collector.ps1to copy a file from another location to the temp folder. This is the way other data sources can be embedded in the output ZIP file.script: it requests the scriptbw_data_collector.ps1to launch a built-in extractor to extract a known data source and put the output file(s) into the temp folder.merge: it requests the scriptbw_data_collector.ps1to unzip an existing archive to the temp folder, see Decentralized Extractions section for more details.
The folder attribute is the destination folder inside the temp folder. The accepted values are:
hr: This folder should contain all the HR files about identities, organizations... There can be multiple files if the identities are split into multiple files (for example employees in a first file and contractors in another file).ad: This is the folder that should be used as the output when extracting Active Directory.ldap: This is the folder that should contain LDIF files of LDAP severs different from Active Directory.
The folder attribute may contain any value but only the folder specified above will be scanned and loaded in the Identity Analytics data cube. All the files located in an unknown folder will be ignored.
To disable a copy or a built-in script, you may remove the section from the config.json file or change the enable attribute to "false". The section will be ignored when the script bw_data_collector.ps1 is executed.
The attribute name and _comment are not used to identify and document each section. This information is not used by Identity Analytics Platform. The comment is used to describe the data source and the action. The name is an identifier that is used in the log file to reference the section if an error is encountered while performing the action.
The values for attributes action, folder, script and enabled should be written in lower case.
Extractions
External Extractions
The script bw_data_collector.ps1 allows to add in the ZIP file some data sources that are generated by extractors not provided by Identity Analytics. This is useful for the following types of data:
- HR data,
- Application data.
- LDAP data ( not from Active Directory)
The HR and application extraction files must conform to a format and an encoding. The following chapters detail the expected formats.
Extractions can be done manually or through an automated process. A section in config.json must be modified or added to indicate an action to copy a file to the "hr" or "applications" folder.
In the following example, we consider that the contractors are collected via a process not described here but which provides a file in the format expected by Identity Analytics Platform.
{
  "_comment": "Embed the contractor file into the output ZIP file",
  "name": "hr-2",
  "enabled": true,
  "file": "C:/HR/extract-current/contractors.csv",
  "folder": "hr",
  "action": "copy"
},
The extracted file must be accessible on the disk (or on a network disk) from the computer where the script bw_data_collector.ps1 is executed.
This configuration section requests the bw_data_collector.ps1 script to copy the file C:/HR/extract-current/contractors.csv to the "hr" folder so that it can be included in the output ZIP.
If this file is generated with an extraction script on a different computer than the one where bw_data_collector.ps1 is installed, you have to make sure that the file is transferred into the C:/HR/extract-current folder and is called contractors.csv.
If the external extraction script can be run on the same computer, then it must be executed before bw_data_collector.ps1.
LDAP extractions
Identity Analytics Platform supports to load data related to accounts, groups and group members using standard LDIF files. If you are using Active Directory, the Identity Analytics Platform provides the script that can handle the data extraction automatically, more information on the next section.
If the data does not come from Active Directory, the LDIF file can be included into the ZIP file. Example:
{
  "_comment": "Embed the LDIF into the output ZIP file",
  "name": "domain",
  "enabled": true,
  "file": "C:/LDAP/extract-current/domain.ldif",
  "folder": "ldap",
  "action": "copy"
},
Identity Analytics Platform supports LDIF files that use the encoding ISO-8859-1.
To identify the accounts, entries are filter by objectclass: user or person or inetorgperson. The ldap attributes that are used for the accounts are:
Field | LDAP Attribute |
|---|---|
key | dn or distinguishedname |
Given name | givenname |
Surname | sn |
Login | samaccountname or uid or cn |
Username | displayname or '{givenname} {sn}' if they are not empty, or samaccountname or cn or uid |
Expire date | loginexpirationtime |
To identify the groups, entries are filter by objectclass: group or groupofnames or groupofuniquenames. The ldap attributes that are used for the groups are:
Field | LDAP Attribute |
|---|---|
Code | dn or distinguishedname |
Display name | samaccountname or cn or uid |
Description | description |
Members | member or uniquemember |
Active Directory Extractions
Identity Analytics Platform requires an extraction of accounts and groups from Active Directory.
The script bw_data_collector.ps1 performs the Active Directory extraction and adds the output files into the ZIP file. The PowerShell script can be configured to extract several domains.
Only one configuration section is needed to extract Active Directory even if there are multiple domains. The technical account used to run the script must have enough privileges to read the Active Directory content.
Out of the box, the configuration section for Active Directory does not contain information about the credentials to use or the filtering to apply or the domains to extract. There is a list of options to add to the section in order to specify how the Active Directory extraction should be done.
-
filter: An LDAP filter by default it is:((objectcategory=Person)(objectclass=group))
-
ouFilter: Filter on a specific organizationalUnit, should be a valid organizational Unit DN for example:OU=Internal Users,DC=intra,DC=test,DC=local
This filter will apply on all domains if script launched on several servers (with --server option).
-
attributesfile: File that contains the attribute names to include in the extraction (by default,attributes.cfg). For example:attributes.txtwhere it contains an attribute in each line. By default, this option contains the following attribute names:- objectcategory
- objectguid
- objectsid
- sidhistory
- member
- objectclass
- accountexpires
- badpwdcount
- displayname
- givenname
- lastlogon
- logoncount
- lastlogontimestamp
- manager
- pwdlastset
- samaccountname
- sn
- whencreated
- useraccountcontrol
- createtimestamp
- description
- grouptype
- managedby
- modifytimestamp
- legacyexchangedn
- PrimaryGroupID
-
servers: File that contains in each line a name of an AD server, if the file is not specified, the script will extract all the ActiveDirectory domains data in the current forest. -
credential: File containing PSCredential used to extract objects in ActiveDirectory, see example to create and store PSCredential object to a file, if not set current session credential will be used. -
logLevel: This parameters allow to specify a log level. The default value isError.Possible values are:- Error
- Warning
- Info
- Debug
-
errAction: Specify the action to perform if an error occur. The default value isStop. The possible values are:- Continue
- SilentlyContinue
- Stop
-
port: LDAP server port. The default value is 389. -
authType: Authentication method to use in LDAP connection, for more details refer to https://msdn.microsoft.com/fr-fr/library/system.directoryservices.protocols.authtype(v=vs.110).aspx -
useSSL: Boolean value to activate SecureSocketLayer on LDAP connection. The default value is 'False'.
Here is a sample of the configuration to extract two servers:
{
  "_comment": "Extarct AD data of the current forest with the current Creds",
  "name": "ad-1",
  "enabled": true,
  "folder": "ad",
  "action": "script",
  "servers": "C:/extract_ad/servers.txt"
},
The file servers.txt referenced in the "servers" option contains the following lines:
server1
server2
HR Extractions from Active Directory
Usually, the identities are extracted from the HR database but the contractors are not part of the HR database. They may be present in Active Directory as accounts. Active Directory can also be used to deduce identities from the accounts (employees and/or contractors) if Active Directory is the only repository that contains the contractors' accounts.
The script bw_data_collector.ps1 meets both needs:
- the need to feed the Identity Analytics data cube with Active Directory accounts and groups. This is performed using a section in the configuration named "ad-1", and
- the need to populate the Identity Analytics data cube with identities from Active Directory. This is performed using a section in the configuration named "ad-hr-1".
In order to extract identities from Active Directory accounts, the section "ad-hr-1" should be enabled by changing the "enabled" flag to true.
{
  "_comment": "Use AD as HR source, get users list using ad script",
  "name": "ad-hr-1",
  "enabled": true,
  "folder": "hr",
  "action": "script"
},
By default, the script will use the following attributes mapping between HR attributes (csv file header) and Active Directory attributes.
HR attribute | AD attribute |
|---|---|
hrcode | samaccountname |
givenname | givenname |
surname | sn |
altname | |
fullname | displayname |
titlecode | |
phone | |
mobile | |
internal | |
employeetype | employeetype |
arrivaldate | createtimestamp |
departuredate | accountexpires |
Jobtitlecode | title |
jobtitledisplayname | title |
organisationcode | department |
organisationshortname | department |
organisationdisplayname | department |
organisationtype | |
Parentorganisationcode | |
linemanager | |
managedorgcode | |
analyticsgroup |
Some options are also available to change the behavior of the extraction. The options are very similar to the Active Directory extraction for users and groups. For this HR extraction from Active Directory, all the options described for the users and groups extraction may be used plus one more: customHrAttributes. The following section shows all options and their description
-
filter: An LDAP filter by default it is:(objectcategory=Person) -
ouFilter: Filter on a specific organizationalUnit, should be a valid organizational Unit DN. example:OU=Internal Users,DC=intra,DC=test,DC=local
This filter will apply on all domains if script launched on several servers (with --server option).
-
attributesfile: File that contains the attribute names to include in the extraction (by default,attributes.cfg).- For example:
attributes.txtwhere it contains an attribute in each line for example:- dn
- objectclass
- accountexpires
- givenname
- By default, this option contains the following attribute names:
- objectcategory
- objectguid
- objectsid
- sidhistory
- member
- objectclass
- accountexpires
- badpwdcount
- displayname
- givenname
- lastlogon
- logoncount
- lastlogontimestamp
- manager
- pwdlastset
- samaccountname
- sn
- whencreated
- useraccountcontrol
- createtimestamp
- description
- grouptype
- managedby
- modifytimestamp
- legacyexchangedn
- PrimaryGroupID
- For example:
-
servers: File that contains in each line a name of an AD server, if the file is not specified, the script will extract all the ActiveDirectory domains data in the current forest. -
credential: File containing PSCredential used to extract objects in ActiveDirectory, see example to create and store PSCredential object to a file, if not set current session credential will be used. -
logLevel: This parameters allow to specify a log level. The default value isError.Possible values are:- Error
- Warning
- Info
- Debug
-
errAction: Specify the action to perform if an error occur. The default value isStop. The possible values are:- Continue
- SilentlyContinue
- Stop
-
port: LDAP server port. The default value is 389. -
authType: Authentication method to use in LDAP connection, for more details refer to [https://msdn.microsoft.com/fr-fr/library/system.directoryservices.protocols.authtype(v=vs.110).aspx] -
useSSL: Boolean value to activate SecureSocketLayer on LDAP connection. The default value is 'False'. -
customHrAttributes: Path to a file that contains a custom mapping between HR attributes and AD attributes.
The file specified in the option customHrAttributes can be used to override the default mapping. The file must be a CSV file and have the following format:
hr_attribute | ad_attribute |
|---|---|
hrcode | sn |
altname | SAMaccountname |
The csv delimiter should be ;and the header must be:
hr_attribute: name of HR attribute, must be part of CSV headerad_attribute: name of AD attribute, must be a valid AD attribute
Active Directory Credentials
To use a specific account to perform the Active Directory extraction (wether users/groups or identities), you can prepare a credential file
The following command shows how to create a PSCredential and store it in a file called credential.xml. The password will automatically be encrypted by powershell API. The generated file can only work using the local machine and user session used to create it.
Get-Credential -UserName test\local -Message "Credential" | Export-CliXml credential.xml
Do not forget to run the command in a powershell on the behalf of a service account.
Task Scheduler and Credentials
The script bw_data_collector.ps1 can be executed on a regular basis. A task can be created in the Windows Task Scheduler.
Depending on the sections activated in the configuration, the script bw_data_collector.ps1 may need to be run as an administrator.
This is important if local accounts and groups have to be extracted from the Windows servers.
If several scripts need to be run in order to get all the extractions, the recommended method is to leave the script bw_data_collector.ps1 without modification. It should be kept untouched to simplify future upgrades. The simplest method is as follows:
Create a PS1 main script that calls all your custom scripts and, at last, calls bw_data_collector.ps1. Your main script is the one to install in the Windows Task Scheduler if it should run on a regular basis.
There are situations that do not allow to chain all extraction scripts. This is the case when each script has to be executed with different technical accounts. In our example with the contractors extraction, it is recommended to set up two tasks in the Windows Task Scheduler:
- One task extracts the contractors using a technical account.
- One hour later, a second task calls
bw_data_collector.ps1to create the output ZIP with another technical account.
CSV data conversion
In case if you have some data files that should be edited to match the requested schema and data format, Identity Analytics provide a csv converter tool that allow you through Javascript expressions to build a new CSV file based on another one
You can activate the csv converter by adding the parameter csv_converter_config on actions copy or script, this path should point to properties file containing the conversion options
{
  "name": "hr-1",
  "enabled": false,
  "file": "./tests/data_copy/hr/*.xlsx",
  "folder": "hr",
  "csv_converter_config": "./tools/bw_csv_converter_*/hr-template.properties",
  "action": "copy"
},
Please refer to the bw_csv_converter tool for more details and examples
The documentation is situated in extraction package under tools/bw_csv_converter_*/doc/bw_csv_converter.pdf
Output ZIP File Content
The output ZIP file contains different folders for each kind of data source.
Warning: One very important point is to have all the extraction folders at the root of the ZIP file. If it is needed to change the content of the ZIP file to manually add or replace a file, then be careful to pay attention to keep the extraction folders (hr, ad, applications...) at the root. An intermediate folder can appear if the ZIP file is created from a parent folder.
Despite the data source folders, there is a "logs" folder and a status file called "status.csv". The file "status.csv" contains a line per action and the result status.
Decentralized Extractions
In some situations, the extractions of all the resources can not be performed from a single location. Some Domains may not be reachable.
To overcome this issue, the extraction package should be installed on another server (called secondary server) that has access to the other resources. Then the configuration file config.json.example should be renamed to config.json.
The upload should be disabled on the secondary server
The configuration file on the secondary server should be edited to enable only the extractions that are missing from the original location.
The output ZIP file should be transfered to the server where the main extraction script is installed. Or set the output directory of secondary extraction to a share drive that the main server can access.
The config.json file on the main server should have a merge action that will take the generated ZIP file, unzip it in the working directory and add the files to the main output ZIP file.
Example of secondary extraction config file
{
  "disableUpload": true,
  "outputDirectory": "R:/shared/zipFolder",
  "zipFileName": "RandD_ENV",
  "configs": [
    {
      "_comment": "Extract an AD from another area of the network",
      "name": "ad-2",
      "enabled": true,
      "folder": "ad",
      "action": "script"
    },
  ]
}
This config will allow to extarct only AD data and generate RandD_ENV.zip under R:\shared\zipFolder directory
Example of main extraction config file
{
  "disableUpload": false,
  "configs": [
    {
      "name": "hr-1",
      "enabled": true,
      "file": "../../importfiles/test-file-copy/hr/*.xlsx",
      "folder": "hr",
      "action": "copy"
    },
    {
      "_comment": "Extract AD data of the current forest with the current credentials",
      "name": "ad-1",
      "enabled": true,
      "folder": "ad",
      "action": "script"
    },
    {
      "name": "merge-secondary-extraction",
      "enabled": true,
      "file": "R:/shared/zipFolder/RandD_ENV.zip",
      "action": "merge"
    }
  ]
}
This config will copy hr files, extarct ActiveDirectory data from current domain, unzip the content of RandD_ENV.zip to the working directory and upload the resulting zip file to the Identity Analytics Platform.
HR Configuration Example
This example demonstrates how to configure a HR extraction from AD executed on a secondary server. On this server a configuration section has been enabled to run the script to get identities from Active Directory users:
{
  "_comment": "Use AD as HR source, get users list using ad script",
  "name": "ad-hr-1",
  "enabled": true,
  "folder": "hr",
  "action": "script"
},
The output ZIP file should be copied either manually or automatically to the main server. The ZIP file should be unzipped into a folder. In this example, the output ZIP file is unzipped into the folder C:\transfer\extraction. On the main server, the configuration block is enabled. It requests a copy of the file containing the HR data extracted from the domain ACME.
{
  "_comment": "Copy the HR file generated on another platform",
  "name": "ad-hr-1",
  "enabled": true,
  "folder": "hr",
  "action": "copy",
  "file": "C:/transfer/extraction/acme.csv"
},
File Formats
For the HR data, one or more Excel or CSV files is needed. For example, one Excel file can contain the employees, while another can contain the contractors. An Excel file template and a CSV file are available in the service. After deleting the example data, it will be necessary to download and integrate the HR data into one of these templates. They contain columns for descriptions of the identities as well as their attachment to an organization. They also contain the ability to describe the hierarchy of organizations which is important for the analysis.
HR File Format
The HR file template is an Excel file containing columns that are mostly optional. A CSV file template is also available with the same columns. The CSV file must be in UTF-8 format (with or without BOM header). However, it is recommended that as many characteristics as possible are gathered in order to have complete information. The HR extraction from an HR database is shown in the top branch in the following diagram:
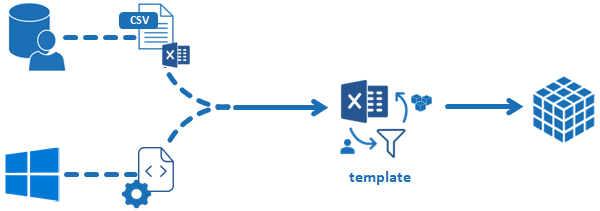
The bottom branch represents an extraction from Active Directory that is used, for example, to build the list of contractors. This path is explained in the chapter on Active Directory.
The file template provides a list of identities. The content of the file also allows the indirect reconstruction of the hierarchy of organizations. For each identity, the template asks for information about the organization in which the person works as well as his job title. An additional column makes it possible to specify which organization is the direct parent of the one in which the person works.
All the other columns correspond to the identity's characteristics, such as the employee ID number, email, type of employee, etc...
The following table describes the columns required by the model.
Column | Example | Mandatory? | Description |
|---|---|---|---|
hrcode | ID0000183 | No | Employee ID number |
givenname | Denis | Yes | First name |
surname | GEOFFRAY | Yes | Last name |
altname | JACOB | No | Alternative or maiden name |
fullname | Denis GEOFFRAY | Yes | Complete name |
titlecode | Mr | No | Civil title |
No | Email address | ||
phone | +33123456789 | No | Home phone |
mobile | +33666666666 | No | Cell phone |
internal | true | Yes | Employee? |
(true for Employee, false for Contractor) | |||
employeetype | CDD | No | Type of employee or contract |
arrivaldate | 12/1/2020 | No | Hire date |
departuredate | 31/5/2021 | No | Departure date |
active | true | No | Is the employee still in the company? (T/F) |
jobtitlecode | TecQu | No | Job function code |
jobtitledisplayname | Qualification | No | Job function display name |
organisationcode | STECQU | No | Department code |
organisationshortname | STECQU | No | Department short name |
organisationdisplayname | Quality Assurance | No | Display name of job function |
organisationtype | Service | No | Department display name |
parentorganisationcode | DTECPR | No | Parent department code |
linemanager | ID0000121 | No | Manager's employee ID number |
managedorgcode | STECRD | No | Manager's department code |
analyticsgroup | group1 | No | Reserved for future use |
reconciliation1 | 183 | No | reconciliation key #1 |
reconciliation2 | GEOFFRAY183 | No | reconciliation key #2 |
reconciliation3 | DGEOFFRAY183 | No | reconciliation key #3 |
If data is not available for a certain column, it is best to leave the column header present. The header row should not be changed.
The case of the header (uppercase/lowercase) is important. For example, if a column heading is changed to capital letters, the column will no longer be recognized.
All dates should use the European format (DD/MM/YYYY)
The active column is not mandatory. If empty, the identity is considered as inactive!
Depending on Excel version and language used, the internal and active columns may appear differently and with a different case. The real value should be true or false.
The last 3 columns about reconciliation are explained in the chapter "Account Owners".
Individuals who have left the company
The departure date is very important. It should be taken from the HR database or Active Directory if available because many ITGC controls make use of it. For example, finding active accounts which belongs to identities who have left the company is not possible if the departure date is not provided.
For the same reason, knowing if an account is active or disabled is essential. Without this information, all accounts will be considered as active and false positives may appear in the ITGC controls. Looking at the previous example, the service would display some identities who have left the company because they have an active account but this is a false positive if the account is truly disabled.
Monitoring
To track both extraction and upload of zip files, several systems have been set up:
Extraction logs
The extraction script generates several log files which are then archived in a zip file for later consultation.
The zip file is called bw_data_collector_logs_<date>.zip
The zip contains the following files:
ExtractAD_<date>.log: log file of the Active Directory extraction if it was requested.ExtractADHR_<date>.log: log file of the HR extraction using Active Directory if it was requested.bw_data_collector_<date>.log: log file to track the reading of theconfig.jsonfile, the launch of the extraction scripts and the upload to the Identity Analytics platform.
After an extraction is finished, the zipped log files remains on the extraction platform so they can be opened at a later time.
Event log
The extraction script also generates events in the Windows Event log. These are Application logs with a source called "Identity Analytics Extraction".
Only important events are logged in the event log:
Message | Level |
|---|---|
bw_data_collector has started | Information |
bw_data_collector upload zip started | Information |
Request sent without Zip file | Information |
bw_data_collector zip file successfully uploaded | Information |
bw_data_collector zip upload failed | Error |
bw_data_collector has finished with code 0 | Information |
bw_data_collector has finished with code 1 | Error |
bw_data_collector has finished with code 0 (forceUpload=True) | Information |
Unable to compress log files | Error |
Unable to clean working directories | Error |
Upgrade
It is higly recomemded to keep your your bw_data_collector up to date, this will allow you to get bug fixes,extraction improvments, new extraction capabilities, ...
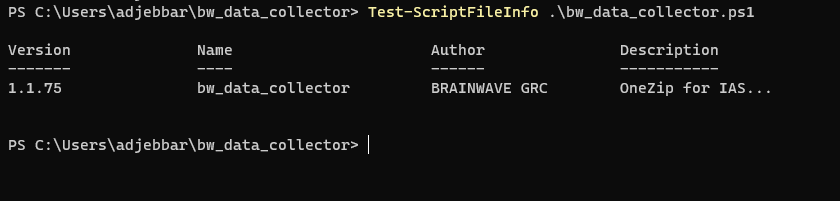
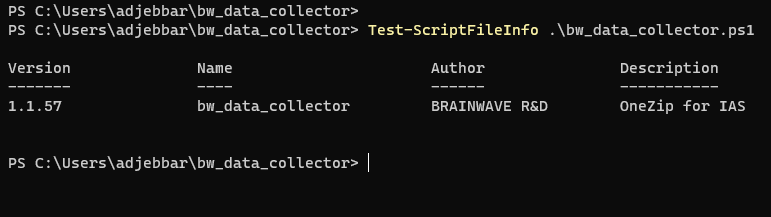
Before upgrading check you version by executing the folowing PowerShell cmdlet
Test-ScriptFileInfo .\bw_data_collector.ps1
Upgrade steps
- Donwload the latest version of
bw_data_collector.ps1 - Copy the zip file to the directory where your
bw_data_collector.ps1is installed - Unzip the downloaded package and override existing files
- Configuration file config.json will not be overitten
- Chek the new version to validate the migration