Identity Providers
Identity Provider is the term used to describe any mechanism or system that handles authentication of users, and provides claims about those users to CFS. There are five types of identity providers / authentication systems supported in CFS:
- Login / Password Authentication (Forms Based Authentication)
- Certificate/PIV card Authentication
- Social Networks
- Active Directory (RadiantOne Trust Connectors)
- External Trusted Identity Providers
- Microsoft AD FS
- OpenAM
- RSA SecurID (deprecated)
- Other Ws-Federation Identity Providers...
Note that for applications using certificates, CFS offers Certificate rollover feature which should be used when a certificate is nearing expiration or when you want to proactively replace it without causing downtime.
Below is a high-level diagram depicting the flow when CFS leverages a Trusted Identity Provider for authentication. In scenarios like this, CFS acts as a relying party to the Trusted Identity Provider. This is known as Inbound Federation. CFS is receiving assertions from a trusted IDP to provide access to identities outside of CFS's security boundary to relying parties that trust CFS as their Identity Provider.
Only the WS-Federation standard is supported between CFS and external trusted identity providers.
 In environments where an existing identity provider is deployed and needs to trust CFS as an identity/claims provider, the existing identity provider is then considered a relying party for CFS. This is known as Outbound Federation. CFS produces the assertions to be consumed by a trusted IDP. This allows identities managed by CFS to access applications outside of its security boundary. This is depicted in the diagram below.
WS-Federation, SAML, and OAuth/OIDC are supported between CFS and external trusted identity providers as long as the external identity provider supports it.

Applications
Name | Description | Link |
|---|---|---|
Amazon Web Services (AWS) is a collection of remote computing services (also called web services) that together make up a cloud computing platform, offered over the Internet by Amazon.com. | ||
AWS Single Sign-On (AWS SSO) is a cloud service that allows you to grant your users access to AWS resources, such as Amazon EC2 instances, across multiple AWS accounts. | ||
Box is the single, secure solution for content access, sharing and collaboration. Connect Box to other business applications using preexisting integrations, add functionality by adding Box Apps to your deployment or incorporate Box into your infrastructure through SSO integrations. | ||
Collaborate with colleagues across your organization, or halfway across the planet. Meet online and share files, information, and expertise. WebEx solutions increase productivity and keep you connected. | ||
DocuSign helps your world work better with the easiest, fastest, most secure way to send, sign, track and store documents in the cloud. | ||
DocuSign helps your world work better with the easiest, fastest, most secure way to send, sign, track and store documents in the cloud. | ||
DocuSign helps your world work better with the easiest, fastest, most secure way to send, sign, track and store documents in the cloud. | ||
DocuSign helps your world work better with the easiest, fastest, most secure way to send, sign, track and store documents in the cloud. | ||
Dropbox is a home for all your photos, docs, videos, and files. Anything you add to Dropbox will automatically show up on all your computers, phones and even the Dropbox website - so you can access your stuff from anywhere. | ||
Code, test, and deploy together with GitLab open source git repo management software. | ||
Google Apps is a suite of Google applications that brings together essential services to help your business. This is a hosted service that lets businesses, schools, and institutions use a variety of Google products -- including Email, Google Docs, Google Calendar, and Google Talk -- on a unique domain (e.g., www.yourcompany.com). | ||
Citrix GoToMeeting HD video conferencing software makes it simple and cost-effective to hold online meetings with colleagues and customers. | ||
Citrix GoToTraining online training software enables individuals and enterprises to provide interactive training sessions to customers and employees in any location. | ||
Citrix GoToWebinar is the online conference software that makes it possible for anyone to host a professional webinar from the comfort of their own office. | ||
Jive is the proven social provider, helping many of the world's most successful companies achieve breakthrough results, slash operating costs and drive $billions in revenue. | ||
Microsoft Active Directory Federation Services (AD FS) helps simplify access to applications and other systems with an open and interoperable claims-based model. The AD FS platform provides a fully redesigned Windows-based Federation Service that supports the WS-Trust, WS-Federation, and Security Assertion Markup Language (SAML) protocols. | ||
Microsoft Active Directory Federation Services (AD FS) helps simplify access to applications and other systems with an open and interoperable claims-based model. The AD FS platform provides a fully redesigned Windows-based Federation Service that supports the WS-Trust, WS-Federation, and Security Assertion Markup Language (SAML) protocols. | ||
Microsoft Azure Active Directory is a comprehensive identity and access management cloud solution that provides a robust set of capabilities to manage users and groups and help secure access to applications including Microsoft online services like Office 365 and a world of non-Microsoft SaaS applications. | ||
Citrix NetScaler is the world's most advanced application delivery controller for mobile and web. | ||
NetSuite Inc. is a leading vendor of cloud computing business management software suites. NetSuite enables companies of all sizes to manage all key business operations in a single, integrated system, which includes customer relationship management; order management and fulfillment; inventory management; finance; ecommerce and Web site management; and employee productivity. | ||
OpenAM is an open source access management, entitlements and federation server platform. | ||
Salesforce's main web-based CRM software is available for management of sales projections and orders, marketing plans, knowledge management, service and support, partner relationships, analytics and customer application development. Each is designed for the unique needs of different industries. | ||
Salesforce's main web-based CRM software is available for management of sales projections and orders, marketing plans, knowledge management, service and support, partner relationships, analytics and customer application development. Each is designed for the unique needs of different industries. | ||
SAML 2 Generic application. | ||
ServiceNow is a platform-as-a-service provider of enterprise service management software. | ||
Citrix ShareFile is an enterprise follow-me data solution that enables IT to deliver a robust data sharing and sync service that meets the mobility and collaboration needs of users and the data security requirements of the enterprise. By making follow-me data a seamless and intuitive part of every user's day, ShareFile enables optimal productivity for today's highly mobile, anywhere, any-device workforce. | ||
Microsoft SharePoint 2010 makes it easier for people to work together. Using SharePoint 2010, your people can set up Web sites to share information with others, manage documents from start to finish, and publish reports to help everyone make better decisions. | ||
Microsoft SharePoint 2013 makes it easier for people to work together. Using SharePoint 2013, your people can set up Web sites to share information with others, manage documents from start to finish, and publish reports to help everyone make better decisions. | ||
All your team communication in one place, instantly searchable, available wherever you go. That's Slack. | ||
Syncplicity provides file synchronization, back-up, and sharing. The service allows users to protect files with real-time backups and to share their files with others. Syncplicity offers unlimited storage and offers one click syncing and sharing. | ||
Workplace by Facebook allows you to communicate and collaborate quickly, easily and effectively with your entire organization using tools your colleagues are already familiar with. | ||
WsFederation Generic application. |


Configuring SAML Signing Settings
SAML2 applications let you control how responses and assertions are signed, and they support configuring multiple Assertion Consumer Service (ACS) endpoints (recipients) for service providers (SPs) that define more than one ACS URL in their metadata, as permitted by the SAML 2.0 specification.
- Open the SAML2 application configuration page.
- Go to the Parameters tab and locate the Recipients table.

- Click Add Recipient to add each ACS endpoint as a separate entry, and configure each row:
- Index — position/order of the endpoint.
- Location — the ACS endpoint URL.
- Binding — the SAML binding (HTTP-POST only).
- Default — marks the fallback endpoint.
- Alternatively, click Import from a metadata file and upload the SP metadata XML. CFS parses any
<AssertionConsumerService>elements and auto-populates the recipients table. Only SAML 2.0 HTTP-POST endpoints are supported; non-POST endpoints are ignored. - When an SP sends a SAML authentication request, CFS chooses the response destination as follows:
SP Request AttributeCFS Behavior
AssertionConsumerServiceURLMatches the URL against configured recipients and responds to that URL.
AssertionConsumerServiceIndexUses the recipient at the matching index.
Neither specified
Falls back to the recipient marked Default.
- Upload your encryption and signing certificates using the import button.

- Use the Sign Response toggle to sign the entire SAML response when required.
- Use the Sign Assertion toggle to sign only the assertion when required.
- Review the chosen options and click Save.
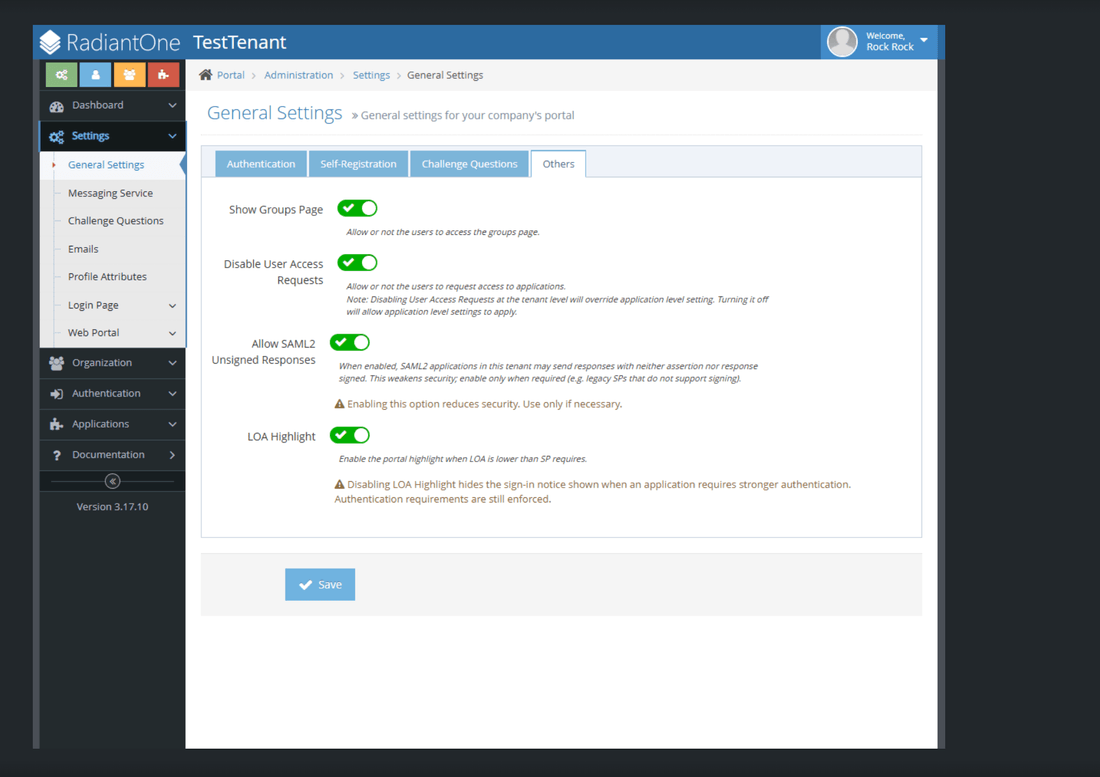
- By default, at least one of these options (response or assertion) must be signed for security purposes. To allow skipping both signatures, navigate to Settings > General Settings > Others, enable Allow SAML2 Unsigned Responses, and click Save.

- Return to the SAML configuration page and ensure neither option requires a signature.
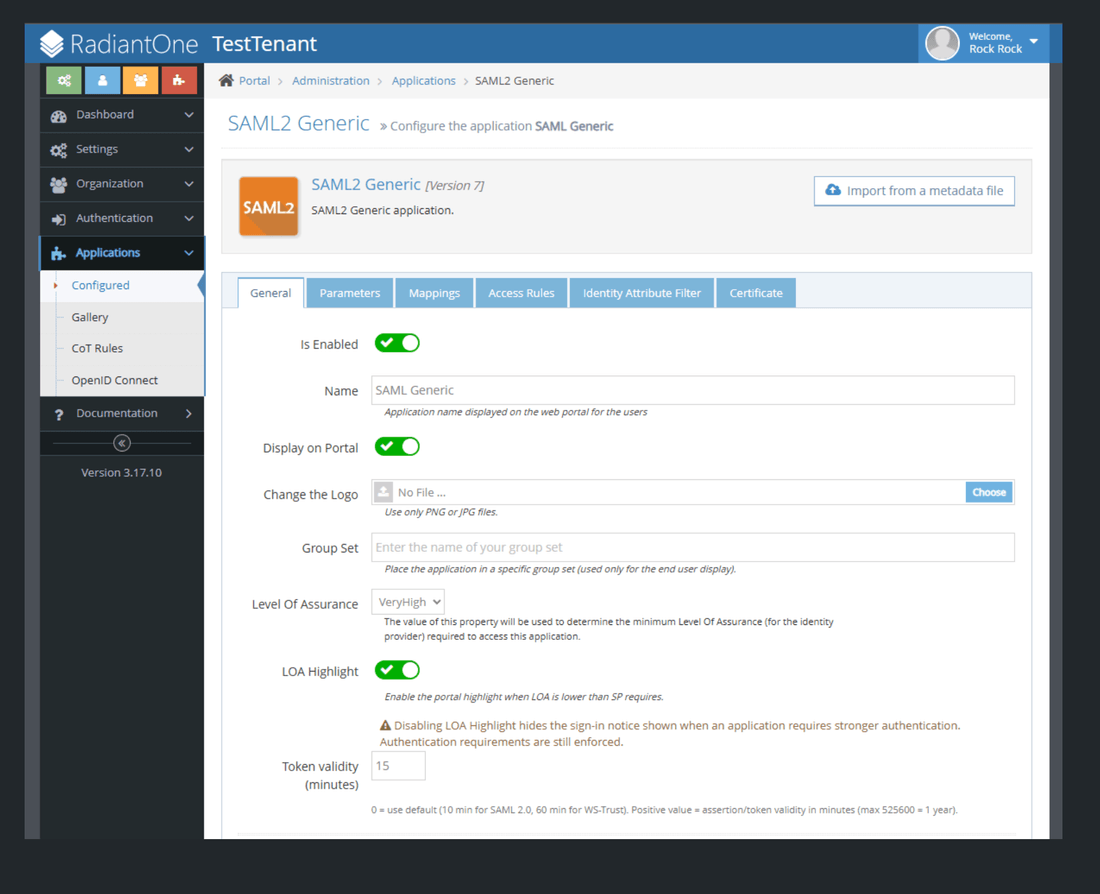
Configure Token Validity and LOA in SAML Applications
The General tab of a SAML2 application includes settings that control token lifetime, authentication strength requirements, and the display of Level of Assurance banner. CFS administrators can configure these by following the steps below:
- Navigate to Applications > Configured.
- Select the SAML application you want to configure and click Edit.
- Open the General tab.
-
Token validity (minutes) defines how long tokens generated for this application remain valid. Set this value according to your security policy.
-
Level of Assurance sets the minimum authentication strength required to access the application. When a user's current session does not meet this level, CFS enforces a step-up — prompting the user to re-authenticate at the required strength before access is granted. This value is passed as part of the identity token to the service provider.
-
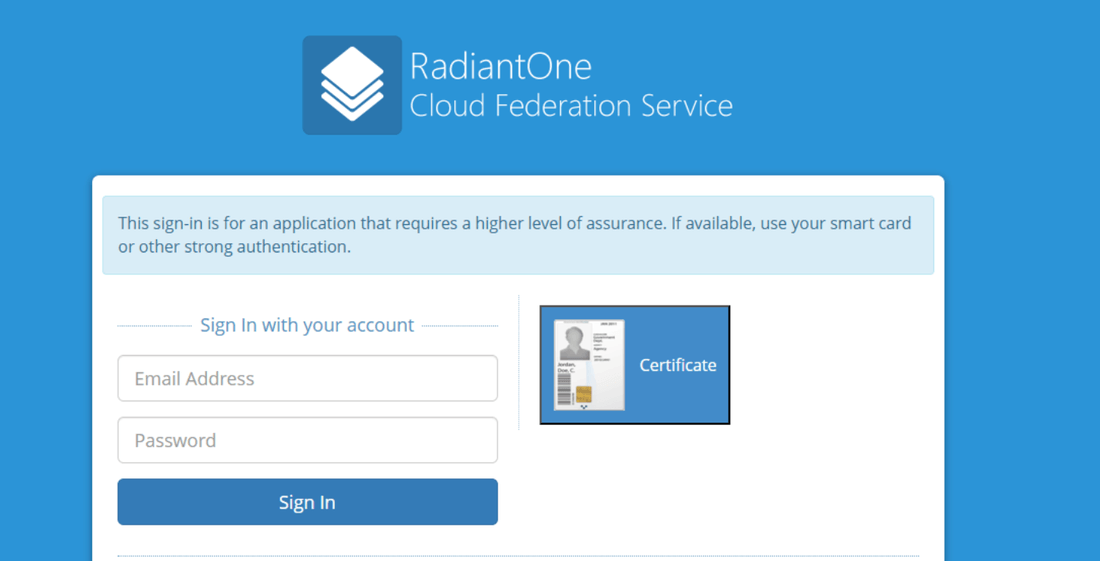
LOA Highlight (introduced in CFS 3.17.11) - when enabled (default), displays an informational banner on the login page for users when the application's assurance requirement exceeds their current session level, prompting them to use a stronger method such as a smart card or certificate. Disabling LOA Highlight setting hides the informational banner only. CFS continues to enforce all level-of-assurance requirements, including step-up authentication, logout, RTC filtering, and related logging.
Example banner users see when LOA Highlight is active:
- Enter the desired value in Token validity (minutes).
- Set Level of Assurance (LOA) to the desired authentication strength for this application.
- Set LOA Highlight to Enabled (default) to show the banner when the LOA requirement is not met, or Disabled to suppress it.
- Click Save to apply the changes.
The LOA banner appears only when both the application-level and tenant-level LOA Highlight toggles are enabled. To configure the tenant-level setting, navigate to Settings > General Settings > Others, locate the LOA Highlight toggle, and set it to Enabled or Disabled.
The table below describes the scope of the LOA highlight setting.
Scope | Default | Applies to |
|---|---|---|
Tenant | Enabled | All federated sign-in flows for the tenant |
Application | Enabled | SAML 2 and WS-Federation applications only |
Configuring Group Access Using an LDAP Filter
CFS allows administrators to control application access by filtering groups using LDAP with regex-based patterns. This ensures that only users belonging to specific groups can access the application. The steps below guide you through configuring and validating a group filter.
Configuring the Filter
- Open the SAML2 application configuration page.
- Select the application to configure and click Edit.
- Open the Access Rules tab.

- Locate the "Allow groups using filter" field under the group access (allowed groups) section.
- Enter an LDAP filter pattern that matches the groups you want to allow.
Examples:
- Admins only
admin(cn=*admin*) - Groups containing
-svn-
(cn=*-svn-*) - Groups starting with
east-
(cn=east-*) - Groups ending with
-developers
(cn=*-developers)
 Any group whose attributes match the filter will be granted access based on the defined access rules.
 - Admins only
- Click Validate next to the filter field.
Validation results:
- Valid filter: Displays a list of matching groups for review
- Invalid filter: Shows an error message; the application cannot be saved until the filter is corrected. Update the filter as needed and revalidate until it succeeds.
- Once validation is successful and the results are correct, click Save. The filter gets applied immediately. Existing matching groups are granted access and newly created groups that match the filter are automatically included.
Configuring Clock Skew Settings
In SAML, WS-Fed, and OIDC applications, you can configure clock skew to mitigate differences in system time between your application and external services such as an Identity Provider (IdP), Service Provider (SP), or third-party system/API. The clock skew feature introduces a configurable time tolerance when validating time-based security artifacts, including certificates and access tokens.
To configure clock skew, navigate to Applications > Configured > Parameters. Locate the Clock skew (minutes) setting, enter the appropriate value for certificate and/or token expiration validation, and save your changes.
 By default, the maximum permitted clock skew duration is 10 minutes. To modify this limit, follow these steps:
- Log in to the RadiantOne portal and go to the Directory Browser tab.
- Navigate from the CFS configuration root (ou=cfs,cn=config) to ou=Parameters,ou={your_tenant},ou=tenants,{configuration_root}, then update the MaxClockSkewMinutes parameter with the desired value.

Smart links
Overview
For RP-initiated SSO (when a user navigates directly to a site/application) the Identity Provider (IDP) knows exactly where to redirect the user back to after they authenticate. However, for IDP-initiated SSO (when the user navigates directly to the IDP to log in first), the exact desired application/sub-service may not be known so CFS would redirect the user back to a general/main page of the service instead of directly to the sub-service. Smart Links provide users with an improved login experience when accessing any browser based site that offers many services/sub-sites. An example is Office 365 which offers many services, including SharePoint Online. Even SharePoint 2010 (on-premise) offers many different sites/web applications. Another example is Google Apps which offers many services like email, calendar...etc. Smart Links offer an improved IDP-initiated user experience because once logged in, with just a single click, the user is automatically redirected to the specific service without any additional clicks required. On the CFS configuration side, only 1 application is required to be configured. Then each sub-service is configured for this application as a smart link. This page explains the Smart Link generation and deployment process in detail and is based on a use case of Office 365 (SharePoint Online) deployed trusting ADFS as the Identity Provider and extending access to users in CFS (ADFS configured with a claims provider trust for CFS).
Generating Smart Links
- Install Fiddler.
- Open Fiddler and enable HTTPS decryption.
- Open Internet Explorer, clear the cookies and restart the browser.
- Using Internet Explorer, navigate to an Office 365 SharePoint site.
- At the Office 365 Login Prompt, enter your username, check the boxes 'Remember me' and Keep me signed in' and then click "Sign in at
". - Return to Fiddler and locate the 302 redirection session. Right-click the 302 session, click "Copy and click "Just Url".
- Open Notepad and paste the string copied in step 6. It should look something like:
[https://federation.domain.com/adfs/ls/?cbcxt=mai&vv=&username=david.ross%40domain.com.au&mkt=&lc=3081&wa=wsignin1.0&](https://federation.domain.com/adfs/ls/?cbcxt=mai&vv=&username=david.ross%40domain.com.au&mkt=&lc=3081&wa=wsignin1.0&); wtrealm=urn:federation:MicrosoftOnline&wctx=MEST%3D0%26LoginOptions%3D1%26wa%3D wsignin1%252E0%26rpsnv%3D2%26ct%3D1348618157%26rver%3D6%252E1%252E6206%252 E0%26wp%3DMBI%26wreply%3Dhttps%253A%252F%252Fdomain%252Esharepoint%252Ecom %252F%255Fforms%252Fdefault%252Easpx%26lc%3D3081%26id%3D500046%26cbcxt%3Dmai %26wlidp%3D1%26guest%3D1%26bk%3D1348618158
- Remove everything between ".../adfs/ls/?" and "wa=wsignin...", and everything after "...wreply%3D". The string now looks like:
[https://federation.domain.com/adfs/ls/?wa=wsignin1.0&wtrealm=urn:federation:Microsoft](https://federation.domain.com/adfs/ls/?wa=wsignin1.0&wtrealm=urn:federation:Microsoft) Online&wctx=MEST%3D0%26LoginOptions%3D1%26wa%3Dwsignin1%252E0%26rpsnv%3D2 %26ct%3D1348618157%26rver%3D6%252E1%252E6206%252E0%26wp%3DMBI%26wreply%3D
This is the base URL that is used to create the Smart Links.
Next, convert the SharePoint site URLs to double encoded URLs. We need to do this for all SharePoint sites that you would like to create Smart Links for. Use the following table as a reference:
ASCII Character Double-Encoded Value
: %253A
. %252E
/ %252F
The following are some examples of URLs and their double-encoded URL equivalent:
URL -- > Double-Encoded URL https://company.sharepoint.com -- > https%253A%252F%252Fcompany%252Esharepoint%252Ecom https://company.sharepoint.com/search -- > https%253A%252F%252Fcompany%252Esharepoint%252Ecom%252Fsearch https://company-10.sharepoint.com/sites/finance -- > https%253A%252F%252Fcompany-10%252Esharepoint%252Ecom%252Fsites%252Ffinance
- To complete the Smart Link, append the double encoded string to the base URL that was previously created. The end result is a Smart Link that looks something like:
[https://federation.domain.com/adfs/ls/?wa=wsignin1.0&wtrealm=urn:federation:Microsoft](https://federation.domain.com/adfs/ls/?wa=wsignin1.0&wtrealm=urn:federation:Microsoft) Online&wctx=MEST%3D0%26LoginOptions%3D1%26wa%3Dwsignin1%252E0%26rpsnv%3D2% 26ct%3D1348618157%26rver%3D6%252E1%252E6206%252E0%26wp%3DMBI%26wreply%3D https%253A%252F%252Fcompany%252Esharepoint%252Ecom
Deploying Smart Links
The URL generated in the previous section is used during the CFS configuration described below.
- From the Tenant Administration Dashboard, navigate to the Applications sections.
- Click Gallery and click Configure next to the application you want to configure with Smart Links. (This example uses ADFS as WS-Federation).
- Enter the needed parameters (if you need assistance, see Applications ).
- Click Smart Links at the bottom of the page.
- Click New Smart Links.
- Paste in the final smart link result calculated in the previous section. E.g.
[https://federation.domain.com/adfs/ls/?wa=wsignin1.0&wtrealm=urn:federation:Microsoft](https://federation.domain.com/adfs/ls/?wa=wsignin1.0&wtrealm=urn:federation:Microsoft) Online&wctx=MEST%3D0%26LoginOptions%3D1%26wa%3Dwsignin1%252E0%26rpsnv%3D2% 26ct%3D1348618157%26rver%3D6%252E1%252E6206%252E0%26wp%3DMBI%26wreply%3D https%253A%252F%252Fcompany%252Esharepoint%252Ecom - Toggle the "Is Enabled" option so that is shows a green check mark.
- Enter any other desired parameters on the General, Access Rules and Filter tabs and then click Save. For details on parameters available on these tabs, please see the Applications Configuration guide.

OpenID Connect
Overview
CFS supports OAuth 2.0 and is an OpenID Connect provider. It supports the role of "Authorization Server" (to authenticate users) and "Resource Server" (to deliver user attributes requested by the application). When a user accesses the OpenID Connect application (relying party), they are redirected to the "authorization endpoint" of CFS to authenticate (step 2 in the diagram below). If the user has an active session with the CFS, authentication may be skipped. After the user authenticates to CFS, they are prompted to authorize the application to access certain profile information (unless they've already given permission to the application previously, in which case they are not prompted). This is shown in step 3 in the diagram below. The user browser is sent back to the client application (indicated by the Callback URL in the configuration) with the authentication/authorization result (shown in step 4 in the diagram below). The application can contact CFS (DIRECTLY) at the UserInfo endpoint (shown in step 5 in the diagram below). The application has a maximum of 2 minutes to contact CFS for the user's information. After 2 minutes, the access token is no longer valid and steps 2-4 shown in the diagram must be done again. Note here that even if steps 2-4 is executed again, the user does not see any of this because they have already been authenticated by CFS (and not prompted again) and already authorized the application to access their information (so they won't have to consent again - as long as they have not manually revoked access to this application in the meantime). The UserInfo endpoint (CFS) returns consented profile information to the client application (shown in step 6 in the diagram below). This can contain ONLY attributes indicated in the "scope" (indicated in the Mappings). A tenant's OIDC discovery document is located at: https://cfs-server.domain.com/cfs/oauth/[tenant-identifier]/.well-known/openid-configuration This discovery document provides general information about the OpenID connect configuration such as:
- The OAuth issuer (CFS tenant)
- Authorization endpoint
- Token endpoint
- User Information endpoint
- Response types and response modes supported
- ID token Signing algorthims supported
- The JSON Web Keys URI
- Supported scopes
- End session endpoint and check session iframe
 A few things to keep in mind for OpenID Connect Applications are:
- There are no certificates required.
- The application can communicate directly to CFS to get information about a user (not just indirectly through the client browser with redirects).
- Only RP-initiated SSO is supported (no IDP-initiated, which means OpenID Connect applications does not appear in the CFS portal).
Supported Flows in CFS
The following OIDC flows are supported:
- Authorization Code
- Authorization Code (with PKCE)
- Hybrid
- code token
- code id_token
- code id_token token
- Implicit
- id_token token
- token
- id_token
The implicit flow is less secure since access token and/or ID tokens are returned directly from CFS to the browser. As a result, the code flow is encouraged and the most secure.
Tokens
Tokens in CFS are returned in the form of Json Web Tokens (JWTs).
Access Tokens
An access token body returned from CFS looks similar to: { "name": "Jane Doe", "sub": "Jane Doe", "scope": "openid profile address phone email", "token_type": "bearer", "client_id": "h5Ik8ep4nFMu433hUI55g", "nbf": 1610573741, "exp": 1610573861, "iat": 1610573741, "iss": "https://cfs.server/cfs/oauth/[tenantIdentifier]", "aud": "https://cfs.server/cfs/oauth/[tenantIdentifier]" } These access tokens have a two minute expiration time, unless changed in the tenant admin console. Important things to note:
- The "aud" (Audience) claim is the resource the access token is intended for. In this case, it's CFS which, as mentioned above, is also the resource server.
- The "iss" (Issuer) claim is who issued the access token (the authorization server), which is also CFS.
- The "scope" claim are those user claims that the OIDC client is requesting from the backend datastore (FID).
ID Tokens
An ID token body returned from CFS looks similar to: { "name": "Jane Doe", "sub": "Jane Doe", "family_name": "Doe", "given_name": "Jane", "nickname": "jen", "gender": "female", "address": "123 East Brussels Lane, Novato, CA 95213", "email": "[email protected]", "email_verified": "True", "phone_number": "555-639-1234", "phone_number_verified": "False", "nonce": "63746170493LWE2NzQtNTdkMGQ3Zjc5NjU2", "at_hash": "UBugsfdT1PWxJ6wqpw", "c_hash": "Upb8pdndf30UQ4-g", "nbf": 1610573742, "exp": 1610574942, "iat": 1610573742, "iss": "https://cfs.server/cfs/oauth/[tenantIdentifier]", "aud": "h5Ik8ep4nFMu433hUI55g" } These ID tokens have a twenty minute expiration time, unless changed in the tenant admin console.. Important things to note:
- The "aud" (Audience) claim is the OIDC client the token is intented
- The "iss" (Issuer) claim is the authorization server that issued the ID token, which is CFS.
- The "c_hash" (Code Hash) value is included in the ID token if the
response_typeincludes a code (i.ecode,code id_token,code token id_token). - The "at_hash" (Acess Token Hash) value is included in the ID token if the
response_typealso includes an access token (i.ecode id_token token). - Requests to the
authorizeendpoint that contain any of the below response types return user claims only from the/userinfoendpoint:tokencode tokentoken id_tokencode id_token token
JSON Web Keys
These tokens are signed using JSON Web Keys (JWKs). The key ID (kid) used to sign the token can be found in the JSON Web Token's header
{
"alg": "RS256",
"kid": "9ac7441d-1c47-49ad-9bb9-740d0f6a1702",
"typ": "JWT"
}
The JWKs can be accessed from https://cfs-server.domain.com/cfs/oauth/[tenant-identifier]/.well-known/keys. This endpoint can be discovered from tenant's OIDC discovery document.
Keys are automatically rotated every 180 days.
If there are existing OIDC applications in your tenant prior to CFS 3.15.0 you have to reconfigure them, as the JWKs won't be created if there are existing OIDC applications in the tenant.
Configuration
There are two parts to the configuration in CFS. One is the configuration of the application. The other is configuring which identity store attributes are associated with the scopes (mappings). These configurations are described below.
The configuration of the actual OpenID Connect application is not covered in this guide. However, take note of the Key and Secret set when you configure the application in CFS as these values are needed when you configure your actual application.
Application
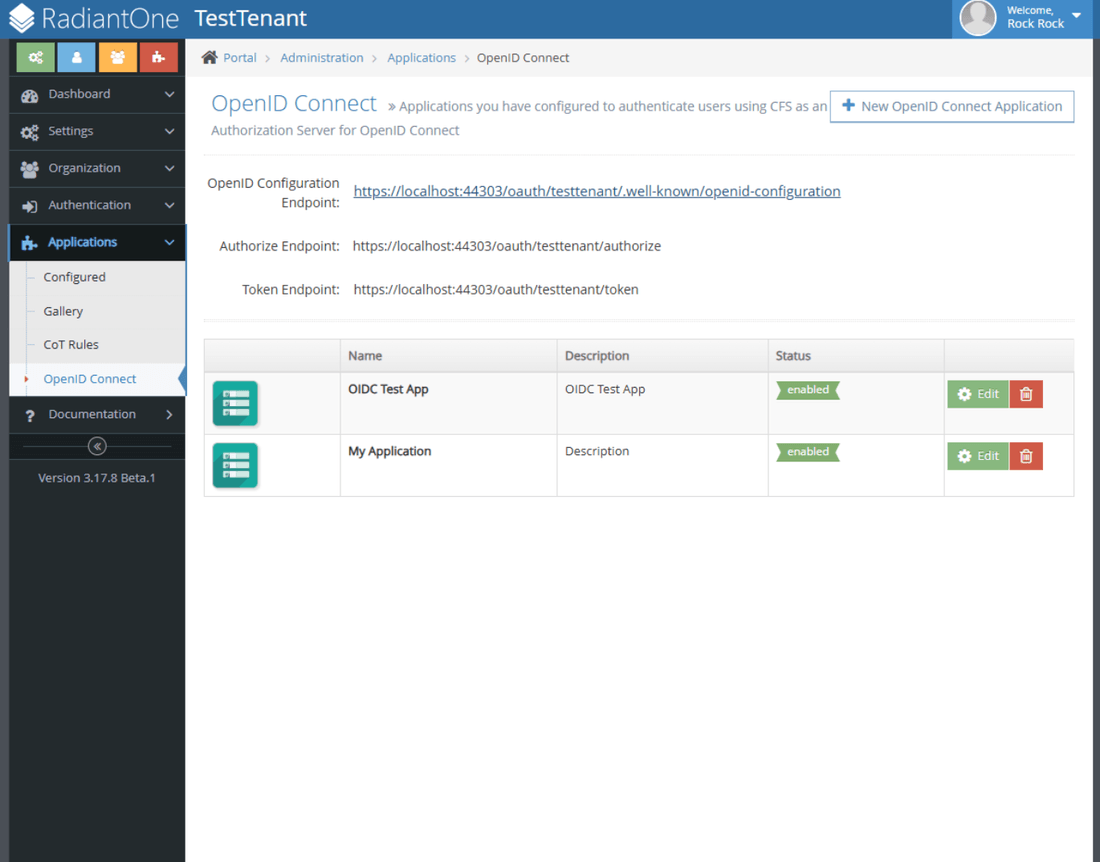
In the Tenant Administration Dashboard, navigate to the Applications section and select OpenID Connect. Click New OpenID Connect Application.
- Enter a unique name for the OpenID Connect application.
- Enter a description.
- Enter a website associated with the application.
- Enter a Callback URL. The address where CFS redirects the user to after authentication.
- Enter the organization name and website. This information is displayed to the user (along with the logo you configure in the next step) when requesting consent for the application to access the user's information.
- Select a logo to display to the user when requesting consent for the application to access the user's information.
- Check "Is Enabled" until it shows green.
- Take note of the Application Key and Secret as this information is used in the configuration of the application (when you set it up to be able to connect to CFS).
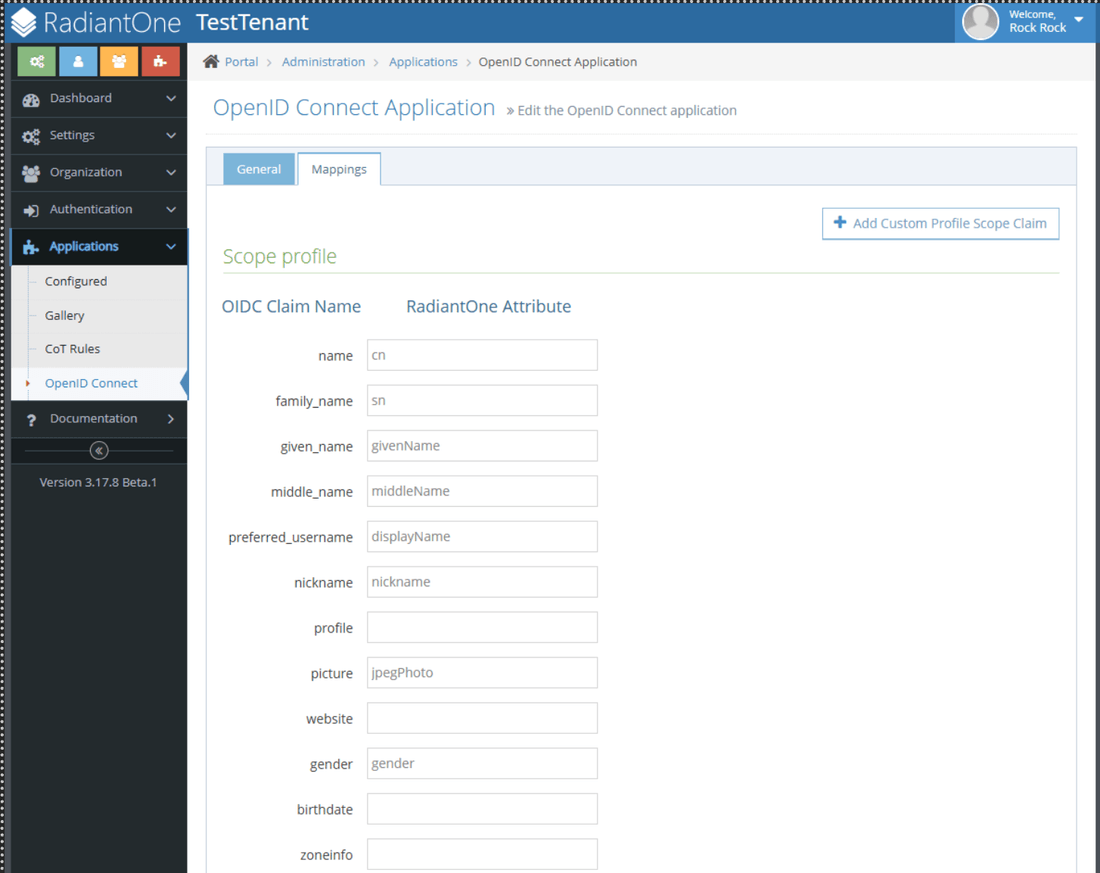
Mappings (Scopes)
OpenID Connect "scopes" can be thought of as predefined sets of claims/assertions. To define the attributes associated with the scopes, from the Administration Dashboard, navigate to Applications and select OpenID Connect. Click Mappings. A claim/scope mapping is a configuration that determines how user information (claims) is selected, transformed, and named in the tokens issued by an identity provider (IdP) using OpenID Connect (OIDC). Different applications often need different subsets of user data. Tailoring claims per application improves:
- Security: Least-privilege data sharing
- Performance: Smaller tokens
- Compatibility: Meeting app-specific requirements
Standard Scopes
Profile Scope
The profile scope returns a set of standard user profile claims, including:
- name
- family_name (Last Name)
- given_name (First Name)
- middle_name, Nickname
- peferred_username
- profile
- picture
- website
- gender
- birthdate
- zoneinfo
- locale
- update_at
Each claim can be mapped to a corresponding attribute in the identity store (Identity Data Management).

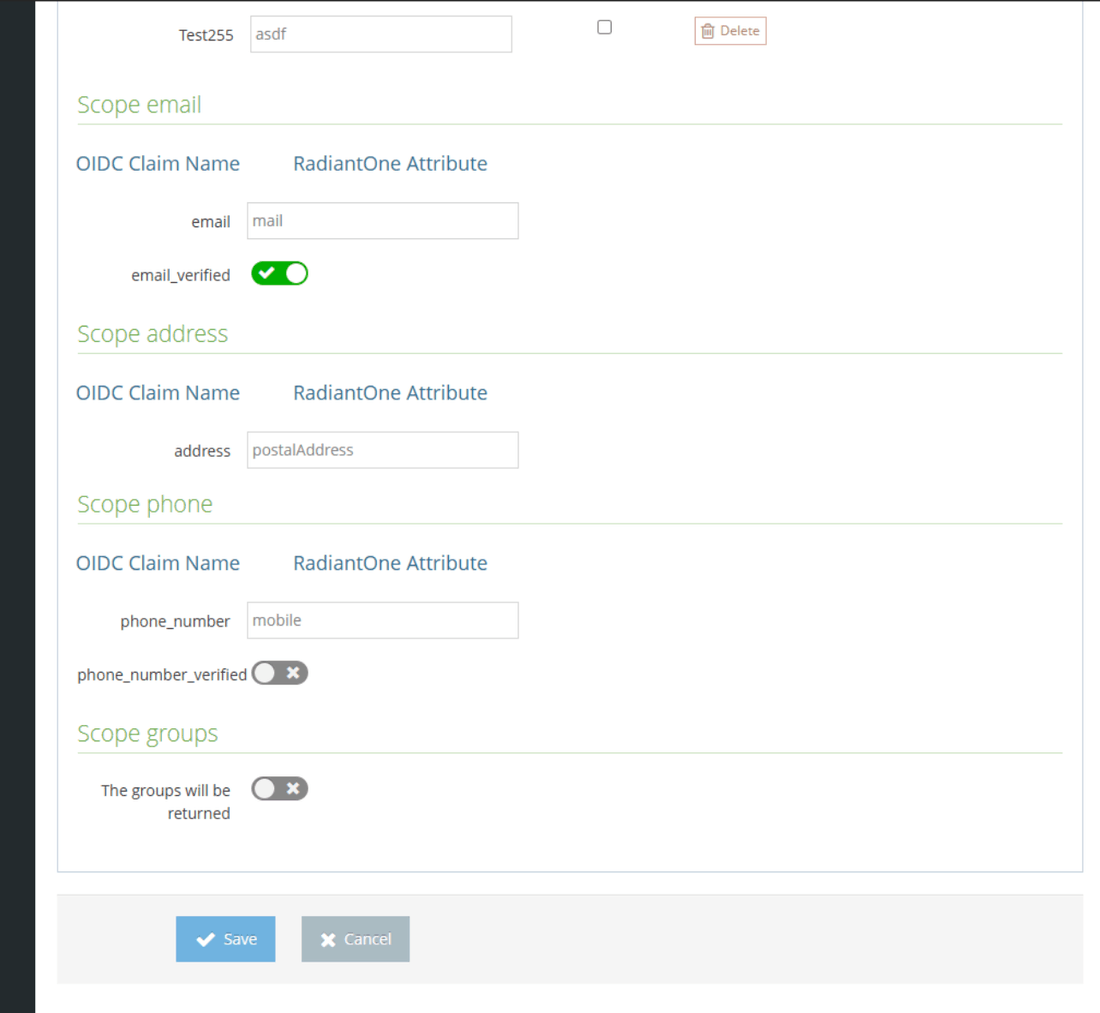
Email Scope
The email scope returns the user's email claim.
- The claim value is mapped to an attribute in Identity Data Management (e.g.,
mail). - Email can be marked as verified based on identity store configuration.
- Verification is not performed by CFS or Identity Data Management; it is determined by the administrator based on authoritative data sources.
Address Scope
The address scope returns the user's address claim.
- Mapped to a single attribute in Identity Data Management (e.g.,
postalAddress).
Phone Scope
The phone scope returns the user's phone number claim.
- Mapped to an attribute in Identity Data Management (e.g.,
mobile). - Phone numbers can be marked as verified based on identity store configuration.
- Verification is determined by the administrator (not enforced by CFS or Identity Data Management).
Groups Scope
The groups scope returns a groups assertion containing the user's group memberships. Group data is derived from the tenant's configured group schema.
What Changed in CFS 3.17.8
- Per-application mappings: Each OIDC application now has its own Mappings tab to define its claim rules.
- Tenant-wide mappings removed:
- OIDC mappings are no longer managed solely at the tenant level.
- If an app doesn't yet have a custom mapping, the previous tenant-wide mapping is used to populate its initial configuration; once saved, it becomes specific to that app.
During token and user info requests, the server applies the app's saved mappings if they exist; otherwise, it falls back to the tenant's global mappings.
Prerequisites
- Confirm that you have admin access to manage OIDC applications in CFS.
- Have clarity on the application's required claims (e.g., which attributes and formats are expected).
Steps to Configure Claim Mappings
- Open the OIDC application
- In the CFS admin console, navigate to OIDC Applications and click Edit on the application you want to configure.
- Switch to the Mappings tab
- View claim mapping rules for this application. If no custom mapping exists yet, the view is initially populated with your prior global mapping as a starting point.
- Adjust claim rules
- Add, remove, or modify claim mappings as needed for this application. For example, you might map only a subset of user groups or use a computed attribute instead of sending all groups. Each mapping determines which user attribute is sent as which claim in the OIDC token.
- Save the configuration
- Click Save. Both the application's attributes and its claim mappings will be saved together.
- Click Save. Both the application's attributes and its claim mappings will be saved together.
Custom Claims
CFS supports configuring custom claims. These custom claims are returned as part of the profile scope.
- If a custom claim is disabled, it is not returned in either the
id_tokenor from the/userinfoendpoint. - Custom claims, like all other scopes, can only be managed by administrators.
To add a custom claim:
-
From the Administration tab navigate to Applications > OpenID Connect.
-
In the top right, click + Add Custom Profile Scope Claim.

-
In the popup that appears, enter a Claim name and Claim Value. The Claim Name is just a user-friendly string to identify the custom claim. The Claim Value is the attribute in Identity Data Management.

-
The mappings page should then display the custom claim with the option to disable or delete it.

Change Token Expiration Time
Certain situations may require that an OIDC application's token expiration be changed. To do so:
- Log in as a tenant administrator.
- Navigate to Administration > Applications > OpenID Connect.
- Choose Edit next to the application in which the token expiration should be changed.
- Scroll to the bottom of the page to the Token Expiration Settings section.
- Modify the values accordingly.
- Click Save.
PKCE Flow
CFS supports the PKCE flow, a secure alternative to the implicit flow. PKCE is used mainly for Single-Page Applications (SPAs) in which the client secret cannot be securely stored. These SPAs tend to store information in the browser, and therefore it is recommended to use this flow since it's more secure than the implicit flow. Since this flow builds off the standard authorization code flow, the steps are very simliar:
- The user clicks on Login from the OIDC client application
- The OIDC client application creates a
code_verifier - The OIDC client application also creates a
code_challengeand acode_challenge_methodwhich is eitherplainorS256- If the
code_challenge_methodisplain, then thecode_challengeis just thecode_verifier - If the
code_challenge_methodisS256, then thecode_challengeis the Base64 URL-encoded SHA256 hashed value of thecode_verifier
- If the
- The client sends the
code_challengeandcode_challenge_methodalong in the authorization request to CFS - CFS stores the
code_challengeand responds with anauthorization code - The client then sends a request containing it's
code_verifierandauthorization codeto CFS'/tokenendpoint - CFS verifies the
authorization codeand then verifies thecode_verifierusing thecode_challengeandcode_challenge_methodreceived in the/authorzierequest- If the validation is successful, CFS responds with an
access token,id_token, andrefresh_token
- If the validation is successful, CFS responds with an
- The OIDC client the requests, user data to the
/userinfoendpoint with theaccess tokenissued from step 7 - CFS verifies the
access token, and if correct, responds with the user's information based on thescopesrequested from theaccess token`
When using the PKCE flow, the client_secret is not needed. The code_challenge essentially replaces the client_secret.
A sample authorization request using the PKCE flow is as follows (line breaks included for readability):
GET https://[cfs-server]/cfs/oauth/[tenant-identifier]/authorize?
client_id=g1hokpYGybxFMw98Hm2GEx
&redirect_uri=https%3A%2F%2Fwin-cit95mqedh1.luckylemurs.com%2Fsignin-oidc
&response_type=code
&scope=openid%20profile%20groups
&code_challenge=48OXGnJ6mmia6TWwEaVYfm02laegbqABMDGR_20NN98
&code_challenge_method=S256
&response_mode=form_post
&nonce=63762669242...jODg3
&state=CfDJ...7kV1SZQ8Oj_
If, for some reason, a client_secret is passed in the authorization request when using the PKCE flow, CFS also verifies it in addition to verifying the code and code_verifier.
Session Management
Session management in OIDC allows for clients to monitor users' session state in CFS, and act accordingly. It also enables clients to allow users to logout of CFS. OIDC session management can be used to:
- Log users out of all applications they're signed into from an IdP (single-logout)
- End a user's current CFS session (simple logout)
As of CFS version 3.15.1, only simple logout is supported.
Check Session Management
Clients (Relying Parties (RPs)) can check for users' session status by using CFS' (OpenID Connect Provider's (OP)) /checksession endpoint, which can be found from the OIDC discovery endpoint for the tenant. In order for clients to correctly use the /checksession endpoint, two iframes must be loaded into the client:
- An OP iframe -- an iframe loaded into the RP pointing to the OP's
checksessionendpoint found in the OIDC discovery document.- The RP must assign an
idattribute to the iframe so that it can identify it in the OP iframe - The RP's postMessage from the iframe sends the following string concatenation as data:
client_id+ " " +session_state.
- The RP must assign an
- An RP iframe -- an iframe loaded into the RP used to handle the response from the OP's
checksessionendpoint.- This iframe must know the
idof the OP iframe and the origin URL of the OP iframe (i.e.https://cfs-server.domain.com) to ensure that requests are sent to and received only from the originating OP (i.e. CFS).
- This iframe must know the
A response from the OP's checksession endpoint is either changed, unchanged, or error.
- If the response is
changed, the RP must send a request to the OPs'authorizeendpoint withprompt=nonewith the RP iframe to request a new ID token, sending the old ID token as theid_token_hint. - If the response is
unchanged, the RP need not do anything, as the user's session has not changed. - If the response is
error, the RP must not perform re-authentication to theauthorizeendpoint.
End Session Mangement
If an OIDC client chooses to allow users to logout of CFS (i.e. simple logout), it can do so from the tenant's endsession endpoint found in the OIDC discovey document. The client must know the ID token for the user, and must pass it in the id_token_hint parameter.
If the ID token is valid, CFS logs the user out and the following page is displayed.
 If the ID token is invalid, CFS displays the following page.
 If the
 id_token_hint parameter is not passed, CFS displays the following page.
An example end session request is as follows.
https://cfs-server.domain.com/cfs/oauth/[tenant-identifier]/endsession?id_token_hint=ey8Ujmnr43dC...PZ
Revoking Access to an Application
Once a user authenticates to an OpenID application and gives consent for the application to access their profile attributes, they can log in to the CFS portal and "revoke access" to these applications meaning that the application is no longer allowed to get the user's attributes without consent.
- Log into the CFS Portal and click Security.
- Click Edit next to Applications. You will see a list of applications and the scope they are currently using.
- Click the Revoke button next to the applications you no longer want to be able to access your profile.

PowerShell Commandlets
The Microsoft PowerShell commandlets are available starting CFS version 3.3. 145 of them are available in CFS 3.16.2.
Run the PowerShell prompt and use the following command in order to connect to FID: Connect-CfsService -Address <FID ADDRESS> -Port <SSL PORT> -Root "cn=cfs,cn=config". You are prompted for your FID credentials. After the authentication is successful, you can manage your CFS using the following cmdlets.
If the CFS PowerShell cmdlets are not available after installing CFS, enter the command Import-Module RLI.CFS.Management in order to import the CFS commandlets. Also, make sure you have PowerShell 4.0 (or later) installed.
General
Schema
Name | Description | Since Version |
|---|---|---|
Get-CfsSchema | Retrieves the version of the CFS configuration schema in FID. | 3.3.0.0 |
Update-CfsSchema | Updates the CFS configuration schema in FID. | 3.3.0.0 |
Service
Name | Description | Since Version |
|---|---|---|
Connect-CfsService | Initiates the connection to FID. | 3.3.0.0 |
Get-CfsService | Retrieves the connection object. | 3.3.0.0 |
Install-CfsService | Initializes the CFS configuration in FID. | 3.3.0.0 |
Tools
Name | Description | Since Version |
|---|---|---|
Get-CfsVersion | Retrieves the version of the CFS PowerShell Commandlets. | 3.3.0.0 |
New-Certificate | Generates a new X509Certificate2. | 3.3.0.0 |
System
Global Login Page
Name | Description | Since Version |
|---|---|---|
Get-CfsGlobalLoginPage | Retrieves the Global Login Page parameters. | 3.6.0.0 |
Set-CfsGlobalLoginPage | Updates the Global Login Page parameters. | 3.6.0.0 |
Bypass Redirection
Name | Description | Since Version |
|---|---|---|
Get-CfsBypassRedirection | Retrieves the bypass User Agent rules. | 3.9.0.0 |
Set-CfsBypassRedirection | Updates the bypass User Agent rules. | 3.9.0.0 |
Enable-CfsBypassRedirection | Enables the bypass redirection. | 3.9.0.0 |
Disable-CfsBypassRedirection | Disables the bypass redirection. | 3.9.0.0 |
Packages
Name | Description | Since Version |
|---|---|---|
Get-CfsApplicationPackage | Retrieves an Application Package. | 3.7.0.0 |
Get-CfsPackages | Retrieves the Web Gallery Application or Theme packages. | 3.7.0.0 |
Get-CfsTheme | Retrieves a Theme. | 3.7.0.0 |
Import-CfsPackage | Imports an Application or Theme package from a local folder. | 3.7.0.0 |
Import-CfsPackages | Imports all application or theme packages from a local folder. | 3.7.0.0 |
Install-CfsPackages | Installs the packages from the Web Gallery. | 3.7.0.0 |
Remove-CfsPackage | Removes a Package. | 3.7.0.0 |
Update-CfsPackages | Updates the package from the Web Gallery. | 3.7.0.0 |
Servers
Name | Description | Since Version |
|---|---|---|
Get-CfsServer | Retrieves a Server. | 3.3.0.0 |
Get-CfsServerSecretKey | Retrieves the Secret Key from a Proxy Server. | 3.3.0.0 |
New-CfsServer | Creates a new Proxy Server. | 3.3.0.0 |
Remove-CfsServer | Removes a server from the system. | 3.3.0.0 |
SMTP
Name | Description | Since Version |
|---|---|---|
Disable-CfsSmtp | Disables the SMTP. | 3.3.0.0 |
Enable-CfsSmtp | Enables the SMTP. | 3.3.0.0 |
Get-CfsSmtp | Retrieves the SMTP parameters. | 3.3.0.0 |
Send-TestEmail | Sends a Test Email. | 3.3.0.0 |
Set-CfsSmtp | Updates the SMTP parameters. | 3.3.0.0 |
Tenants
Name | Description | Since Version |
|---|---|---|
Disable-CfsTenant | Disables a Tenant. | 3.3.0.0 |
Enable-CfsTenant | Enables a Tenant. | 3.3.0.0 |
Get-CfsTenant | Retrieves a Tenant. | 3.3.0.0 |
New-CfsTenant | Creates a new Tenant. | 3.3.0.0 |
Remove-CfsTenant | Removes a Tenant. | 3.3.0.0 |
Set-CfsTenant | Updates a Tenant. | 3.3.0.0 |
Themes
Name | Description | Since Version |
|---|---|---|
Get-CfsTheme | Retrieves a Theme. | 3.3.0.0 |
Remove-CfsTheme | Removes a Theme. | 3.3.0.0 |
Update-CfsTheme | Updates the Themes from the Web Gallery. | 3.3.0.0 |
Web Gallery
Name | Description | Since Version |
|---|---|---|
Get-CfsWebGallery | Retrieves the Web Gallery Application or Theme packages. | 3.3.0.0 |
Install-WebGallery | Installs the packages from the Web Gallery. | 3.3.0.0 |
Get-CfsWebGalleryAddress | Retrieves the Web Gallery URL. | 3.3.0.0 |
Set-CfsWebGalleryAddress | Updates the Web Gallery URL. | 3.3.0.0 |
Web Proxy
Name | Description | Since Version |
|---|---|---|
Disable-CfsWebProxy | Disables the Web Proxy. | 3.3.0.0 |
Enable-CfsWebProxy | Enables the Web Proxy. | 3.3.0.0 |
Get-CfsWebProxy | Retrieves the Web Proxy parameters. | 3.3.0.0 |
Set-CfsWebProxy | Updates the Web Proxy parameters. | 3.3.0.0 |
Tenant
Use command Set-CfsCurrentTenant (Available since CFS 3.4) in order to set the Tenant to use for the current session.
Name | Description | Since Version |
|---|---|---|
Get-CfsCurrentTenant | Get the Tenant used for the current PowerShell session. | 3.6.0.0 |
Set-CfsCurrentTenant | Set the Tenant to use for the current PowerShell session. | 3.4.0.0 |
Application
Name | Description | Since Version |
|---|---|---|
Disable-CfsApplication | Disables an application. | 3.3.0.0 |
Enable-CfsApplication | Enables an application. | 3.3.0.0 |
Get-CfsApplication | Retrieves an Application for the tenant. | 3.3.0.0 |
Get-CfsApplicationUpdate | Retrieves if an Application has a template update available. | 3.6.0.0 |
Get-CfsAppParameter | Retrieves an application Parameter. | 3.6.0.0 |
Import-CfsApplication | Imports an Application package. | 3.6.0.0 |
Move-CfsApplication | Changes the identifier of an Application. | 3.3.0.0 |
New-CfsApplication | Creates a new Application. | 3.3.0.0 |
Remove-CfsApplication | Removes an application. | 3.3.0.0 |
Set-CfsApplication | Updates application settings such as the application name, the AllowAllUsers attribute, and supports importing complete Service Provider (SP) metadata. Example syntax: | 3.6.0.0, with updated support for metadata updates starting version 3.17.8. |
Set-CfsAppParameter | Updates the Parameter of an Application. | 3.6.0.0 |
Update-CfsApplication | Updates an Application from a template. | 3.6.0.0 |
Applications and SmartLinks
Name | Description | Since Version |
|---|---|---|
Add-CfsAppGroups | Adds a Group to an Application or SmartLink. | 3.6.0.0 |
Get-CfsAppGroup | Retrieves the principal Group of an Application or SmartLink. | 3.6.0.0 |
Get-CfsAppGroups | Retrieves the list of Groups of an Application or SmartLink. | 3.6.0.0 |
Get-CfsGroupOwner | Retrieves the Group Owner of an Application or SmartLink. | 3.6.0.0 |
Get-CfsGroupSet | Retrieves the GroupSet of an Application or SmartLink. | 3.6.0.0 |
Get-CfsLdapFilter | Retrieves the LDAP Filter of an Application or SmartLink. | 3.6.0.0 |
Get-CfsLevelOfAssurance | Retrieves the Level Of Assurance of an Application or SmartLink. | 3.6.0.0 |
Set-CfsLevelOfAssurance | Updates the Level Of Assurance of an Application or SmartLink. | 3.6.0.0 |
Get-CfsLoaHighlight | Retrieves whether the Level Of Assurance (LOA) Highlight setting is enabled for a federated Application (SAML2 or WS-Federation). | 3.17.11 |
Set-CfsLoaHighlight | Enables or disables the Level Of Assurance (LOA) Highlight setting for a federated Application (SAML2 or WS-Federation). | 3.17.11 |
Remove-CfsAppGroups | Removes a group from an Application or SmartLink. | 3.6.0.0 |
Set-CfsAppGroup | Updates the principal Group of an Application or SmartLink. | 3.6.0.0 |
Set-CfsGroupOwner | Updates the Group Owner of an Application or SmartLink. | 3.6.0.0 |
Set-CfsGroupSet | Updates the GroupSet of an Application or SmartLink. | 3.6.0.0 |
Set-CfsLdapFilter | Updates the LDAP Filter of an Application or SmartLink. | 3.6.0.0 |
Tenant Certificate
Name | Description | Since Version |
|---|---|---|
Get-CfsCertificate | Retrieves an X509Certificate2 used by a tenant. | 3.3.0.0 |
Get-CfsExpiringCertificates | Retrieves certificates that are expiring in 30 days in a tenant. | 3.17.8 |
Tenant and Application Certificates
The Set-CfsCertificate commandlet is used to update signing and encryption certificates for tenants and applications. It accepts certificates of type X509Certificate2.
Command | Scope | Description |
|---|---|---|
| Tenant | Updates the tenant signing certificate. |
| Application (signing) | Updates the signing certificate for a specific application. |
| Application (encryption) | Updates the encryption certificate for a specific application. |
Expiring Certificates
The Get-CfsExpiringCertificates commandlet is used to retrieve certificates that are nearing expiration across tenants, applications, and identity providers. It is supported in version 3.17.8 and higher.
It supports both scoped (per-tenant) and global queries, along with optional filters for expiration time and error handling.
By default, the command returns certificates expiring within the next 30 days, unless a different value is specified using the -Days parameter.
Command | Scope | Description |
|---|---|---|
| Tenant | Retrieves expiring certificates for the specified tenant. |
| Application (single) | Retrieves expiring certificates for a specific application within the tenant. |
| Identity Provider (single) | Retrieves expiring certificates for a specific identity provider within the tenant. |
| Applications (tenant-wide) | Retrieves expiring certificates for all applications in the specified tenant. |
| Identity Providers (tenant-wide) | Retrieves expiring certificates for all identity providers in the specified tenant. |
| Full tenant scope | Retrieves all expiring certificates (tenant, applications, and identity providers) within the tenant. |
| Applications (global) | Retrieves expiring certificates for all applications across all tenants. |
| Identity Providers (global) | Retrieves expiring certificates for all identity providers across all tenants. |
| Tenants (global) | Retrieves expiring certificates for all tenants. |
| Full global scope | Retrieves all expiring certificates (tenants, applications, and identity providers) across all tenants. |
| Filtered global | Retrieves certificates expiring within the specified number of days (e.g., 60 days). |
| Resilient global | Retrieves all expiring certificates while skipping any that cause errors. |
Tenant and Application Certificate Rollovers
Name | Description | Since Version |
|---|---|---|
Add-CfsNextCertificate | Add the next certificate for tenant or application for certificate rollover. Can use existing certificate ( | 3.17.5 |
Get-CfsCertificateStatus | Checks the status of tenant or application certificates. | 3.17.5 |
Start-CfsCertificateRotation | Manually rotates tenant or application certificates. | 3.17.5 |
Start-CfsCertificateEmergencyMigration | Emergency migration for expiring certificates. Options for new or existing certificate. | 3.17.5 |
Challenge Questions
Name | Description | Since Version |
|---|---|---|
Add-CfsChallengeQuestion | Adds a Challenge Question for the tenant. | 3.3.0.0 |
Get-CfsChallengeQuestion | Retrieves the Challenge Questions for the tenant. | 3.3.0.0 |
Remove-CfsChallengeQuestion | Removes a Challenge Question for the tenant. | 3.3.0.0 |
Emails
Name | Description | Since Version |
|---|---|---|
Get-CfsEmail | Retrieves an Email configuration for the tenant. | 3.3.0.0 |
Get-CfsEmailTemplateBase | Retrieves the Email Template Base for the tenant. | 3.3.0.0 |
Set-CfsEmail | Updates an Email configuration. | 3.3.0.0 |
Set-CfsEmailTemplateBase | Updates the Email Template Base for the tenant. | 3.3.0.0 |
Identity Providers
Certificate
Name | Description | Since Version |
|---|---|---|
Disable-IdpCertificate | Disables Certificate Authentication for the tenant. | 3.6.0.0 |
Enable-IdpCertificate | Enables Certificate Authentication for the tenant. | 3.6.0.0 |
Get-IdpCertificate | Retrieves the Certificate Authentication configuration for the tenant. | 3.6.0.0 |
Form-Based
Name | Description | Since Version |
|---|---|---|
Disable-IdpFba | Disables Login / Password Authentication for the tenant. | 3.6.0.0 |
Enable-IdpFba | Enables Login / Password Authentication for the tenant. | 3.6.0.0 |
Get-IdpFba | Retrieves the Login / Password Authentication configuration for the tenant. | 3.6.0.0 |
Set-IdpFba | Updates the Login / Password Authentication configuration for the tenant. | 3.6.0.0 |
RSA SecurID
Name | Description | Since Version |
|---|---|---|
Disable-IdpRsa | Disables RSA SecurID Authentication for the tenant. | 3.6.0.0 |
Enable-IdpRsa | Enables RSA SecurID Authentication for the tenant. | 3.6.0.0 |
Get-IdpRsa | Retrieves the RSA SecurID Authentication configuration for the tenant. | 3.6.0.0 |
Set-IdpRsa | Updates the RSA SecurID Authentication configuration for the tenant. | 3.6.0.0 |
Yubico
Name | Description | Since Version |
|---|---|---|
Disable-IdpYubico | Disables Yubico Authentication for the tenant. | 3.8.0.0 |
Enable-IdpYubico | Enables Yubico Authentication for the tenant. | 3.8.0.0 |
Get-IdpYubico | Retrieves the Yubico Authentication configuration for the tenant. | 3.8.0.0 |
Set-IdpYubico | Updates the Yubico Authentication configuration for the tenant. | 3.8.0.0 |
RTC
Name | Description | Since Version |
|---|---|---|
Disable-IdpRtc | Disables an RTC. | 3.6.0.0 |
Enable-IdpRtc | Enables an RTC. | 3.6.0.0 |
Get-IdpRtc | Retrieves an RTC for the tenant. | 3.6.0.0 |
New-IdpRtc | Create a new RTC. | 3.6.0.0 |
Remove-IdpRtc | Removes a RTC. | 3.6.0.0 |
Trusted
Name | Description | Since Version |
|---|---|---|
Disable-IdpTrusted | Disables a Trusted Identity Provider | 3.6.0.0 |
Enable-IdpTrusted | Enables a Trusted Identity Provider. | 3.6.0.0 |
Get-IdpTrusted | Retrieves a Trusted Identity Provider for the tenant. | 3.6.0.0 |
New-IdpTrusted | Create a new Trusted Identity Provider. | 3.6.0.0 |
Remove-IdpTrusted | Removes a Trusted Identity Provider. | 3.6.0.0 |
Two-Step
Name | Description | Since Version |
|---|---|---|
Get-IdpTwoStep | Retrieves the Two-Step Verification configuration for the tenant. | 3.6.0.0 |
Set-IdpTwoStep | Updates the Two-Step Verification configuration for the tenant. | 3.6.0.0 |
Identity Store
Name | Description | Since Version |
|---|---|---|
Get-CfsIdentityStore | Retrieves the ObjectClass and Attribute configuration for the tenant. | 3.3.0.0 |
Set-CfsIdentityStore | Updates the ObjectClass and Attribute configuration for the tenant. | 3.3.0.0 |
Mappings
Name | Description | Since Version |
|---|---|---|
Add-CfsMapping | Adds an application Mapping. | 3.6.0.0 |
Get-CfsMapping | Retrieves an application Mapping. | 3.6.0.0 |
Get-CfsNameIdentifier | Retrieves an application Name Identifier definition. | 3.6.0.0 |
Remove-CfsMapping | Removes an application Mapping. | 3.6.0.0 |
Set-CfsMapping | Updates an application Mapping. | 3.6.0.0 |
Set-CfsNameIdentifier | Updates an application Naming Identifier definition. | 3.6.0.0 |
Messaging Service
Name | Description | Since Version |
|---|---|---|
Disable-CfsMessagingService | Disables the Messaging Service. | 3.3.0.0 |
Enable-CfsMessagingService | Enables the Messaging Service. | 3.3.0.0 |
Get-CfsMessagingService | Retrieves the Messaging Service configuration. | 3.3.0.0 |
Set-CfsMessagingService | Updates the Messaging Service configuration. | 3.3.0.0 |
OpenID Connect
Name | Description | Since Version |
|---|---|---|
Disable-CfsOpenIDConnect | Disables the OpenID Connect Application. | 3.3.0.0 |
Enable-CfsOpenIDConnect | Enables the OpenID Connect Application. | 3.3.0.0 |
Get-CfsOpenIDConnect | Retrieves an OpenID Connect Application. | 3.3.0.0 |
New-CfsOpenIDConnect | Creates a new OpenID Connect Application. | 3.3.0.0 |
Redo-CfsOpenIDConnect | Generates new keys for the OpenID Connect Application. | 3.3.0.0 |
Set-CfsOpenIDConnect | Updates the OpenID Connect Application. | 3.3.0.0 |
Settings
Name | Description | Since Version |
|---|---|---|
Get-CfsSettings | Retrieves the settings object ( | 3.3.0.0 |
Set-CfsSettings | Updates the settings for the current tenant. Example: | 3.3.0.0 |
As of CFS 3.17.11, the TenantSettingsPSModel object returned by Get-CfsSettings (and accepted by Set-CfsSettings) includes the following new property:
Property | Type | Description | Default |
|---|---|---|---|
| Boolean | When |
|
Example: disable LOA Highlight for the tenant
$settings = Get-CfsSettings
$settings.LoaHighlight = $false
Set-CfsSettings -Settings $settings

# Verify
(Get-CfsSettings).LoaHighlight
# Expected: False
Smart Links
Name | Description | Since Version |
|---|---|---|
Disable-CfsSmartLink | Disables a Smart Link. | 3.3.0.0 |
Enable-CfsSmartLink | Enables a Smart Link. | 3.3.0.0 |
Get-CfsSmartLink | Retrieves a Smart Link. | 3.3.0.0 |
New-CfsSmartLink | Creates a new Smart Link for an Application. | 3.3.0.0 |
Remove-CfsSmartLink | Removes a Smart Link. | 3.3.0.0 |
Set-CfsSmartLink | pdates a Smart Link | 3.3.0.0 |
Social Networks
Name | Description | Since Version |
|---|---|---|
Get-CfsSocialNetwork | Retrieves all the Social Network configurations. | 3.3.1.0 |
Get-Facebook | Retrieves the configuration of the Social Network Facebook. | 3.3.1.0 |
Set-Facebook | Updates the configuration of the Social Network Facebook. | 3.3.1.0 |
Get-GitHub | Retrieves the configuration of the Social Network GitHub. | 3.4.0.0 |
Set-GitHub | Updates the configuration of the Social Network GitHub. | 3.4.0.0 |
Get-Google | Retrieves the configuration of the Social Network Google. | 3.3.1.0 |
Set-Google | Updates the configuration of the Social Network Google. | 3.3.1.0 |
Get-Instagram | Retrieves the configuration of the Social Network Instagram. | 3.3.1.0 |
Set-Instagram | Updates the configuration of the Social Network Instagram. | 3.3.1.0 |
Get-LinkedIn | Retrieves the configuration of the Social Network LinkedIn. | 3.4.0.0 |
Set-LinkedIn | Updates the configuration of the Social Network LinkedIn. | 3.4.0.0 |
Get-Microsoft | Retrieves the configuration of the Social Network Microsoft. | 3.3.1.0 |
Set-Microsoft | Updates the configuration of the Social Network Microsoft. | 3.3.1.0 |
Get-PayPal | Retrieves the configuration of the Social Network PayPal. | 3.3.1.0 |
Set-PayPal | Updates the configuration of the Social Network PayPal. | 3.3.1.0 |
Get-Twitter | Retrieves the configuration of the Social Network Twitter. | 3.3.1.0 |
Set-Twitter | Updates the configuration of the Social Network Twitter. | 3.3.1.0 |
Get-WordPress | Retrieves the configuration of the Social Network WordPress. | 3.4.0.0 |
Set-WordPress | Updates the configuration of the Social Network WordPress. | 3.4.0.0 |
Get-Yahoo | Retrieves the configuration of the Social Network Yahoo. | 3.4.0.0 |
Set-Yahoo | Updates the configuration of the Social Network Yahoo. | 3.4.0.0 |
