AWS SSO
Return to all applications.
Create the application
- Log in as Tenant Administrator.
- Navigate to Applications | Gallery.
- Look for the application AWS SSO
- Click Configure.

Configuration in CFS
General
In the General tab you can define the general information of the application.
- Enable the application.
- Provide a name that will be displayed on the end user portal.
- You can change the logo of the application.
- The Group set is used to group the applications on the end user portal.
- Set the application minimum Level Of Assurance.
- Use the option Display on Portal to allow this application to appear on the end user portal or not.
The Smart Links link is used to configure Smart Links for this application.
You can also access directly the Metadata file by clicking the Metadata File link. This file might help you to configure the application (or service) side of this trust relationship.

Parameters
The Parameters tab contains the list of settings required to configure the application.
- Issuer - The identifier to use for CFS (i.e. https://cfs.domain.com )
- Audience - The AWS SSO Issuer URL
- Recipient - The AWS SSO ACS URL

- Signature Algorithm - Algorithm to use to sign the token.
- Digest Algorithm - Algorithm to use to generate the digest of the token.

Mappings
The Mappings tab contains the list of transformation required to generate the output token claims. Since this application supports it, you can send additional claims in your token. Click the "New Mapping" button to add a new mapping.

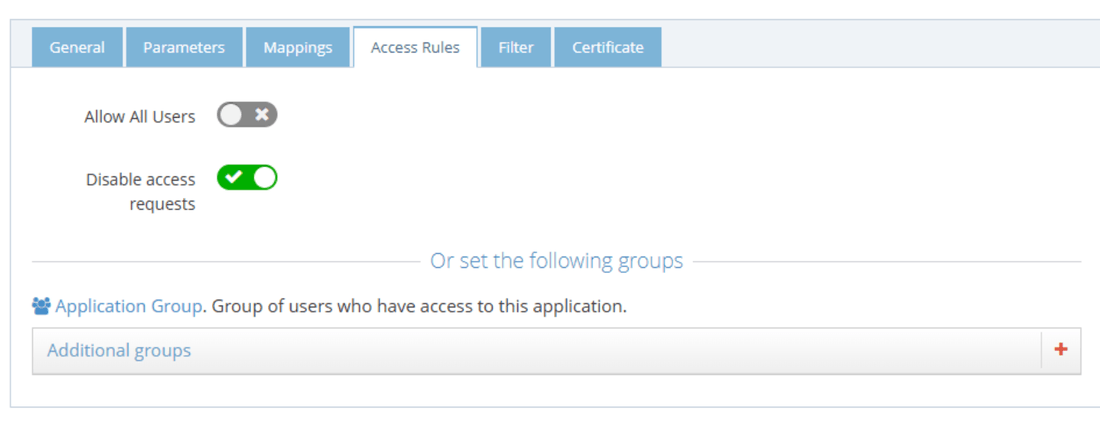
Access Rules
The Access Rules tab helps define the second layer of security (after LOA) to grant access to this application. By default, the access is limited to only the people in the Application Group which is a group created automatically by CFS when the application is created.
To grant access to this application, you can use one of the following options:
- Enabling Allow All Users option grants access to every user of your tenant (as long as the other security layers, LOA, COT... are accepted for the user).
- Use the Application Group to add users allowed to access this application. The users who are granted access to the application after an access request are automatically added to this group.
- Add Additional groups from the RadiantOne identity store.
There is also an option to disable users from seeing the "Request Access" feature entirely, providing you with more control over who can request access to your application.
Filters
The Filter tab is another security layer that allows to filter the access to the application by using the context of the user. This context is based on the attributes of the user retrieved from the RadiantOne identity store and the attributes generated by CFS like the Circle of Trust.

Certificate
The Certificate tab is used to define the certificate used by CFS to build the signature of the token it generates for the application. When configuring the application (or service), provide the public key of this certificate so the application can ensure that only CFS could have generated and signed the token. There are 3 options to provide this certificate to the application.
- Default Tenant Certificate - CFS generates a certificate for each tenant and stores it the RadiantOne identity store. This is the default certificate that is used for all applications.
- Upload a private key - You can upload your own certificate (private plus public key) and it will be used for this application only. This certificate is stored in the RadiantOne identity store, and can be used from any CFS machine.
- Upload a public key - You can upload your own certificate (public key only). This public key is stored in the RadiantOne identity store, but the private key must be installed in the Windows Vault and made available on each CFS machine that will sign the application tokens. This is the most secure way to sign a token because the private key never travels on your network between the RadiantOne identity store and the CFS machines.

Configure AWS SSO
- Log into your AWS SSO console at https://console.aws.amazon.com/singlesignon/home.
- In the Recommended Setup Steps section, click Option 1: Choose your identity source.
- In the Identity Source section, click 'Change' next to the Identy Source entry.

-
Ensure that the External Identity Provider radio button is chosen.

-
In the CFS configuration settings for the application, under the General tab, click Metadata File, and save the content in a text file on your computer.
-
Back on the AWS SSO console, under the Service provider metadata section, click the Show individual metadata values, and copy the appropriate values into the parameters section of the CFS application configuration page. Note that the AWS SSO Sign-in URL is not needed in the parameters section.

-
In the Identity provider metadata section, click the Browse... button, and upload the metadata file you just saved from CFS.

-
Click Next: Review
-
If prompted to Review and Confirm, do so by typing ACCEPT in the screen that appears.

-
Click Change Identity Source in the bottom left corner of the screen.
-
If everythings is successful, the following screen should show. If not, you will need to reconfigure the identity provider.

Note about the Mappings for AWS SSO
The AWS SSO documentation specifies that the SAML nameID must be in the format of email address. However, you can use a value from the entry in the RadiantOne identity store that doesn't look like an email address (i.e. uid, or samAccountName).
Just ensure that:
-
The Mappings tab in the CFS AWS SSO configuration correctly maps to the attribute of the entry in the RadiantOne identity store. For example:


-
The username value in AWS SSO matches the value in the RadiantOne identity store.

