Integrate and configure a Global Identity Builder custom data source
The custom data source example described in this section is Azure AD. RadiantOne includes a default custom data source to virtualize Azure AD. Edit this data source to point to your Azure AD. You must have an application registered in your Azure AD and have the APPLICATION ID and PASSWORD KEY before proceeding with the following steps.
If you have not already registered an application in Azure AD, you must do so prior to configuring RadiantOne. If you need help registering an application, see the RadiantOne Namespace Configuration Guide or the Microsoft Azure AD documentation.
Customize data source
The Azure application APPLICATION ID and PASSWORD KEY are required to configure the Azure AD data source.
- On the Main Control Panel > Settings tab > Server Backend section, go to Custom Data Sources.
- On the right, select mgraph and select Clone.
- Enter a data source name and select Clone. Select OK to exit the confirmation. In this example, the data source is named
azureadglobalrlitenant.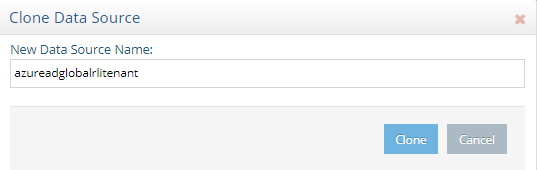
- Choose the new data source (for example
azureadglobalrlitenant) and select Edit.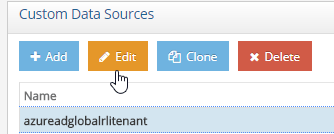
- Choose the
usernameproperty and select Edit. - Enter the value of the Azure AD Application ID and select OK.
- Choose the
passwordproperty and select Edit. - Enter the password key associated with your Azure AD application and select OK.
- Choose the
oauthurlproperty and select Edit. Enter the URL for your Azure AD tenant (for examplehttps://login.microsoftonline.com/{YOUR_TENANT_NAME}/oauth2/v2.0/token) and select OK. - Choose the
activeproperty and select Edit. - Set the value to
trueand select OK. - Select Save.
Create virtual view
RadiantOne includes a default virtual view for Azure AD. Edit this virtual view to point to your Azure AD custom data source configured in the previous section.
- Launch RadiantOne Context Builder and select the View Designer perspective.
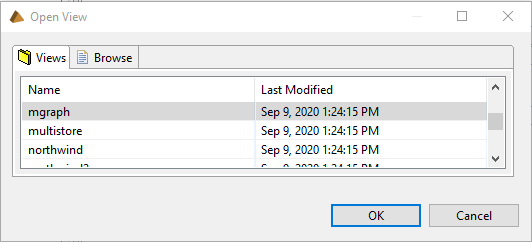
- Choose File > Open > View.
- Choose the mgraph view and select OK.
- Choose File > Save As and enter a file name (for example
azureadglobalrlitenant). - Select OK.
- On the Tree View tab, right-click on the view name and select Edit Connection String.
- Select Edit.
- Choose the custom data source created in the previous section and select OK.

- Select OK to exit the connection string dialog.
- Since contacts and devices are not needed for this use case, on the Tree View tab, right-click on Category=contacts and choose Delete. Select Yes, to confirm.
- On the Tree View tab, right-click on Category=devices and choose Delete. Select Yes, to confirm.
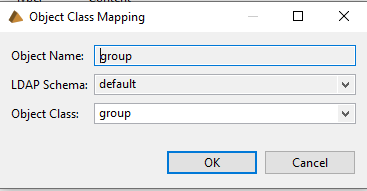
- The default group object class need remapped to a common name because the group settings allowed by the Global Identity Builder are currently,
group,groupOfNamesandgroupOfUniqueNames. On the Tree View tab, expand category=groups and select group.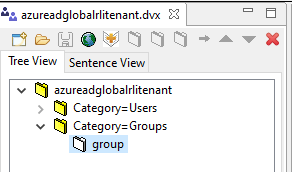
- Select the Properties tab and locate the Object Class.
- Select Edit next to Object Class.
- From the drop-down list, choose group and select OK.
- Select
 to save the view.
 - In the RadiantOne Main Control Panel, go to the Directory Namespace tab.
- Select New Naming Context.
- Enter a naming context (for example
o=azuread) and select the Virtual Tree type. - Select Next.
- Choose the Use an existing view (.dvx) option and select Browse.
- Choose the virtual view created in Context Builder (saved in step 1. above) and select OK.
- Select OK and then OK again to exit the confirmation.
- Select the Main Control Panel > Directory Browser tab and select
 to re-load the tree.
 - Navigate to the root naming context created in step 21. Expand the tree and verify your Azure AD user and groups are returned.
Configure persistent cache
Prior to using FID as an identity source in your Global Identity, configure and initialize a persistent cache for your virtual views.
- Select the Main Control Panel > Directory Namespace tab.
- Select Cache.
- Select Browse to navigate to the naming context you want to cache.
- Select Create Persistent Cache.
- On the Refresh Settings tab, choose the type of cache refresh strategy you want to use. For details on the different refresh options and how to initialize the cache, see the RadiantOne Deployment and Tuning Guide.
- After the persistent cache is configured, choose the cached branch below Cache and on the Refresh Settings tab, select Initialize.
- If you selected a Real-time refresh strategy, configure the connectors accordingly and start them. For details, see the Connector Properties Guide and the Deployment and Tuning Guide. If you selected a periodic cache refresh approach, configure the refresh interval. For details, see the Deployment and Tuning Guide.
Add RadiantOne cache as an identity source in the project
After configuring a persistent cache, add it as an an identity source. This will enable synchronization between your identity source and the global profile.
- Select Add Identity Source to add an identity source to a project.
- Enter the required properties.

- Select Save changes.
- Configure attribute mappings.
- Select Save Mappings.
- Configure correlation rules.
- Select Save Rules.
- Upload Azure AD entries into the global profile.
To learn more about Global Identity Builder, please read the chapter that describes how to address group membership challenges.