RadiantOne Configuration and Administration
There are several options available for securing the RadiantOne configuration and administration. Firewalls can be configured to allow only permitted traffic to pass through. Intrusion Prevention Systems (IPS) can detect and identify anomalous behaviors. Using secure channels and strong authentication, Virtual Private Networks (VPNs) help secure the network perimeter. Logical Unit Number masking and zoning is an authorization process that makes the unique identifier of a storage device that executes input/output commands available to some hosts and unavailable to others.
Put in Place Proper Firewall Rules
Outside access to a production deployment of RadiantOne is generally only required for client access to RadiantOne which is on the LDAP/LDAPS port, the web services ports (HTTP/HTTPS), and/or the VRS port. All other ports, mentioned later in this section (e.g. Control Panel, Admin Service, ZooKeeper) can be inaccessible to outside clients, enforced by the needed firewall rules.
Generally, RadiantOne is deployed behind a hardware load balancer that is charge of directing client traffic to the appropriate node(s). If there is a load balancer, then it can be configured with firewall rules as the only access from outside the network. Then, the load balancer is the only thing accessing the RadiantOne nodes. This allows the cluster nodes, inside the network, to be able to communicate with each other with fewer restrictions.
Each RadiantOne node must be able to communicate to the other nodes on the following ports (these are configurable during install). Therefore, the firewall rules for these ports must be inbound and outbound. Note here that the non-SSL ports can be disabled if desired.
For more information on disabling non-SSL access, see the Forbid Access to RadiantOne on the Non-SSL Port section.
The default TCP ports defined during install are described here. You might have changed these defaults.
-
Standard LDAP: 2389 and 636 or 1636 (SSL)
-
Control Panel HTTP Ports: 7070 and 7171 (SSL)
-
RadiantOne Web Service HTTP Ports: 8089 and 8090 (SSL)
-
RadiantOne Admin Service HTTP Ports: 9100 and 9101 (SSL)
-
Zookeeper (configuration management): 2181 (ZK Client port), 2182 (JMX), 2888(ZK Ensemble port), 3888 (ZK Leader Election Port)
If you are using third party tools, that are monitoring the above components, then all ports listed above might be required for their service. Also, if you want to allow administration/configuration of RadiantOne remotely, the Control Panel HTTP port must be made available.
-
SMTP emails for alerts and other notifications use outbound ports 25 and 465 (SSL).
-
Task scheduler ports 1099 and another random port between 49,000-65,000 do not need inbound or outbound connectivity. However, they must be accessible by localhost. This is used for running tasks on a RadiantOne node. Tasks are associated with initializing or exporting stores/persistent cache, re-indexing, etc.
Protect and Monitor Access to the Directory Manager Account
The directory manager account (e.g. cn=Directory Manager by default, this is defined during RadiantOne installation) is a super user account that is managed locally by RadiantOne without password or lockout policies. To mitigate against online password cracking attacks against this account, use a strong password that is:
- At least 9 characters long
- Does not contain any dictionary words
- Contains a mixture of uppercase, lowercase, numbers and special characters
Provide this password only to trusted administrators with business need for super user access. Monitor failed login attempts to this account using a Security Incident and Event Management (SIEM) system such as RSA envision or others. Other accounts used by RadiantOne are managed by backend data sources and subject to lockout policies associated with those backend data sources.
Limit Usage of Directory Manager Account
Knowledge and usage of the RadiantOne super user (e.g. cn=Directory Manager) credentials should be limited. It is highly recommended to use the delegated administrator accounts to manage RadiantOne configuration instead of the super user account. Add your users to the appropriate delegated administrator groups to define the roles they should have for managing the RadiantOne configuration. For details on what activities the delegated administrators can perform, please see the RadiantOne System Admin Guide.
For details on updating the RadiantOne super user (e.g. cn=directory manager) credentials, see the RadiantOne Operations Guide.
Limit Access as Directory Manager to Specific Clients
To help prevent against the unwarranted use of the directory administrator account, you can set specific IP addresses from where the directory administrator account can connect to the RadiantOne service from. This value can be a single IP address or a list of IP addresses separated by a comma. The syntax can also support a range of IP addresses. Both IPv4 and IPv6 addresses are allowed and a mix of both is supported.
This parameter can be changed in the Main Control Panel > Settings Tab > Administration section. On the right side, set the value below the Allowed IPs parameter.
If you use this setting, you must list the IP address of each RadiantOne node in addition to the addresses from all servers you want the directory administrator to connect from. If RadiantOne is deployed in a cluster, you must list all IP addresses for all nodes.
For more details and example syntax, please see the RadiantOne System Administration Guide.
Protect and Monitor Access to the Underlying Host Where RadiantOne is Deployed
RadiantOne locally stores passwords and/or certificates to access backend data sources.Although these credentials are obfuscated, a determined attacker with the right level of access to the underlying host could recover them to use in an unauthorized fashion. To mitigate this threat:
- Apply operating system ACLs to limit exposure of these files:
<RLI_HOME>\vds_server\datasources\ldap.xml <RLI_HOME>\vds_server\datasources\database.xml <RLI_HOME>\vds_server\datasources\custom.xml <RLI_HOME>\vds_server\data<all files and folders>
- Restrict access to underlying host to trusted administrators with operational need to access hosts.
- Monitor access to underlying host using a SIEM system such as RSA envision.
If deploying a cluster, each node/machine in the cluster should be protected and monitored based on the recommendations in this section.
RadiantOne offers a command line configuration utility (<RLI_HOME>/bin/vdsconfig.bat/.sh) that must be run on the same machine where RadiantOne is installed. Restrict access to the machine (and the ability to execute this utility) to trusted administrators with operational needs to use this command line configuration utility. Requiring a username and password to be passed in the commands can also be enabled in ZooKeeper. Please see the Command Line Configuration Guide for details on how to enable this.
Secure Access to Log Files
RadiantOne can be installed on an encrypted drive (e.g. BitLocker on Windows or Linux-equivalent) to limit exposure to log files. In the RadiantOne Main Control Panel you can configure log location to write to a secure, encrypted drive where strict system-level write permissions are enforced for the user account under which the RadiantOne service runs.
RadiantOne also offers a Log2DB utility that can write logs into any secure JDBC-accessible database you choose. For details on configuring log location and writing into a database, see the Logging and Troubleshooting Guide.
Require Credentials for Making Configuration Changes from Command Line
By default, the commands available in the vdsconfig utility can be executed by anyone who can launch the utility and the change, as tracked by Zookeeper, is logged as simply that the change was made from the command line utility. The only exception here is when the command is updating a property containing a password. In this context, the RadiantOne super user credentials are required. If you want to enforce that credentials are required to execute any command in the vdsconfig utility, add "enableVdsConfigAuth" : true to the vds_server.conf settings in Zookeeper. For details on changing this setting and how it impacts the vdsconfig utility, see the RadiantOne Command Line Configuration Guide.
Update Default Delegated Admin Account Passwords
There are eight groups used for delegated administration are Directory Administrator, Namespace Administrator, Operator, Schema Administrator, ACI Administrator, ICS Administrator, ICS Operator, and one role for Read Only access. Default administrative users are included as members of these groups. They are as follows:
uid=aciadmin,ou=globalusers,cn=config Member of the ACI Administrator Group.
uid=icsadmin,ou=globalusers,cn=config Member of the ICS Administrator Group.
uid=icsoperator,ou=globalusers,cn=config Member of the ICS Operator Group.
uid=namespaceadmin,ou=globalusers,cn=config Member of the Namespace Administrator Group.
uid=operator,ou=globalusers,cn=config Member of the Operator Group.
uid=readonly,ou=globalusers,cn=config Member of the Read Only Group.
uid=schemaadmin,ou=globalusers,cn=config Member of the Schema Administrator Group.
uid=superadmin,ou=globalusers,cn=config Member of the Directory Administrator Group.
You can use these default users for delegated administration of RadiantOne activities, or you can add your own users to the various admin roles as described in the Managing Delegation Administration Roles section in the RadiantOne System Administration Guide. To use the default users, you can log in to the Main Control Panel with any of the following (depending on the configuration you want to manage). For details on the privileges and associated activities these users can perform, please see the RadiantOne System Administration Guide.
user: aciadmin password: <set to the same password you defined for the super user (cn=directory manager) during the installation>
user: icsadmin password: <set to the same password you defined for the super user (cn=directory manager) during the installation>
user: icsoperator password: <set to the same password you defined for the super user (cn=directory manager) during the installation>
user: namespaceadmin password: <set to the same password you defined for the super user (cn=directory manager) during the installation>
user: operator password: <set to the same password you defined for the super user (cn=directory manager) during the installation>
user: readonly password: <set to the same password you defined for the super user (cn=directory manager) during the installation>
user: schemaadmin password: <set to the same password you defined for the super user (cn=directory manager) during the installation>
user: superadmin password: <set to the same password you defined for the super user (cn=directory manager) during the installation>
By default, the password for the delegated admin accounts is set to the same password you defined for the super user (cn=directory manager) during the installation of RadiantOne. It is recommended that you change these passwords to match your company security policy and/or follow the same recommendations as detailed in Protect and Monitor Access to the Directory Manager Account. You can also define strong password policies to ensure further protection of these accounts. Or you can delete the default users and assign your own.
To change the password:
-
Log in to the Main Control Panel as the directory manager and select the Directory Browser tab.
-
Navigate below cn=config > ou=globalusers.
-
Select the entry representing the user whose password you want to change. On the right side, select the userPassword attribute.
-
From the Modify Attribute drop-down menu, select Edit. An editable userpassword field displays above the attribute list.
-
Change the value here in the userpassword field. Click OK.
Below is an example of changing the aciadmin user’s password.
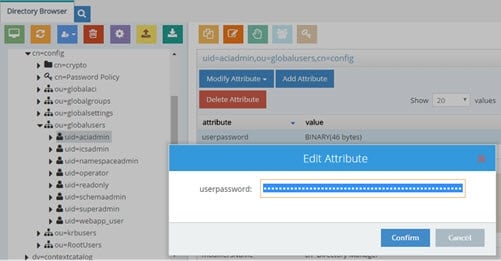
Figure 1.1 : Changing Passwords
Configure Strong Password Policies
RadiantOne offers advanced password policy settings that can be a combination of the following:
-
Allowing users to change their own passwords (require existing password to change).
-
Password strength (minimum length, required uppercase characters, required special characters, required digits and required lowercase characters, required to pass a dictionary check).
-
Password history (prevent password re-use).
-
Forcing passwords changes after reset.
-
Maximum password age.
-
Allowing grace logins after password expires.
-
Multiple password storage schemes are supported (e.g. Salted SHA-1, Salted SHA-256, Salted SHA-384, Salted SHA-512, BCrypt, SCrypt, and PBKDF2)
-
Account lockout – if a user has not authentication successfully for longer than a specified period of time or if a user has reached the failed login threshold.
-
Account expiration.
For details on password policy properties, see the RadiantOne System Administration Guide.
Assign Appropriate Personnel to Delegated Administration Roles
There are eight default delegated administration groups/roles available for managing the RadiantOne configuration. Only members of these groups can login to the Main Control Panel.
The eight groups used for delegated administration are Directory Administrator, Namespace Administrator, Operator, Schema Administrator, ACI Administrator, ICS Administrator, ICS Operator, and one role for Read Only access. To add or remove members, log into the Main Control Panel as the super user and click on the Directory Browser tab. Navigate below ou=globalgroups,cn=config node to locate all of the groups. Select the group you want to manage and click the Manage Group button. From here you can remove users from groups and search for new users (located anywhere in the RadiantOne namespace) to add to groups. For complete configuration steps, see the RadiantOne System Administration Guide.
It is recommended that only users required to configure and administer RadiantOne get assigned to these groups.
Leverage PIV Cards to Login to the Control Panel
Log into the Control Panel using a PIV Card/Certificate as an alternative to using username and password. For details on this configuration, please see the RadiantOne System Administration Guide.
Configure SSL between RadiantOne and ZooKeeper
By default, communication between RadiantOne (client) to ZooKeeper is over a non-SSL port. The basic configuration and state information that are stored in ZooKeeper pose a generally low security risk. However, if your corporate policies dictate that all internal services must connect to each other via SSL/TLS, you can configure this secure connection between RadiantOne nodes and ZooKeeper. A high-level architecture depicting the certificates involved is shown below.

The configuration of SSL between RadiantOne and ZooKeeper must be configured after installation. When you install RadiantOne, make sure you indicate the ZooKeeper connection using the hostname and not the IP address as it must match the hostname (or SAN) of the ZooKeeper server certificates.
If you use SSL connectivity between RadiantOne and ZooKeeper nodes, take note that the non SSL port 2181 is still open in ZooKeeper. The following link explains the problem:
https://issues.apache.org/jira/browse/ZOOKEEPER-3166. The work-around is to use firewall rules to block traffic on that non-ssl port in ZooKeeper.
As outlined in the diagram above, each node (RadiantOne and ZooKeeper nodes) currently maintains their own certificate truststores. The following steps outline the overall process and use the default certificates included in the installation. For production, you will replace these certificates with your own CA-signed ones, and if you use a known/trusted Certificate Authority then you shouldn’t need to import the public key certificates into all the corresponding truststores (as outlined in the steps below). For test environments, you can follow the steps below to configure mutual authentication.
If you plan to use RadiantOne in FIPS-Mode, you must configure it before configuring SSL between RadiantOne FID and ZooKeeper. If FIPS-Mode is used:
-
A FIPS keystore "fidzk_fips.keystore" is automatically added under "\vds_server\conf" -- which is required for ZK SSL/TLS client running in FIPS mode;
-
A line "zk.client.isFipsMode=true" is automatically added into "\vds_server\conf\cloud.properties";
-
TLSv1.3 is automatically deactivated after enabling FIPS mode.
-
(Optional) If you plan to use RadiantOne FID in FIPS-Mode, configure it now by following the instructions in the RadiantOne_FIPSMode Guide.
-
Copy the ZooKeeper public key certificate (
/rli-zookeeper-external/zookeeper/conf/zk .cer file) from each ZooKeeper server to each RadiantOne node. 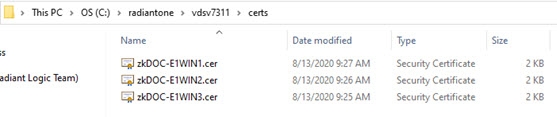
-
Copy the ZooKeeper public key certificate (
/zookeeper/conf/zk .cer file) from each ZooKeeper node to all other ZooKeeper nodes. Each ZooKeeper node should have the corresponding public key certificate for all other nodes in the ensemble. 
-
On each RadiantOne node, import the zk
.cer files into <RLI_HOME>/vds_server/conf/fidzk.truststore. This can be done with keytool. An example is shown below, your install paths and keystore password may vary. <RLI_HOME>\jdk\bin\keytool -import -alias zk:E1WIN1 -keystore'
C:\radiantone\vds\vds_server\conf\fidzk.truststore -file
C:\radiantone\vdsv7311\certs\zkDOC-E1WIN1.cer -storepass radiantlogic -storetype
JKS –noprompt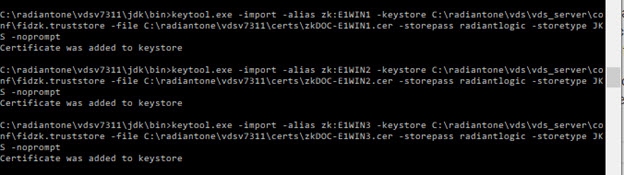
-
Copy the RadiantOne public key certificate (<RLI_HOME>/vds_server/conf/fidzk-
.cer file) from each RadiantOne node to each ZooKeeper server. An example is shown below, your install paths may vary. 
-
On each ZooKeeper server, import the fidzk-
.cer files into /zookeeper/conf/zk.truststore. This can be done with keytool. An example is shown below, your install paths and keystore password may vary. <ZooKeeperInstall>/rli-zookeeper-external/jdk/bin/keytool.exe -import -alias fidzk:W-RLI10-LISAPC -keystore
C:\ZooKeeper\rli-zookeeper-external\zookeeper\conf\zk.truststore -file C:\ZooKeeper\rli-zookeeper-external\fidzk-W-RLI10-LISAPC.cer -storepass radiantlogic -storetype JKS –noprompt
-
On each ZooKeeper server, import the
zk-<hostname>.cerfiles (corresponding to all other servers in the ZooKeeper ensemble) into/rli-zookeeper-external/zookeeper/conf/zk.truststore. This can be done with keytool. An example is shown below, your install paths and keystore password may vary. <ZooKeeperInstall>/rli-zookeeper-external/jdk/bin/keytool.exe -import -alias zk1:zkDOC-E1WIN1 -keystore C:\ZooKeeper\rli-zookeeper-external\zookeeper\conf\zk.truststore -file C:\ZooKeeper\rli-zookeeper-external\zkDOC-E1WIN1.cer -storepass radiantlogic -storetype JKS -noprompt
-
On each ZooKeeper server, modify
/rli-zookeeper-external/zookeeper/conf/zoo.cfg and set the secureClientPort and sslQuorum (they are in the file, so you can uncomment them by removing the # at the beginning of the line). An example is shown below.
secureClientPort=2155sslQuorum=true -
(Optional) to allow both non-SSL and SSL access to ZooKeeper, uncomment portUnification=true and/or client.portUnification=true in the zoo.cfg file on each ZooKeeper server.
-
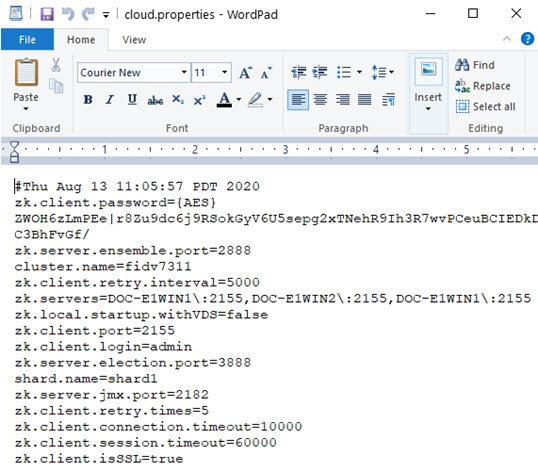
On each RadiantOne node, modify <RLI_HOME>\vds_server\conf\cloud.properties and add zk.client.isSSL=true.
-
Change the zk.client.port and zk.servers properties in the cloud.properties file to match the secureClientPort you set in the ZooKeeper zoo.cfg file. An example is shown below.
-
Stop the RadiantOne service on all nodes.
-
Stop all ZooKeeper services in the ensemble.
-
Restart the ZooKeeper services one at a time until all servers are back online.
-
Restart the RadiantOne service on all nodes. Once the RadiantOne service is back online, you should see the Main Control Panel > Dashboard tab indicate the ZK SSL port.
Using Your Own Certificates
Environment variables can be used to indicate your own keystores (the type will be inferred from the filename .pem, .p12 or .jks. If there is no extension, then JKS is the default type used):
For ZooKeeper Servers:
"ZK_KS_PASS" = ZK Keystore pass
"ZK_KS_PATH" = ZK Keystore path
"ZK_TS_PASS" = ZK Truststore pass
"ZK_TS_PATH" = ZK Truststore path
For RadiantOne Servers:
"ZK_CLIENT_KS_PASS" = RadiantOne Keystore pass for ZK
"ZK_CLIENT_KS_PATH" = RadiantOne Keystore path for ZK
"ZK_CLIENT_TS_PASS" = RadiantOne Truststore pass for ZK
"ZK_CLIENT_TS_PATH" = RadiantOne Truststore path for ZK
ZooKeeper ACLs
Best practice is to tighten the ZooKeeper ACLs when deploying RadiantOne in production.
ZooKeeper Usage:
- /zookeeper - Node stores metadata of ZooKeeper itself.
- /zookeeper/quota - Stores quota information.
- /zookeeper/config - Stores the current dynamic configuration.
Default ACLs:
- /zookeeper - world:anyone:cdrwa
- /zookeeper/quota - world:anyone:cdrwa
- /zookeeper/config - world:anyone:r
To limit client access to ZooKeeper to only RadiantOne (the user/creds in cloud.properties), you can use the following command:
<RLI_HOME>/bin/advanced/cluster.bat enforce-zk-system-acl
Migrating to a PBE-enabled Environment
RadiantOne generates a random master key by default to use for encrypting information in configuration files. You can migrate from the default encryption process to using a more secure PBE method by following the guidance below.
The migration process involves exporting your existing configuration, installing RadiantOne with PBE enabled, and importing the configuration from your existing deployment.
The RadiantOne configuration can be exported from one machine/cluster and imported into another. The export needs to happen on only one node in a cluster (as all nodes share the same config) and needs to be imported on only one node in the cluster of the target environment.
Ensure you have the latest patch applied before migrating to a PBE-enabled environment: v7.3.30 or v7.4.8.
Exporting the Existing Environment
This section describes exporting the contents of the existing environment configuration. The RadiantOne configuration is stored in various files which makes the task of manual migration a painful and error-prone process. The Migration Utility automates the process of moving the configuration files from one RadiantOne machine/cluster to another.
To use the migration utility to export the configuration from the the existing environment, follow the steps below.
For details on customizing the migration plan, see the RadiantOne Migration Utility Guide.
-
Download the latest migration utility (at least v2.1) from the Radiant Logic support site and unzip it on both the source machine (from where you are exporting) and the target machine (where you plan on importing). Contact Support ([email protected]) for credentials and location of the Migration Utility.
-
On the source machine, lock configuration changes to ensure no changes are being made while the configuration is exported. Log into the Main Control Panel as a directory administrator and go to Settings tab > Configuration > Configuration Lock and toggle the option to the Locked position. Click Save.
-
On the source machine, from a command prompt, navigate to the location where you unzipped the migration utility.
-
Run the migration command (modifying the version of the migration tool and the location of the export file to match your needs).
C:\r1\migration\radiantone-migration-tool-2.1.7/migrate.bat export /home/ec2-user/exportfromnopbe.zip
Installing RadiantOne with PBE Enabled
To use Password-based encryption (PBE) to generate the key, you must use a silent install and indicate vds.security.pbe.enabled=true in the \vds\install\install.properties file before using Instance Manager to install RadiantOne. Refer to the RadiantOne Installation Guide for more information.
Importing Configuration into the PBE-enabled Environment
All RadiantOne services EXCEPT ZooKeeper must be stopped on the target machine prior to importing. If you have deployed RadiantOne in a cluster, only the services on the machine you are importing into need to be stopped. ZooKeeper servers in the ensemble must be running prior to importing.
Run <RLI_HOME>/bin/advanced/stop_servers.bat (use stop_serers.sh on Linux) on all RadiantOne cluster nodes. This ensures that all RadiantOne services are stopped.
Run <RLI_HOME>/bin/runZookeeper.bat (use runzookeeper.sh on Linux) on all RadiantOne cluster nodes. ZooKeeper on all nodes must be running.
Specifying RLI_HOME
If you do not have an RLI_HOME system environment variable set, you must pass the location where you have RadiantOne installed when you run the Migration Utility. An example of importing configuration on Linux where RadiantOne is installed in /home/r1user/radiantone/vds, can be seen below.
./migrate.sh /home/r1user/radiantone/vds import test2.zip cross-environment
Performing the Import
Copy the export file to the target PBE-enabled machine and with the RadiantOne services stopped (all except for ZooKeeper), run the import command. A Windows example of the command is shown below.
C:\r1\migration\radiantone-migration-tool-2.1.7\migrate.bat import C\tmp\exportfromnopbe.zip cross-environment
Post-import Tasks
After the import process finishes, two additional tasks must be completed on the target environment.
Restarting RadiantOne
Restart the RadiantOne service on all cluster nodes.
Re-initializing a Persistent Cache
Persistent cache should be re-initialized during off-peak hours, or during scheduled downtime, since it is a CPU-intensive process and during the initialization queries are delegated to the backend data sources which might not be able to handle the load.
Cache refresh connectors do not need to be stopped to re-initialize the persistent cache.
-
Deactivate any inter-cluster replication on the cached branch prior to re-initializing. To do so, navigate to the cached branch on the Main Control Panel > Directory Namespace Tab and on the right side, uncheck “Inter-cluster Replication”, then click Save. Click Yes to apply the changes to the server.
-
With the cached node selected, on the Refresh Settings tab, click Initialize.
-
Choose to either initialize the cache by creating an LDIF file or from an existing LDIF file. Typically, you would always use the default option which is to create an LDIF file. The only time you could choose to use an existing file is if you already have an up-to-date LDIF file containing all of the needed entries.
-
Click OK. A task is launched to re-initialize the persistent cache. The task can be monitored and managed from the Server Control Panel > Tasks Tab associated with the RadiantOne leader node.
-
Click OK to exit the initialization wizard.
-
Click Save in the upper right corner.
-
Re-enable Inter-cluster Replication that was deactivated in step 1.