Using the LDAP Browser
The following procedures describe how to:
Configure Browser to Connect to LDAP Directories via SSL
Manage Directory Profiles
To view the directory through the LDAP Browser, a profile must be created.
Create a Profile
This stores the information needed to connect to the directory.
-
Start the LDAP Browser from <RLI_HOME>/bin/LDAPBrowser.exe. On UNIX platforms use, $RLI_HOME/bin/runLDAPBrowser.sh.
-
Choose File > New.
-
Enter the parameters needed to connect to the LDAP directory. This includes server name, port, user and password (if required), Base DN, and the name to save the file as. See Figure 1.
This profile is stored in a .prof file and can be found in <RLI_HOME><instance_name>\ldif\profiles directory.
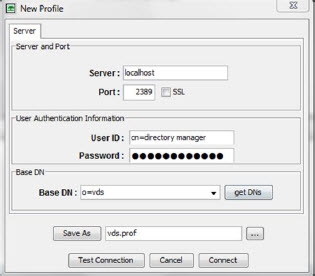
Figure 1: New Profile
Create a Profile for RadiantOne
Make sure that the RadiantOne service’s LDAP port is running. You can start it from the Dashboard tab in the Main Control Panel. For more details on starting the RadiantOne service, please see the System Administration Guide.
The parameters needed to connect to the RadiantOne LDAP service are as follows:
-
Server – the name of the machine where RadiantOne is installed
-
Port – by default this is 2389
-
User/Password – not required if anonymous access is allowed to the RadiantOne service. Otherwise you can use cn=directory manager with the password you set during the RadiantOne install
-
Base DN – by default this is set to o=vds
-
Save Profile as – enter any name you choose
Open a Profile
Opens the LDAP Directory tree by loading the values from the selected profile file. The left pane displays the directory tree.
If you already have a profile open, you should disconnect before trying to open a different profile.
-
Choose File -> Open/Connect.
-
Select the profile and click Connect. See Figure 2.

Figure 2: Open Profile
Edit a Profile
The loaded profile can be edited. The different parameters can be modified and the new values are automatically changed in the profile.
-
Choose Modify > Profile > Edit.
-
Enter new parameters and click Next.
You can also click on the Edit Profile button on the toolbar to reach this same menu.
Delete a Profile
The loaded profile can be deleted.
- Choose Modify Profile > Delete.
- Click Yes to confirm the deletion. See Figure 3.

Figure 3: Delete Profile
Modify Directory Content
Adding Entries
- Right-click on the node above where you would like to add an entry and choose New Entry and choose the type of entry.
if you choose the User entry type, this uses the inetOrgPerson objectclass. If you choose Active Directory User, the entry uses the User object. The Active Directory User option is only for adding users into Active Directory. If you want to add a new entry using a different objectclass, then choose the More option. If you are trying to insert a new entry through RadiantOne, then you must make sure the correct objectclass appears in the RadiantOne LDAP schema (or else it is not displayed in the Object Class drop-down list when you select the More option). For details on extending the LDAP schema, please see the RadiantOne System Administration Guide.
-
Enter the information about the new entry. See Figure 4.
-
Click OK when finished.
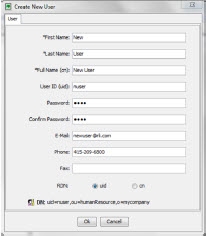
Figure 4: Add New Entry
Deleting Entries
-
Right-click on the entry to be deleted and choose Delete Entry.
-
A confirmation box is displayed. Click Yes to proceed with the deletion (See Figure 5).
You will be notified if the entry has children. You will have the option to delete the child nodes too.
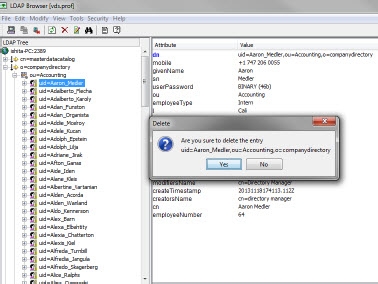
Figure 5: Delete Entry
Modifying Entries
Updating Attributes
Attributes of the selected entry can be modified if the connected user has permissions to do so.
-
Select the entry in the tree.
-
On the right side, double-click on the attribute you have permission to change.
-
Enter a new value and click OK. See Figure 6.
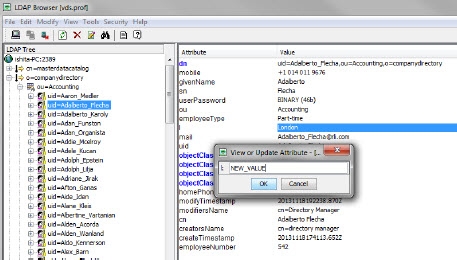
Figure 6: Edit Attribute
If you want to add a value to a multi-valued attribute, right-click on the attribute and choose Add > Value. Provide a new value on the line provided.
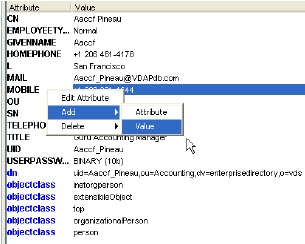
Figure 7: Adding a Value for a Multi-Valued Attribute
Only attributes that have values are displayed in the LDAP Browser. If you want to add a value for an attribute that does not yet have one, right-click on any of the existing attributes and choose Add > Attribute. Select the attribute you want to add from the drop-down list and provide a value.
Editing Binary Attributes
The LDAP Browser can be used to view, edit, and update binary attributes like photos, audio, and certificates.
If an attribute is binary, the value is displayed with BINARY as the value. Double-clicking on the attribute displays the binary editor.
You have the option to save the attribute (Save As), view, or insert a new value (Insert From). If it is an audio attribute, you have the option to play it.

Figure 8: Viewing a Binary Photo Attribute
Deleting Attributes
Attributes of the selected entry can be deleted if the connected user has permissions to do so.
-
Select an entry on the left side.
-
In the right pane, right-click on the attribute and choose Delete > Attribute.
Required attributes cannot be deleted. To remove a value of an attribute (for multi-valued attributes), choose the Delete > Value option.
- A confirmation box is displayed. Click Yes to proceed with the deletion. See Figure 9.
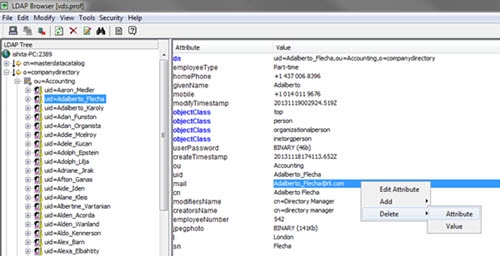
Figure 9: Delete Attribute
Refreshing the Tree
This feature allows for refreshing the tree under the selected entry. Use this function if the tree structure has changed but the changes are not visible.
Right-click on the branch that has changed, and choose Refresh.
Configure Browser to Connect to LDAP Directories via SSL
The LDAP Browser is a Java LDAP client. As such, you can use it to connect to LDAP directories over SSL. The LDAP directory server certificate needs to be imported into the cacerts database for the LDAP Browser (unless it is signed by a known Certificate Authority).
There are two methods that can be used: keytool or the Main Control Panel.
Using Keytool to Import the Certificate File
You must send the LDAP server certificate file to the client machine(s), which commutes via SSL with the directory server. The following command can be used to import the certificate into the keystore for the LDAP Browser:
>C:\radiantone\jdk\jre\bin>keytool -import -alias rli -keystore c:\radiantone\jdk\jre\lib\security\cacerts -file rli.cer
Java_Home>/lib/security/cacerts is the default truststore from JDK with password changeit and rli.cer is the server’s certificate in this example.
Using the Main Control Panel to Import the Certificate File
Since the RadiantOne service and the LDAP Browser share the same client certificate store by default, you can import the client certificates from the Main Control Panel.
-
In the Main Control Panel > Settings > SSL. In the Manage Certificates section, click the Manage button next to Client Certificates.
-
Click the Add Certificate button.
-
Click Browse and navigate to the location of the saved LDAP server certificate. Select the certificate and click Open. The certificate file is displayed. Click OK.
-
Click Add Certificate
-
Enter a name for the certificate and click OK.
-
Enter the Key Store password (which is changeit by default) and click OK.
-
The server certificate name should appear in the list. Click OK to exit the Manage Client Certificates window. See Figure 10.
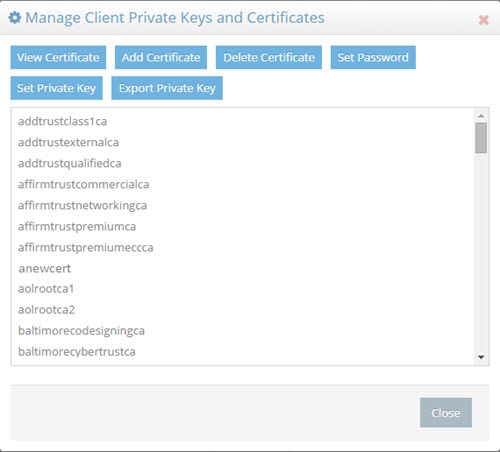
Figure 10: Managing Client Certificates
After the LDAP server certificate has been imported, in the connection profile, set the SSL port and check the SSL option. See Figure 11.
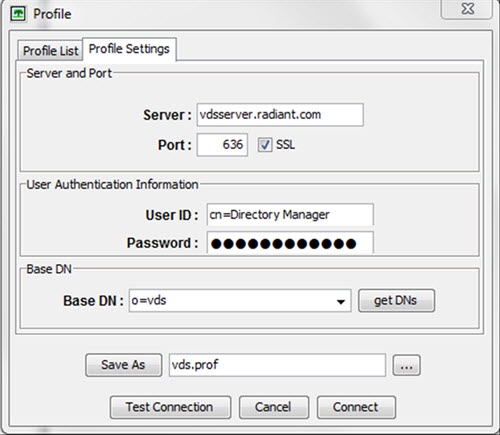
Figure 11: Connecting to the LDAP Server over SSL
Create an LDIF File for Populating a Directory
Entire trees and single entries coming from real or virtual directories can be easily exported to an LDIF file, or directly inserted into another LDAP Directory Server.
LDIF Functions
The LDAP Browser supports a simplified version of the LDIF file format. For example, it does not support 'changetypes'. All binary attributes are Base64 encoded.
Export Options
There are two basic Export functions:
-
Export to an LDIF file
-
Export to an existing LDAP Directory Server
Export to LDIF
This function saves the selected entry or entries into an LDIF file.
- Right-click at the level that you want to export and choose Export > Export To LDIF (See Figure 12).
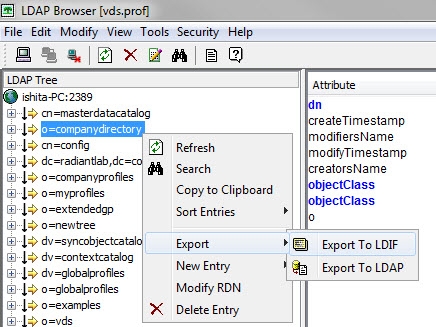
Figure 12: Export Menu
-
Enter the required information for the LDIF file. Depending on the scope option chosen, only the selected entry (one entry), the entries below this entry (one level), or the entire tree below this entry (sub tree) are exported to the LDIF file.
-
Select to export all entries or specify a maximum number of entries to be exported. Enter a name for the file or accept the default.
-
You can change the Target DN to whatever you need. In Figure 13, the Target DN has been set to ou=people,o=radiant.
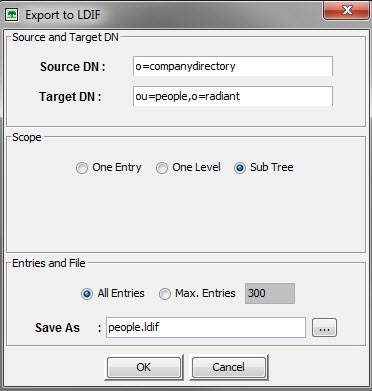
Figure 13: Configuring the LDIF File
-
Click OK when finished.
-
Click Yes to start exporting.
-
Click OK on the confirmation window.
The file that is generated is stored in the directory <RLI_HOME>\vds_server\ldif. This LDIF file is now available for importing into an existing LDAP directory server.
Export to LDAP
The entries under the selected DN can be exported to an existing LDAP directory using Export to LDAP.
-
Verify that a profile has been created for the destination LDAP directory (see Creating Profiles for more information).
-
Right-click on the branch/entry that needs to be exported and choose Export > Export to LDAP. See Figure 14.
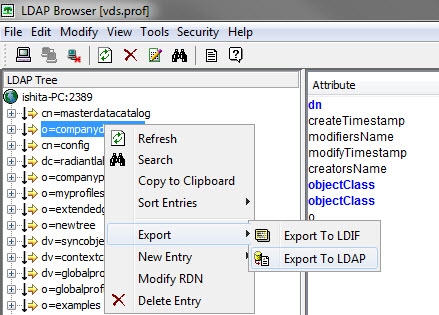
Figure 14: The Tree to be Exported to the LDAP Directory is Selected
-
Select the profile (.prof file) containing the destination LDAP directory.
-
Select the tree path where the branch to be exported should be created under.
-
Click Connect. The Select the Tree Path is displayed. See Figure 15.
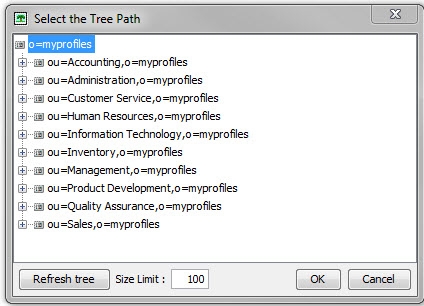
Figure 15: The Destination Directory with the Appropriate Branch Selected
- Enter necessary information for the export and click OK. Click OK to close the window confirming the import into the destination directory.