Directory Namespace design
The virtual namespace is managed from the Main Control Panel > Directory Namespace tab.
The Directory Namespace tab is not available on follower-only cluster nodes.
The RadiantOne namespace can be comprised of many different branches, each of which can come from a different configuration and be combined below a common naming context or have their own. The following are the options that can comprise the virtual Directory Information Tree (DIT):
RadiantOne includes some sample root naming contexts with the install. However, as mentioned above, you can create new naming contexts, and even configure multiple naming contexts.
From the Main Control Panel > Directory Namespace Tab, the Root Naming Contexts node displays all naming contexts configured in the directory. You can have as many naming contexts as you want. The naming contexts can be based on virtual trees (which aggregate multiple types of backends), local RadiantOne Universal directory stores, LDAP backends, database backends, web service backends, cloud services backends or any combination of the above.
You have the ability to hide root naming contexts so that when querying the rootDSE (by sending a query to RadiantOne using base dn=" "), some naming contexts are not displayed. This can be useful to optimize products like Tivoli Access Manager (TAM which is now known as iSAM) which tries to search for users in all published naming contexts. This is also useful when some naming context’s entries are only used as part of a join and do not need to be seen in the “global” tree. To hide naming contexts, edit the <RLI_HOME><instance_name>\conf\rootdse.ldif file and prefix the naming contexts you want to hide with “hiddenContexts” like shown below:
# hide some naming contexts
hiddenContexts: cn=cacherefreshlog
hiddenContexts: dv=syncobjectcatalog
After restarting the RadiantOne service, the hidden root naming contexts do not appear in the list of available naming contexts when a client queries the rootDSE. This affects the display of the root naming contexts in the rootDSE only, not the access to the actual branches.
Creating Naming Contexts
Root naming contexts can be created from command line using the VDSConfig Utility or from the Main Control Panel -> Directory Namespace tab. For details on creating root naming contexts from command line, please see the Radiantone Command Line Configuration Guide. To configure Root Naming Contexts from the Main Control Panel, click on the
 button on the Directory Namespace tab. Follow the steps outlined in Chapters 3-8 applicable to the type of backend you want to mount below the naming context.
Icon Descriptions
On the Main Control Panel > Directory Namespace tab, if a backend has been defined, the icon in the tree changes to show that it has been configured. All icons and corresponding descriptions are listed in the table below.
Icon | Description |
|---|---|
| Represents naming contexts and/or nodes associated with a virtual tree type of backend mapping. |
| Represents a node defined in a virtual tree/view as “label”. |
| Represents a node defined in a virtual tree/view as “container”. |
| Represents a node defined in a virtual tree/view as “content”. |
| Represents naming contexts and/or nodes associated with a backend database mapping. |
| Represents naming contexts associated with an internally used default RadiantOne Universal Directory store. |
| Represents naming contexts and/or nodes associated with a RadiantOne Universal Directory store. |
| Represents naming contexts and/or nodes associated with a backend directory mapping. |
| Represents naming contexts and/or nodes associated with a web service or cloud directory backend mapping. |
| Located in the Cache section. Represents a naming contexts and/or nodes configured for persistent cache with real-time refresh. For details on persistent cache with real-time refresh, see the RadiantOne Deployment and Tuning Guide. |
| Located in the Cache section. Represents a naming context and/or nodes configured for persistent cache with periodic refresh. For details on persistent cache with periodic refresh, see the RadiantOne Deployment and Tuning Guide. |
| Located in the Cache section. Represents a naming context and/or nodes configured for persistent cache with periodic or real-time automated refresh that are currently marked as “inactive”. For details on persistent cache with real-time refresh, see the RadiantOne Deployment and Tuning Guide. |
| Located in the Cache section. Represents a naming context and/or nodes configured for persistent cache without a refresh mechanism configured. The refresh process might be handled by an external, custom process. For details on persistent, see the RadiantOne Deployment and Tuning Guide. |
| Located in the Cache section. Represents a naming context and/or nodes configured for persistent cache without a refresh mechanism configured, that are currently marked as “inactive”. For details on persistent cache, see the RadiantOne Deployment and Tuning Guide. |
| Represents a directory backend naming context that has been cached. The corresponding cache configuration is located below the Cache section. |
| Represents a database backend naming context that has been cached. The corresponding cache configuration is located below the Cache section. |
| Represents a label level below a naming context that has been cached. The corresponding cache configuration is located below the Cache section. |
| Represents a node defined in a virtual tree/view as “content” below a naming context that has been cached. The corresponding cache configuration is located below the Cache section. |
| Represents a node defined in a virtual tree/view as “container” below a naming context that has been cached. The corresponding cache configuration is located below the Cache section. |
| Represents a virtual tree backend naming context that has been cached. The corresponding cache configuration is located below the Cache section. |


Deleting Naming Contexts
To delete a naming context, you must first deactivate it (and delete any child naming contexts first if there are any defined).
When deleting LDAP proxy naming contexts, the underlying <RLI_HOME>/vds_server/lod/<suffixname>.orx and <RLI_HOME>/vds_server/dvx/<suffixname>.dvx are removed. For all other types of virtual views, the underlying .orx and .dvx files remain if the naming context is deleted. This is because these files can be used or referenced from other virtual views. If you want to manually delete specific .orx and .dvx files, do so from the Main Control Panel > Context Builder tab. For details, see the RadiantOne Context Builder Guide.
-
From the Main Control Panel > Directory Namespace Tab, select the naming context you want to delete below the Root Naming Contexts node.
-
On the right side, uncheck the Active option and click Save.
-
Click Yes to apply the changes to the server.
-
Click OK to exit the confirmation.
-
Click Delete.
-
Click Yes to confirm the deletion.
-
Click OK to exit the confirmation.
Importing LDIF Files
Make sure the LDIF file is accessible from your leader node. To import entries from an LDIF file, click
 . Navigate to the location of the LDIF file (either a local file on the host machine where RadiantOne is installed or a file on the server in the <RLI_HOME> file system). Select the option to Add or Override Entries (this option adds new entries and updates entries that already exist) or Add Entries (This option adds entries only and does not try to update the entry if it already exists). Click OK to start the import task.
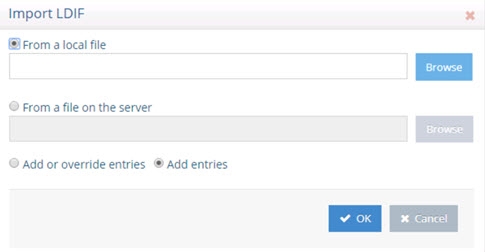
Figure 1: Import LDIF
Managing Attribute Properties for Virtual Entries
Virtual entries are comprised of attributes from the primary backend, secondary objects (from joins, if relevant), and computed attributes (if relevant). All attributes that comprise the virtual entries can be seen on the Objects tab, in the Virtual Attribute table. From the Main Control Panel -> Directory Namespace Tab, select the primary backend below Root Naming Contexts and on the right side, select the Objects tab.
If the primary backend is an LDAP directory and no primary object has been added, click Add to select one.
The Virtual Attribute table displays all attributes from the primary objects (noted with a blue square in the origin column), attributes from secondary objects (noted with a green square in the origin column) and computed attributes (noted with an orange square in the origin column).
To customize the display based on a particular attribute origin, use the Display drop-down list. The options are: All, Primary, Join and Computed. Use the “all” option to display attributes from primary objects, secondary objects and ones that are computed. Use the “primary” option to display only attributes from primary objects. Use the “join” option to show only attributes returned from secondary objects. Use the “computed” option to display only computed attributes.
If you only want to display attributes that are marked as visible (NOT hidden), check the “visible only” checkbox.
If you want to modify an attribute’s hidden status, searchability, updateability or priority, select the attribute in the list and click the Edit button.
If you change anything related to the attributes of the virtual object, click Save in the upper right corner and click Yes to apply the changes to RadiantOne.
Testing Authentication
You can test authentication for any entry in the RadiantOne namespace. To test authentication:
-
In the RadiantOne Main Control Panel, go to the Directory Browser tab.
-
Expand a root naming context and select an entry.
-
Click the
 button. The Test Authentication window opens.
 -
Enter the password and click the Test bind button. If the password is correct, the Test Authentication window returns the message “Binding successful”. If the password is incorrect, the Test Authentication window returns a message similar to the following.
Connection failed:javax.naming.AuthenticationException: [LDAP: error code 49 – Reason: 52e – Invalid credentials.