Introduction
Prior to diving into this guide, it is recommended that you read the RadiantOne Architect Guide for a high-level overview of the capabilities of the RadiantOne Platform. This guide introduces concepts in addition to step-by-step instructions to configure and administrate the RadiantOne.
For details on deploying RadiantOne including tuning and maintenance, please see the RadiantOne Deployment and Tuning Guide.
Technical Support
Before contacting Customer Support, please make sure you have the following information:
-
Version of RadiantOne.
-
Type of computer you are using including operating system.
-
The license number for your software.
-
A description of your problem including error numbers if appropriate
Technical support can be reached using any of the following options:
-
E-mail: [email protected]
-
Website: https://support.radiantlogic.com
Expert Mode
Some settings in the Main Control Panel are accessible only in Expert Mode. To switch to Expert Mode, click the Logged in as, (username) drop-down menu and select Expert Mode.

The Main Control Panel saves the last mode (Expert or Standard) it was in when you log out and returns to this mode automatically when you log back in. The mode is saved on a per-role basis.
RadiantOne Control Panels
The RadiantOne Control Panels are web-based interfaces to provide remote access to the most commonly used tools and wizards. The control panels are used by administrators to configure and maintain the service. In addition, the control panels offer monitoring, access to server statistics, reports, task management, and other administration options. It can be accessed from mobile or non-mobile devices including smartphones and tablets.
JavaScript must be enabled in the Internet browser you are using.
For cluster deployments, each RadiantOne node includes a Control Panel and administrators can log into any of them.
Starting the Control Panels
The Control Panels utilize a web server that is installed with RadiantOne. The default http port for the web server is 7070 (you can set the port during the RadiantOne install on the settings for the Control Panel). For details on starting the web server that hosts the Control Panels, please see the RadiantOne Deployment and Tuning Guide.
Accessing the Main Control Panel
If the Web Server is already started, you can also access the control panel by opening a web browser and use the following URL: <RadiantOne server machine>:<control panel port set during RadiantOne install>/main/login. You would also use this method for accessing the control panel from a remote machine.
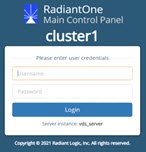
The Main Control Panel displays the name of the RadiantOne cluster.
The background color of the login screen can be customized after you log into the Main Control Panel. Click
![]() and enter a value for the Color Theme.
and enter a value for the Color Theme.
Logging in with Username and Password
You can log in using directory administrator (default cn=directory manager) as the user with the password you set for the directory administrator during the install of RadiantOne. The Control Panel also supports delegated administration accounts if you prefer not to use the directory administrator account. When a user logs in, the control panel application passes the credentials to RadiantOne for authentication. A user can either use their full DN (if known), or their user ID. However, to login with just a user ID, you must configure a user ID to DN Mapping.
The Main Control Panel displays a message when authentication fails. The table below lists the possible error messages.
Message | Cause | Solution |
|---|---|---|
“Authentication failed. Reason: Access is denied.” | Incorrect login ID or incorrect password. | Verify the login ID and password and try again. |
“Authentication failed. Reason: 532 - Password expired." | The user's password has expired. | If the client application supports password reset capabilities, the user can reset their password. |
“Authentication failed. Reason: [LDAP: error code 19 - The password failure limit has been reached and the account is locked. Please retry later or contact the system administrator to reset the password.]” | The account is locked. | Retry later or contact the system administrator to reset the password. |
If you are logged into the Main Control Panel and your password is set to expire soon due to a password policy, the Main Control Panel displays the following warning.
Last Login Time
The time the user last logged into the Control Panel is displayed next to the "Logged in as..." information shown in the top right.

Logging in with PIV Card/Smart Card/Certificate
You can log in using a PIV Card/Smart Card/Certificate as an alternative to using username and password. To support this functionality, login with the default super user account and configure the following.
-
If the client certificate is signed by a Certificate Authority (CA) known/trusted by RadiantOne, you can skip steps 1-5. Otherwise, go to the Main Control Panel, Settings tab, Security, Client Certificate Truststore.
-
In the Client Certificate Truststore section, click IMPORT.
-
Enter a name in the Certificate Alias property.
-
Choose the option to import file on the server or import a local file and browse to the public key certificate corresponding to the certificate on the PIV card of the user that should be allowed to login. Certificates imported into the Cluster Level Truststore are appended to the certificates contained in the cacerts store installed with the default JDK (<RLI_HOME>/jdk/jre/lib/security/cacerts). Therefore, all certificates not known/trusted by default should be imported into the Cluster Level Truststore.
-
Click OK.
-
On the Settings tab, Security section, SSL, click CHANGE next to Client Certificate DN Mapping.
The Client Certificate DN Mapping is only accessible by a member of the Directory Administrator role/group.
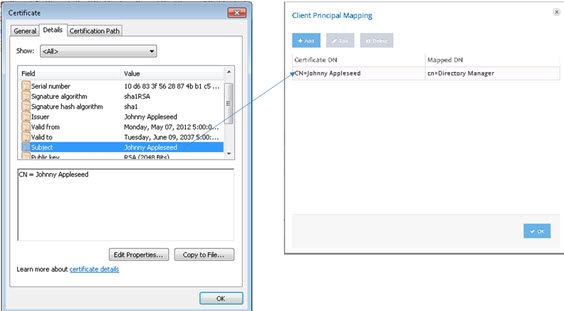
- Click ADD and set the Certificate DN to the subject in the user’s certificate. If the subject in the SSL certificate is blank, you can specify that a Subject Alternative Name (SAN) should be used. You can use an alternative name in the mapping by specifying {alt} before the regular expression. For example: {alt}^(.+)$ uses the first alternative name found. You can be more specific to specify which alternative name you want to match by specifying the type [0-8]. For example: {alt:0}^(.+)$ uses the otherName alternative name. The type number associated with each is shown below.
Alternative Name | Type Number |
|---|---|
otherName | [0] |
rfc822Name | [1] |
dNSName | [2] |
x400Address | [3] |
directoryName | [4] |
ediPartyName | [5] |
uniformResourceIdentifier | [6] |
iPAddress | [7] |
registeredID | [8] |
If the certificate subject/SAN fails to match a Client Certificate DN Mapping rule, the login to the Control Panel fails.
-
Set the mapped DN to any delegated admin user configured in RadiantOne. An example is shown below where the certificate subject is mapped to cn=directory manager.
NoteIf the RadiantOne service is not running, you are only able to log into the Main Control Panel with the directory super user account (e.g. cn=directory manager). If your Client Certificate DN mapping results in a user that is not the directory super user, and the RadiantOne service is not running, you will not be able to log into the Main Control Panel.
-
Click OK to exit the Client Principal Mapping window.
-
Click Save.
-
Open a Chrome Internet browser and use Ctrl+Shift+n to enter incognito mode (you can use other browsers, and it is also recommended to use Incognito/InPrivate mode to ensure no cache affects the behavior).
-
Access the Control Panel on the HTTPS port. E.g. https://w-rli10-lisapc:7171/main/login
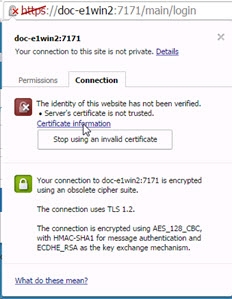
By default, the Control Panel leverages the same SSL server certificate as the RadiantOne service. Make sure this certificate is trusted by your computer/browser, otherwise the browser displays security warnings when you access the Control Panel over HTTPS. An example is shown below.

-
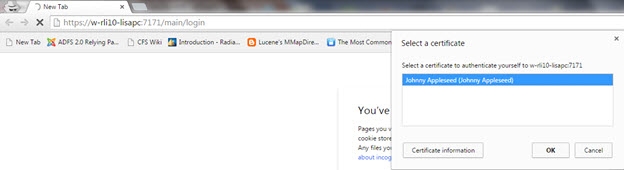
The Control Panel will request a certificate from the browser, so the browser will prompt the user with a list of loaded/trusted certificates. The user selects/confirms their certificate. An example is shown below.
-
CRL checking (if enabled) is applied and if the certificate is valid and trusted, the user is logged into the Control Panel and has the permissions associated with the user defined in the Client Certificate DN Mapping configured in steps 7&8 above.
-
Once logged into the Main Control Panel, the user is prompted to select the certificate again. This second prompt is to indicate the credentials to be used for the Directory Browser tab (as a REST client to the RadiantOne service).
If you log out of the Control Panel, you are redirected to the main login form. If you want to be prompted to select your certificate again, you must close and re-open your web browser.
Logging in with Two-factor Authentication
The Control Panel, as a client to the RadiantOne service, supports two-factor authentication for administrators to log in. This is supported through the Custom Authentication Provider framework and supports RSA SecurID and Yubikey token codes by default. High-level configuration steps to support two-factor authentication for RadiantOne administrators are outlined below. For details on Custom Authentication Providers, see the RadiantOne Custom Authentication Providers Guide.
Two-factor authentication is not required for the RadiantOne super user account (e.g. cn=directory manager). If a custom authentication provider is enabled for other RadiantOne delegated administrator accounts, the super user account is still able to log into the Control Panel without requiring two-factor authentication. This is to prevent complete lockout of server administration.
-
Create a custom data source that defines the connection to the web service for credentials validation.
-
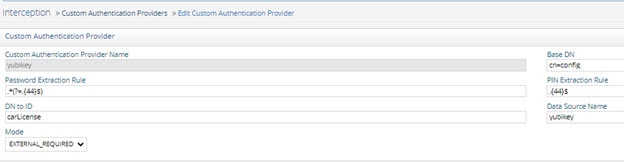
Configure a Custom Authentication Provider (Settings > Interception > Custom Authentication Provider) that indicates the base DN where administrator accounts are located (e.g. cn=config), reference to the custom data source created in step 1, and other necessary parsing criteria of the password.
-
Ensure the delegated administrator accounts have an attribute that contains their unique ID in the custom authentication service. In the example shown above, the token ID is set in the carLicense attribute.

-
Restart the RadiantOne service and Jetty (hosting the control panel). If a cluster is deployed, restart them on all nodes.
-
Log out/re-log into the Control Panel with the administrator password (in the password property) and one time code (in the passcode property). RadiantOne delegates the credentials checking based on the configuration defined in the Custom Authentication Provider.
Accessing the Control Panel over SSL
If you are using a self-signed server certificate (or any certificate not signed by a trusted/known Certificate Authority), you must install/trust the RadiantOne server certificate into your Internet browser. This can be done with the steps below.
-
Open your Internet Browser (as an administrator, in order to install the RadiantOne server certificate when prompted) and navigate to the Control Panel on the HTTPS port (e.g. https://radiantoneserver:7171).
-
The browser should warn you about the certificate. Select to continue/proceed.
-
Click on the "Certificate Error" red area in the address bar, to show information about the certificate.

-
Select the option to install the certificate, in Trusted Root Certificates.

-
Restart your browser after installing the certificate.
-
If your browser does not have the option to install it, you can export the certificate and then import it directly in your browser settings. Below is an example for Google Chrome.
-
Click the Certificate Information link.
-
On the Details tab, click Copy to File.
-
Click Next in the Certificate Export Wizard.
-
Choose DER encoded binary and click Next. Enter a file name (e.g. jetty.cer) and click Next.
-
Click Finish and then click OK.
-
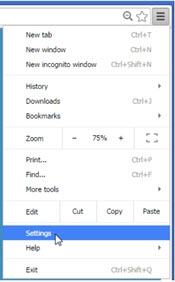
Go to your Internet browser settings. The example below shows the Google Chrome browser settings.
-
Under settings, click Show Advanced Settings.
-
Click Manage Certificates in the HTTPS/SSL section.
-
On the Trusted Root Certification Authorities tab, click Import.
-
Click Next in the Certificate Import Wizard.
-
Click Browse to navigate to the certificate file you exported above.
-
Click Next.
-
Click Next.
-
Click Finish.
-
Click OK to exit the confirmation.
-
Click Close to close the certificate window. Restart your browser and then go to the Main Control Panel again on the HTTPS port. You should not see the certificate warning anymore.
In cluster deployments, when you access the Main Control Panel via HTTPS, it connects to the RadiantOne service on the HTTPS web service port (https://rliserver:8090). To avoid connection problems, your browser must trust the RadiantOne server certificate of each cluster node.
OpenID Connect Token Authentication
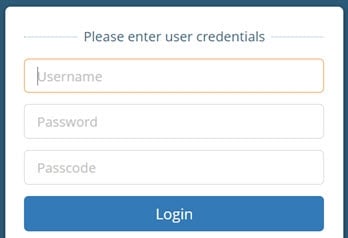
The RadiantOne Main Control Panel also supports OpenID Connect (OIDC) token-based authentication. This option provides the security of sending user login credentials to the authentication server (the Identity Provider), not the application (Control Panel, the Relying Party). OpenID Connect token authentication allows you to send your username and password just once, to the Identity Provider (IDP) and then pass the token in the request to the Main Control Panel. When OIDC is configured in RadiantOne, the Main Control Panel login screen displays:

The administrator must click the Login with OpenID Connect option to login with an OpenID Connect token. The high-level flow is shown below.

Detailed steps:
-
The RadiantOne Admin navigates his browser to the RadiantOne Main Control Panel and clicks “Login with OpenID Connect”.
-
The browser redirects the user to the OIDC Provider’s authorization endpoint with the necessary parameters (ClientID, redirect URI, scope).
-
The RadiantOne Admin will authenticate to OIDC server (if not already authenticated) and the OIDC server prompts the user for authorization: Control Panel wants to access info (scopes) about you. Do you Authorize this?
-
Admin user gives consent.
-
OIDC server gives Control Panel an Authorization code.
-
The Control Panel sends the OIDC server the authorization code and requests an ID token.
-
OIDC Server sends the ID token to Control Panel.
-
Control Panel uses the information in the token along with the OIDC to FID User Mapping rules to locate the user in the FID namespace to enforce permissions based on what delegated admin role the user is a member of – which dictates what the admin is allowed to do within the Control Panel.
To enable support for OIDC authentication:
-
Have your client ID and secret associated with the Control Panel application configured in your OIDC server ready. The Redirect URLs configured for the web application should point to the URLs associated with the Main Control Panel (one for the HTTP port and one for HTTPS:
http://hostname:7070/main/j_spring_openid_security_check
https://hostname:7171/main/j_spring_openid_security_check -
Log into the Main Control Panel.
-
Navigate to Settings > Security > OIDC Provider Configuration.
-
Select an OIDC Provider from the drop-down list. If you are using your own provider, select the Custom option.
-
Click Discover. The Authorization Endpoint URL and Token Endpoint URL should auto-populate. If you configure a custom provider, you can enter the needed Authorization Endpoint URL and Token Endpoint URL. In OpenID Connect the authorization endpoint handles authentication and authorization of a user. In the OpenID Connect Authorization Code Flow, the token endpoint is used by a client to obtain an ID token, access token, and refresh token.
-
Enter the Client ID associated with the Control Panel application configured in the OIDC provider.
-
Enter the Client Secret associated with the Control Panel configured in the OIDC provider.
-
Select the Client Authentication Method corresponding to how the Control Panel client has been configured in the OIDC Server. There are two options available: CLIENT_SECRET_POST and CLIENT_SECRET_BASIC.
-
Click the value for Requested Scopes to display a list of possible choices: openid, email, profile. Openid is required. You can add more if needed as long as they match the configuration of the client in the OIDC server.
-
Click Edit next to OIDC to FID User Mapping. This configuration determines the logic to link the user that logs into the Control Panel with an Open ID Connect token with an identity in the RadiantOne namespace. This process determines which identity is used to enforce authorization within the Main Control Panel. The user mappings must result in a single user. If no user is found or if more than one user is found, the login fails. The RadiantOne user that is linked to the authentication token must be a member of a RadiantOne Delegated Administrative group.
-
In the OIDC to FID User Mappings window, click Add.
-
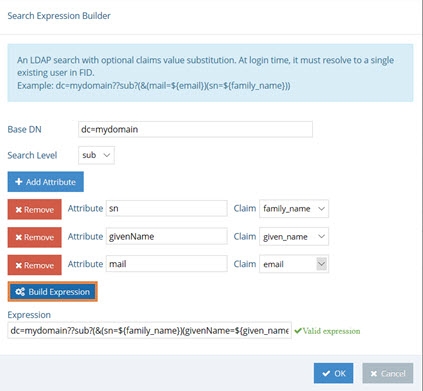
There are two options for identifying the RadiantOne admin user. If the RadiantOne user can be identified by using values/claims from the token to comprise the DN, use the Simple DN Expression Builder. If the RadiantOne user can be identified by performing a lookup in RadiantOne based on values from the token, use the Search Expression Builder.
-
Click Save.
Examples of configuring the Simple DN Expression and the Search Expression are shown below.
In the Simple DN Expression example shown below, the RadiantOne user is identified by using the given_name and family_name claims from the token to compute the DN.

In the Search Expression example shown below, the values of the family_name, given_name, and email claims from the token are used to condition a sub-tree search in RadiantOne, starting at the dc=mydomain naming context to locate the identity.
To disable support for OIDC authentication:
-
Log into the Main Control Panel.
-
Navigate to Settings > Security > OIDC Provider Configuration.
-
Click the Enabled toggle from on to off.

-
Click Save.
Auto-Logout
After 30 minutes of inactivity, a user is automatically logged out.
Adding a Custom Message on the Login Page
The Main Control Panel login page contains a basic username and password text box. You can configure a Custom Message as well.
Using the Main Control Panel
The Main Control Panel allows administrators to manage and monitor the RadiantOne service. If a cluster is deployed, all nodes can be monitored and managed from the Main Control Panel.
All settings configured in the Main Control Panel apply to all cluster nodes.
Node/server specific configuration is managed from the Server Control Panel. The Server Control Panel associated with each node can be launched from the Dashboard tab of the Main Control Panel.
The configuration and monitoring features described in this section are applicable to the Main Control Panel. Configuration and monitoring features associated with the Server Control Panel are described here.
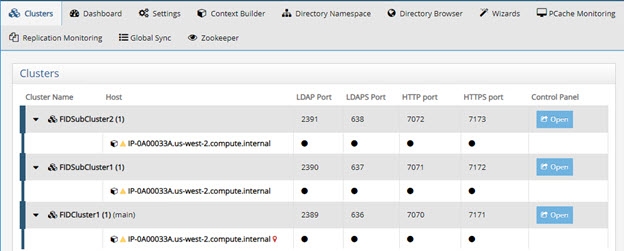
Clusters Tab
The clusters tab allows you to view subclusters. This tab is available only when one or more subclusters have been installed. For more information, refer to the RadiantOne Installation Guide.
Once a new subcluster is defined, you can click on the Open link to launch the Control Panel for that cluster.
Synchronization Tab
The Synchronization tab is used to configure and managing synchronization topologies. For details on configuring synchronization, see the RadiantOne Synchronization.

Zookeeper Tab
The Zookeeper tab is used for browsing and editing ZooKeeper contents. The configurations that are managed for all cluster nodes can be viewed from here. RadiantOne specific configuration is shown when expanding the RadiantOne node. ZooKeeper specific configuration is shown when expanding the zookeeper node.
This tab is accessible only in Expert Mode.
One of the key configuration nodes is vds_server.conf located at /radiantone/
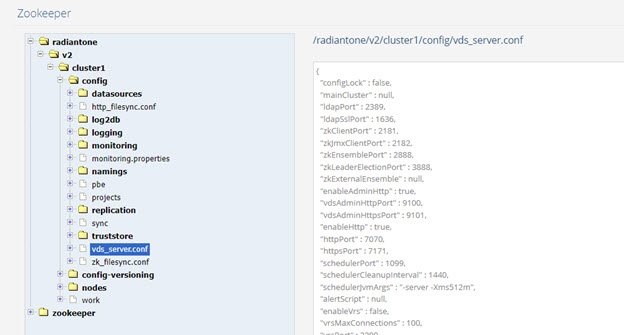
Certain nodes contain editable information. To modify settings for a specific node, click EDIT MODE. You can also import ZooKeeper configuration while in the EDIT MODE. This allows you to rollback to a previously saved ZooKeeper configuration or import configuration from another ZooKeeper (from another cluster for example). Click SAVE when you are finished.
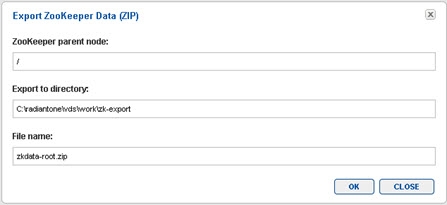
You can also export the ZooKeeper configuration (to make backup copies) by clicking EXPORT. Indicate the parent node in ZooKeeper from where you want to start exporting from. The default is the root (entire config). Indicate the directory to export the file to and the file name. This export can be used to save a backup of the ZooKeeper configuration.
Dashboard Tab
The dashboard tab is displayed upon successfully logging in to the Main Control Panel. It displays information that is valuable for every RadiantOne node.
Dashboard Settings
The Dashboard Settings options (
![]() ) located at the top of the Main Control Panel allow you to customize the Main Control Panel, including how statistics related to the RadiantOne service are gathered. Each configurable option is described below.
) located at the top of the Main Control Panel allow you to customize the Main Control Panel, including how statistics related to the RadiantOne service are gathered. Each configurable option is described below.

Color Theme
This option allows you to configure the background color of the top bar in the Main Control Panel and Server Control Panel. The background color is also used for the Main Control Panel login screen which can be useful, for example, if you want to differentiate between many clusters. Either enter the hexadecimal color code or select from the color chart that appears when you click in the Color Theme property. Changes made with this option affect the Main Control Panel and Server Control Panel for all nodes of the same cluster.
Refresh Interval (sec)
The refresh interval is the frequency at which the CPU, FID Memory and Disk usage are refreshed. The default value is 5 seconds.
Number of Nodes Displayed per Page
The number of nodes displayed per page indicates the number of RadiantOne cluster nodes shown on the Dashboard tab per page. The default is 3 which means if a cluster has more than 3 nodes, the additional nodes are displayed on different pages.
Usage Data Communication Timeout (sec)
The usage data communication timeout indicates how long the monitoring process should wait before determining the data usage of the node. The data usage is everything displayed on the Dashboard tab except for the components’ status (running or not). The default value is 5 seconds. If this value is exceeded, a spinning refresh icon (
 ) displays next to the node name.
Servers Connection Communication Timeout (sec)
The severs connection communication timeout indicates how long the monitoring process should wait for determining the status (running or not) of each component on the node. The default value is 10 seconds. If this value is exceeded, a red exclamation point icon displays next to the node name.
This setting is also used to determine how long to wait for an authentication response during the process of retrieving a token for ADAP to use on the Directory Browser tab (ADAP is the name of the RESTful Web Service API in RadiantOne). If the authentication has been delegated to a backend that is slow to respond, the ADAP token might not be generated, resulting in authentication errors when accessing the Directory Browser tab. Increasing the value in the Servers Connection Communication Timeout allows for more time to perform the authentication and generate the ADAP token.
Control Panel Session Timeout (min)
The Control Panel session timeout indicates how long until the current control panel session expires due to inactivity and the user is logged out. The default value is 30 minutes. To avoid reaching the control panel session timeout when both the Main and Server Control Panels are open, maintain activity in either control panel (activity in both control panels is not required).
Control Panel Max Concurrent Users
The Control Panel max concurrent user value indicates how many control panel sessions are allowed concurrently. This field accepts integer values of 0 and higher. The default value is 0, for an unlimited number of sessions. If attempting to connect to the Control Panel while the number of concurrent sessions is reached, the Login page displays the following message: “Authentication Failed. Reason: Maximum sessions exceeded”.
Absolute Session Timeout (min)
The absolute session timeout specifies the maximum duration of a Control Panel session, regardless of user activity. Unlike the standard session timeout (which resets on activity), this setting enforces a hard limit — once the specified number of minutes has elapsed since login, the user is automatically logged out and must re-authenticate. The default value is 0 (disabled). When set to a value greater than 0, the absolute timeout is enforced.
Absolute Timeout Warning (min)
The absolute timeout warning value (in minutes) specifies how long before the absolute session timeout the user should be alerted. When this threshold is reached, a warning banner is displayed in the Control Panel header, notifying the user that their session will expire soon. The default value is 0 (disabled). This setting has no effect if the Absolute Session Timeout is disabled (set to 0).
For example, if the Absolute Session Timeout is set to 120 minutes and the Absolute Timeout Warning is set to 10 minutes, a warning banner appears in the header after 110 minutes of session time, giving the user 10 minutes to save their work before being logged out.
Reset Node Status
The Reset button resets the nodes’ status. When an LDAP or ZooKeeper error occurs in the monitoring, it is reflected on the cluster dashboard. Past errors persist in the collectors for 12 hours and appear on the dashboard as a yellow warning icon with a message. The Reset button is to immediately clear the cache of the collectors and those messages so they no longer display on the Dashboard tab.
The OK button saves and applies the new settings. The Cancel button reverts the changes back to the previous settings.
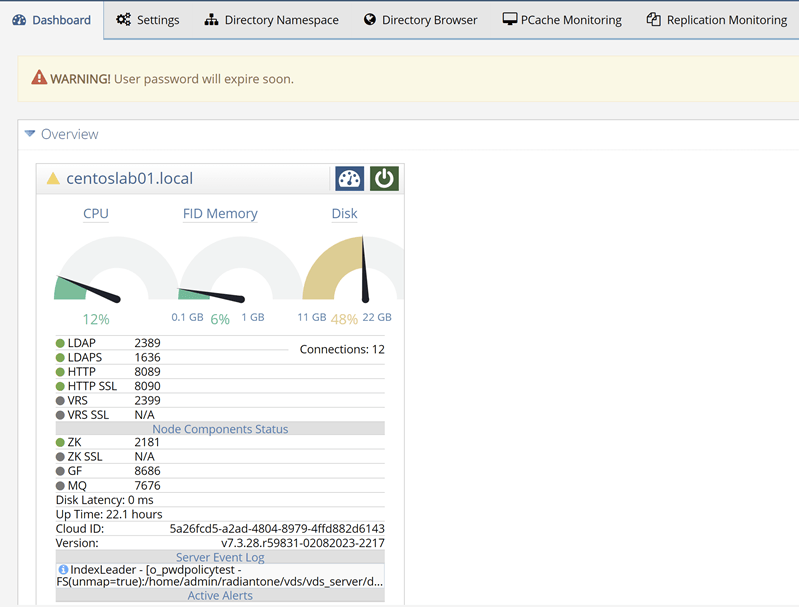
Overview Section
The Overview section displays the cluster nodes. You can see the status of services on the nodes and which node is the cluster’s RadiantOne leader (
 beside the server name) The RadiantOne leader node handles write operations for the cluster.
You can also determine the current RadiantOne leader by using the node-monitor data collector. For details, see the RadiantOne Monitoring and Reporting Guide.
You can start, stop and restart the RadiantOne service here by selecting an option from the
 drop-down menu, (as long as it is not configured to run as a service) and access the Server Control Panel associated with the node by clicking
 . You are only able to perform these operations if the Jetty Application Server hosting the Control Panel on a particular node is running. If it isn’t, these buttons are gray. A red exclamation point icon next to the node name indicates that the application server hosting the Control Panel is not running on the node. Go to the node machine to start the application server hosting the Control Panel.

For each node, the Overview section displays the status of:
- Current CPU usage
- Current FID memory usage
- Current disk usage
- RadiantOne service’s LDAP port
if “Bind requires SSL or StartTLS” is enabled, a message is displayed indicating “Secure Bind Required”.
- RadiantOne service’s LDAPS port
- RadiantOne service’s HTTP port
- RadiantOne service’s HTTPS port
- VRS (SQL) port
- VRS (SQL) SSL port
- ZooKeeper (ZK) on the node (in Node Component Status section). If ZK is running in a separate cluster instead of on the same machine as RadiantOne, the external ZK URL is shown. If SSL Is configured for the ZK connection, the SSL port is shown here.
- Disk latency
- Up time – how long the RadiantOne service on the node has been running.
- Version of RadiantOne installed on the node

A green dot next to the line item indicates the service/port is running.
A gray dot means the service is not running.
If there has been an error with the service during the past 12 hours, an orange exclamation point icon appears in the line item. Hover over the icon with your mouse to view the warning message.
If there is an error with the ZooKeeper service, a red X is shown in the line item. Hover over the icon with your mouse to view the error message.
If RadiantOne is deployed in a classic active/active or active/passive architecture, only one node is shown in the Overview section. If RadiantOne is deployed in a cluster architecture, each cluster node is shown in the Overview section. If the cluster has more than three nodes, a paging option is shown (i.e.
 ) in the upper right corner. Click to go to the next page where up to three additional nodes are displayed. You can page through the nodes three at a time. You can adjust the number of nodes that are displayed in the Dashboard Settings.
Server Event Log
The Server Events log aggregates major events on server nodes such as startup information, leader switches, and RadiantOne Directory (HDAP) store states. This log provides a quick diagnostic of the cluster status and feedback on the server initialization phases. The last status from the log is shown in the Main Control Panel’s Overview section, in the Server Event Log section for each node.
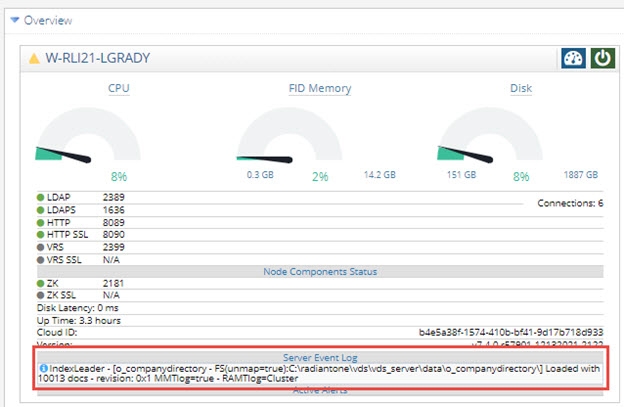
Click the status information to view the end of the Events Log. To view the entire log, open the log file directly from a text viewer like Notepad++. This log is located at <RLI_HOME><instance_name>\logs\vds_events.log.
Active Alerts
The Active Alerts section displays alert information about memory, connections, disk space, disk latency, and CPU usage. Standard alerts are configured in the Main Control Panel at Settings > Monitoring > Standard Alerts. Custom Alerts are configured in the Main Control Panel at Settings > Monitoring > Custom Alerts. When these alerts are activated, they are displayed on the Main Control Panel’s Dashboard tab.

For more information on configuring standard and custom alerts, refer to the RadiantOne Monitoring and Reporting Guide.
Internode Health Section
The Internode Health section displays a topology of all nodes in the cluster and information about the connectivity between the nodes. There are two lines between each node indicating the direction of connectivity.

If you hover the mouse pointer over a node, more details are shown. By default, this includes the availability of the LDAP and LDAPS ports for the RadiantOne service, and the ability to read and write to ZooKeeper on the target node. To toggle information about ZooKeeper or LDAP connectivity, check/uncheck the corresponding box in the upper-left corner of the Internode Health section.

A green checkmark means connectivity on the RadiantOne LDAP and/or LDAPS ports is fine and ZooKeeper can be read from and written to.
A red X means there is no connectivity on the LDAP and/or LDAPS ports for RadiantOne and/or ZooKeeper cannot be read from or written to.
You can also click on any icon depicting the server name to launch the Server Control Panel associated with that node.
Accessing the Server Control Panel
Once the Main Control Panel is started, you can also access the Server Control Panel by clicking
in the Overview section of the Main Control Panel’s Dashboard tab.
You can click the
 icon in the Internode Health section of the Main Control Panel’s Dashboard tab. The Server Control Panel opens in a new browser tab and you are automatically logged in based on the identity used in the Main Control Panel.
Using the Server Control Panel
The Server Control Panel allows RadiantOne administrators to configure and monitor a specific RadiantOne node. If a cluster is deployed, all nodes can be monitored and some aspects can be managed from the Main Control Panel. However, there are some configurations that must be managed separately for each node like server certificates.
Node/server specific configuration is managed from the Server Control Panel. The Server Control Panel associated with each RadiantOne server can be launched from the Dashboard tab of the Main Control Panel.
The configuration and monitoring features described in this section are applicable to the Server Control Panel. Configuration and monitoring features associated with the Main Control Panel are described here.
Dashboard Tab
A series of graphs are displayed on the Dashboard tab and allow for monitoring a variety of aspects related to a given RadiantOne node. The graphs display CPU usage, JVM memory usage, disk space usage, disk latency and number of client connections.
To use this feature, enable the cluster monitor at Main Control Panel > Settings > Logs > Clustermonitor.
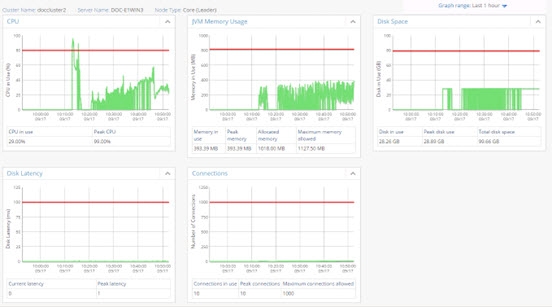
In the upper right, you can indicate the time range the graphs should display. To indicate a time period of longer than 12 hours, choose the Custom option.

It is generally not recommended to expand the graph range beyond a 12-hour period since it causes a large amount of HTTP and LDAP requests to RadiantOne that is proportional in quantity to the length of the time period requested. For example, a 12-hour period generates ~100 requests.
Usage & Activity Tab
From the Usage & Activity tab on the Server Control Panel, you can access information about the RadiantOne software version installed on the node, monitor the current connections and operations, view statistics for all RadiantOne Directory (HDAP) stores and view network latency between nodes (only applicable to cluster deployments).
Server Information
Specific product details associated with the node are shown in the Server Information section.

Server Name – Indicates the machine name where RadiantOne is installed.
Resolved IP – The resolved IP address associated with the host name of the machine.
Port – Indicates the non-SSL (LDAP) port for the RadiantOne service.
SSL Port – Indicates the SSL (LDAPS) port for the RadiantOne service.
SSL Enabled – Indicates if SSL is enabled for the RadiantOne service. This is the LDAPS port.
Installation Path – Indicates the file system path where RadiantOne is installed.
Java Home – Indicates the location of Java in the environment being used by RadiantOne.
Java Version – Indicates the Java version used by RadiantOne.
Server Startup Time – Indicates the time the RadiantOne service was last started.
Cloud ID – The unique GUID associated with the RadiantOne node.
Created Time – Indicates the time RadiantOne was installed.
Node Type – Indicates the type of node. If RadiantOne is deployed in a cluster, the value could be core (leader), core (follower) or follower only. If RadiantOne is deployed in a classic (active/active or active/passive) all servers are leaders.
RadiantOne Leader – Has a value of true if the RadiantOne node is the leader of the cluster. Otherwise the value is false, meaning it is a follower or follower only node in the cluster. If RadiantOne is deployed in a classic (active/active or active/passive) all servers are leaders.
Product - SKU associated with the RadiantOne version.
Version – Indicates the version of the RadiantOne.
Build – Indicates a specific build ID associated with RadiantOne.
License Type – Indicates the type of RadiantOne license used along with the email address and company name the license key was issued to.
Connections & Operations
From the Connections & Ops section you can view the current usage summary in terms of connections and operations to RadiantOne.

In the Usage Summary section, you see connection usage since startup and average per minute. You all see operations since startup and average per minute.
In the Current Connections section, there is a summary of operation types per connection (including a total number of operations) and the bind user that established the connection. You will also see the Client IP address associated with the open connections. To export current connection data into a CSV-format report, click Export to CSV. The Select CSV File window opens. Specify a file location (within <RLI_HOME>) or keep the default (<RLI_HOME>/vds_server/logs). Specify a file name. Click OK. If you specify a location that contains a CSV with the same file name, you are asked if you want to overwrite the existing file.
The data used to calculate these numbers can be found by querying RadiantOne with a base DN of cn=monitor. When you query RadiantOne with a base DN of cn=monitor (from the RadiantOne LDAP Browser, or any other LDAP client), the result is 1 entry per established connection. Each entry includes how many operations the client has performed and what the operation was (bind, search, compare, delete, modify, or add). For details on the information available in cn=monitor, please see the RadiantOne Monitoring and Reporting Guide.
The Processing Activity Details section, shows how many operations are waiting to be processed, how many operations are currently being executed in addition to the maximum working threads available and peak worker threads used.
RadiantOne Directory (HDAP) Status
Statistics for the stores can be viewed from the Directory Status section. To filter the stores displayed, click on
![]() and then click Select Filters. Select the stores to display and click OK.
and then click Select Filters. Select the stores to display and click OK.

For each store, you see total number of entries, index size, search operations per second and write operations per second.

Data Source Status
In the Data Source Status you can see the status of all data sources defined in RadiantOne. A green dot in the Status column indicates that the data source is configured properly and running. A red dot in the Status column indicates that something is wrong with the data source configuration and RadiantOne cannot currently access it. There is a corresponding error message that states the main problem. If the error is due to incorrect connection information, update the data source on the Main Control Panel > Settings Tab > Server Backend section. Once the error has been corrected click on the refresh icon next to “Data Source Status” and the data source information refreshes to reflect your changes.
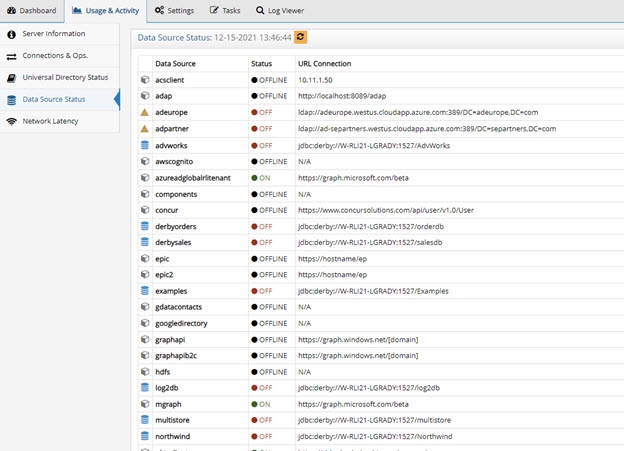
The status values are on, off, offline, and unavailable. The following table describes each status.
Status | Definition |
|---|---|
On | RadiantOne can connect to the data source. |
Off | The connection test to the data source failed. |
Offline | The data source’s active property is set to false. |
Unavailable | No classname property is defined for the data source. |
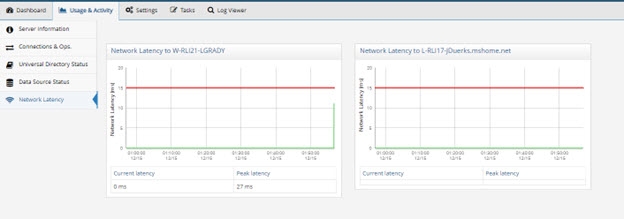
Network Latency
The graphs in the Network Latency section display the network latency between nodes in a cluster in addition to the network latency on the local node. In the upper right, you can indicate the time range the graphs should display.
To use this feature, enable the cluster monitor at Main Control Panel > Settings > Logs > Clustermonitor.
Settings Tab
To change the server name, manage server certificates, and view logs, go to the Server Control Panel > Settings tab.
Server Name
The hostname where the server is installed. By default this is set to the machine name.
This value can be seen in ZooKeeper from the Zookeeper tab in the Main Control Panel at: /radiantone/v1/cluster/shards/shard1/services/vds/registry/<unique ID assigned to the server>
If RadiantOne is running on a multi-homed machine, you can change this parameter to specify a single IP address (or host name). The value set here can work in conjunction with the Server Socket: Restrict to Host/IP specified in Multi Home settings and SSL Server socket: Restrict to Host/IP specified in Multi Home settings defined in the Main Control Panel > Settings tab > Server Front End section > Advanced sub-section.
Changing this value is a delicate operation that must be performed during off-peak hours generally during a maintenance window. You must have your original (unapplied) license key file from Radiant Logic and make sure that the RadiantOne service and Jetty (that hosts the Control Panel) are stopped. Then, follow the steps below.
-
Save the original, unapplied license key into the <RLI_HOME>/vds_server folder (override the license.lic file that is there).
-
Edit <RLI_HOME>/vds_server/conf/cloud.properties to set the zk.servers properties to match the new host name.
-
Edit <RLI_HOME>/bin/openControlPanel.bat (or Linux equivalent) and update the value for: set URL=%PROTOCOL%://<YOUR_NEW_HOSTNAME>:%PORT%/
-
Run openControlPanel.bat (or Linux equivalent) to launch the RadiantOne Main Control Panel.
-
From a command prompt, execute ./bin/advanced/cluster.bat update-hostname (or on linux: ./bin/advanced/cluster.sh update-hostname)
-
Restart the machine.
-
Run openControlPanel.bat (this will start Jetty) to launch the RadiantOne Main Control Panel.
-
From the Settings tab > Server Back End > LDAP Data sources, edit replicationjournal and change the hostname to match the new value.
-
Click Save.
-
From the Settings tab > Server Back End > LDAP Data sources, edit vdsha and change the hostname to match the new value.
-
Click Save.
-
Start the RadiantOne service on all nodes.
Manage Server Certificates
A server certificate used by RadiantOne uniquely identifies it to clients for establishing SSL/TLS and StartTLS connections. RadiantOne supports the JSSE standard provided by Java. RadiantOne is installed with a default self-signed certificate. If you have your own server certificate, please follow the steps listed below in the Replacing the Default Self-signed Certificate section.
Every time you change the RadiantOne server certificate, you must export the public key and import this public key into the Client Certificate Truststore (unless the CA that signed the server certificate is already trusted). Also, the RadiantOne server certificate is shared by the Jetty server to support HTTPS access to the Control Panel(s). If you prefer HTTPS access to the Main Control Panel to use a different certificate, you must manually update the settings for Jetty.
The RadiantOne server certificate is also used by the SAML Attribute Service. However, when you update the server certificate from the Server Control Panel, the SAML Attribute Service configuration is not automatically updated in the following configuration files:
<RLI_HOME>/config/saml/client.properties,<RLI_HOME>/config/saml/query.properties,<RLI_HOME>/config/saml/serverEncryption.properties, and <RLI_HOME>/config/saml/server/AttributeService.properties. If you are using the SAML Attribute Service, update these files manually with the new keystore and password. If you are not using the SAML Attribute Service, you do not need to update these files. Note that if these files are not manually updated, error messages related to these files are shown in the vds_server.log files and can be ignored.
Replacing the Default Self-Signed Certificate
During the RadiantOne installation, a default self-signed certificate is generated for RadiantOne. This self-signed certificate can be replaced with one assigned by a Certificate Authority (CA). Follow the steps below corresponding to your certificate type. If you require a certificate and RadiantOne configuration that is FIPS 140-2 compliant, skip the steps in this section and see the Enabling FIPS Mode.
If RadiantOne is deployed in a cluster, and each node has their own server certificate, the following steps must be performed on each node independently.
JKS Certificate
To replace the default installed self-signed certificate with a new JKS certificate type:
-
Navigate in the file system to <RLI_HOME>/vds/vds_server/conf.
-
In the file system, rename RLI.keystore.
-
Open a command prompt and navigate to <RLI_HOME>/vds/jdk/jre/bin.
-
Request a certificate from a certificate authority. The example below uses a Microsoft Certificate Authority. The following command generates the virtual directory server’s private key. In this scenario, this command creates the rli.keystore file.
C:\radiantone\vds\jdk\jre\bin>keytool -genkey -alias rli -keyalg RSA -keystoreC:\radiantone\vds\vds_server\conf\rli.keystore -dname “cn=machine1,dc=novato,dc=radiantlogic,dc=com"
Enter keystore password: radiantlogic
Enter key password for <rli>
(RETURN if same as keystore password):-
The rli.keystore must be located in
<RLI_HOME>/<instance_name>/conf. The default keystore password is radiantlogic. The key password can be whatever you want. You must set this same password for the Server Certificate Password parameter on the Server Control Panel > Settings Tab. After setting the password here, remember to click Save and restart the RadiantOne service. -
The -dname value is the name of the machine RadiantOne is running on.
-
The -alias value must be rli
WarningThis stores a new certificate in the rli.keystore as alias rli, and with common name:machine1.novato.radiantlogic.com. Machine1 in this case is the name to reference RadiantOne through TCP/IP, so make sure to enter a valid dname parameter matching the hostname of the machine where RadiantOne is running. At this point the certificate will be “self-signed”. Later, the certificate will be modified and signed by the CA.
-
-
From the Server Control Panel > Settings tab, click View next to View Server Certificate. The initial key has been generated.
NoteThe View button is enabled for JKS certificate types only. It is not applicable for another other certificate types.

-
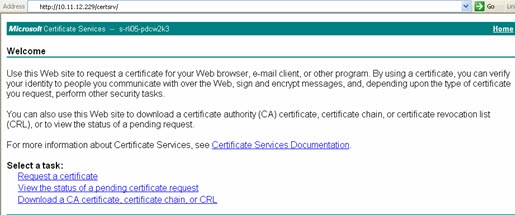
Next, you can download the Root Certificate from the Microsoft CA. From a web browser, access the certificate server.
http://<IP address>/certsrv -
Select Download a CA Certificate, Certificate Chain, or CRL.
-
Select the certificate from the list and choose the encoding method DER.
-
Click Download CA certificate.

-
Click Save to save the certificate file.
-
Navigate to <RLI_HOME>/<instance_name>/conf and save the certificate as certca.cer.
The file can be saved in any location. The location mentioned above is a suggestion.
-
Import the certca.cert into rli.keystore with the following command:
C:\radiantone\vds\jdk\jre\bin>keytool -import -file
c:\radiantone\vds\vds_server\conf\certca.cer -keystore
c:\radiantone\vds\vds_server\conf\rli.keystore -alias rootca <br> Enter keystore password: radiantlogicWarningThe Root CA certificate and any intermediary signing certificates must be imported into rli.keystore.
-
Next, you can generate a certificate signing request. The next few steps describe how to generate a request file that will be sent to the Microsoft CA so it can sign the private key that was generated in step 3 above.
C:\radiantone\vds\jdk\jre\bin>keytool -certreq -alias rli -keystore <br> C:\radiantone\vds\vds_server\conf\rli.keystore -file <br> C:\radiantone\vds\vds_server\conf\vdsserver.csr <br> Enter keystore password: radiantlogic
- Navigate to <RLI_HOME><instance_name>\conf and open the file vdsserver.csr and you will find the certificate request (see sample below):
-----BEGIN NEW CERTIFICATE REQUEST-----
MIIBnzCCAQgCAQAwXzETMBEGCgmSJomT8ixkARkTA2NvbTEcMBoGCgmSJomT8ixkARkTDHJhZGlhbnRsb2dpYzEWMBQGCgmSJomT8ixkARkTBm5vdmF0bzESMBAGA1UEAxMJdmRzc2VydmVyMIGfMA0GCSqGSIb3DQEBAQUAA4GNADCBiQKBgQDIMfutW56qae899+rd/36URsy+J1E3fgKCpi6C00suVOhZfGf97wNGlJKA6sz++WFaAiy/HhLyd4+zevsKGAY7x6fKhz3cGFaU/2ICgeSVPrOx6zhYyUyFedJYTpel7GKoqsxIlTvNnBtDg6mVE81BTSBXX5LrIf1HD9Y1dHJXbwIDAQABoAAwDQYJKoZIhvcNAQEEBQADgYEAQVpuEtcxGXWr4eFNSlBzEkCSp70AZyn+6fl3cl3vZnnez7s6TL/Uqgm4lUCIdPUQeRkr0VHNut+j4uVahax+IKvJ6ZJB4kzQC8Qz2hZuMPafjlEzcttgleQZ6bAgaFjpD3vn3poaYmokzGkwhdnU7EfEJzOXGAPW8c5H3PDqick=
-----END NEW CERTIFICATE REQUEST-----
- Now, the certificate request that was generated in the last step needs to be submitted to the Microsoft CA for signing. From a web browser, access the certificate server.
http://
-
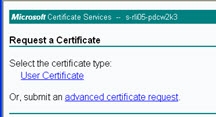
Select Request a Certificate Option.
-
Select Advanced Certificate Request.
-
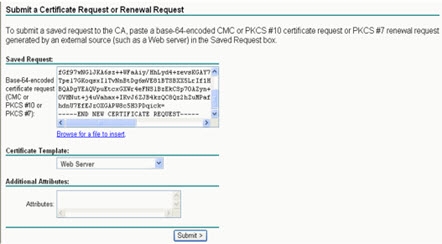
Choose Submit a certificate request by using a base-64-encoded CMC or PKCS #10 file, or submit a renewal request by using a base-64-encoded PKCS #7 file.

-
Paste the entire contents from the certificate request file that was generated previously.
-
From the Certificate Template drop-down list, select Web Server.
-
Click Submit.
-
Choose the DER encoded option.
-
Click Download Certificate.

-
Click Save.
-
Navigate to <RLI_HOME>/<instance_name>/conf and name the file vds.cer.
-
Finally, you can import the signed server certificate into the RadiantOne keystore using the following command:
C:\radiantone\vds\jdk\jre\bin>keytool -import -file c:\radiantone\vds\vds_server\conf\vds.cer -keystore c:\radiantone\vds\vds_server\conf\rli.keystore -v -alias rli
Enter keystore password: radiantlogic
Certificate reply was installed in keystore
[Saving c:\radiantone\vds\vds_server\conf\rli.keystore]WarningThis updates the server certificate that was created in Step 3. It will now be signed by the CA (and not self-signed anymore).
-
Import the CA Root Certificate (e.g. certca.cer) into the RadiantOne client truststore from the Main Control Panel > Settings Tab > Security section > Client Certificate Truststore. On the right side, click IMPORT.
WarningAny client that needs to connect to the RadiantOne service via LDAPS or HTTPS (for the web service interface) must import this CA Root Certificate into their trust store (unless they already trust the CA who signed it).
-
Enter an alias to uniquely identify the certificate in the truststore. Then, depending on the location of the certificate, choose to import the file from the server or the local box from where you are accessing the Control Panel from. After browsing to the certificate, click Open and then OK to exit the Import window.
-
Click Save.
-
From the Dashboard tab of the Main Control panel, launch the Server Control Panel associated with the node you configured the certificate for.
-
On the Server Control Panel, go to the Settings Tab.
-
Set the Server Certificate Key Store to the keystore (e.g. c:\radiantone\vds\vds_server\conf\rli.keystore).
-
Set the Server Certificate Key Type to JKS.
-
Click Change next to the Server Certificate Password parameter. Enter the certificate password. Click Save. The Server Certificate Password must be the same value as the keystore password.
-
If you made changes to the Server Certificate Key Store, Server Certificate Key Type or Server Certificate Password, restart the RadiantOne service. If RadiantOne is deployed in a cluster, each node has its own server certificate and must be updated independently.
If Jetty is configured to use the same server certificate as RadiantOne (jetty.ssl.useVDSSSLConfig=true in <RLI_HOME>/vds_server/conf/jetty/config.properties), and you modify the RadiantOne server certificate outside of the RadiantOne Main Control Panel (e.g. using command line utilities like keytool), you must manually update the Jetty settings.
If you use the RadiantOne SAML Attribute service, manually update the certificate keystore path in <RLI_HOME>/vds_server/conf/saml/server/AttributeService.properties.
PKCS12 Certificate
For PKCS12 types of certificates (.pfx or .p12), make sure the certificate is created with ServerAuth extended key usage. The public key certificate associated with the PKCS12 certificate is also required. This can be the public key certificate of the intermediate signing CA or the public key certificate of the root CA who signed the intermediate CA.
-
Place the server certificate (containing the private key) into <RLI_HOME>/<instance_name>/conf directory. The default instance is vds_server.
-
Open the Server Control Panel > Settings Tab.
-
Set the Server Certificate Key Store to the path to the certificate (containing the private key). E.g. c:\radiantone\vds\vds_server\conf\doce1win2.pfx.
-
Set the Server Certificate Key Type to PKCS12.
-
Click Change next to the Server Certificate Password parameter. Enter the certificate password and click Save, then close. The Server Certificate Password must be the same value as the keystore password.
-
Click Save.
-
Restart the RadiantOne service.
-
Now, the public key (this can be the public key certificate of the intermediate signing CA or the public key certificate of the root CA who signed the intermediate CA) must be added to the RadiantOne client truststore. Go to the Main Control Panel > Settings tab. Go to Security > Client Certificate Truststore. On the right, click Import.
-
Enter an alias to uniquely identify the certificate in the truststore. Then, depending on the location of the certificate, choose to import the file from the server or the local box from where you are accessing the Control Panel from. After browsing to the certificate, click Open and then OK to exit the Import window.
-
Click OK to save the changes.
WarningAny client, including the LDIF-Utils utility, that needs to connect to the RadiantOne service via LDAPS or HTTPS (for the web service interface) must import this public key certificate into their trust store (unless they already trust the CA who signed it).
-
Save the changes.
-
Restart the RadiantOne service. If RadiantOne is deployed in a cluster, each node has its own server certificate and must be updated independently.
If Jetty is configured to use the same SSL certificate as RadiantOne (jetty.ssl.useVDSSSLConfig=true in <RLI_HOME>/vds_server/conf/jetty/config.properties), and you modify the RadiantOne server certificate outside of the RadiantOne Main Control Panel (e.g. using command line utilities like keytool), you must manually update the Jetty settings.
If you use the RadiantOne SAML Attribute service, manually update the certificate keystore path in <RLI_HOME>/vds_server/conf/saml/server/AttributeService.properties.
PKCS11 Certificate
The Cryptographic Token Interface Standard, PKCS#11, is produced by RSA Security and defines native programming interfaces to cryptographic tokens, such as hardware cryptographic accelerators and Smartcards. The Sun PKCS#11 provider included in Java is used to facilitate the integration of native PKCS11 tokens. This provider enables RadiantOne to access native PKCS11 tokens. The Sun PKCS11 provider does not implement cryptographic algorithms, but instead acts as a bridge between the Java JCA and JCE APIs and the native PKCS11 cryptographic API, translating the calls between the two. Any cryptographic device (e.g. smartcards, hardware accelerators...etc.) that includes a PKCS11 implementation can be leveraged by RadiantOne. The Sun PCKS11 provider requires an implementation of PKCS11 v2.0 or later installed on the RadiantOne machine. This implementation is in the form of a shared-object library (.so file on Linux) or dynamic-link library (.dll on Windows).
for an example of RadiantOne deployed with PKCS11 and an NSS Database, see the RadiantOneFIPS_Mode document included with your RadiantOne install.
-
Before you can create a PKS11 provider in the JVM you need to create a configuration file. The configuration file is a text file containing key-value pairs for the configuration options. Although there are many options available (see the Oracle Java PKCS11 Reference Guide), the example used below is for NSS.
A file named “/home/vdsuser/vds-fips/nss_fips.cfg” is created with the following contents:
name = nss-fips
nssLibraryDirectory = /usr/lib64
nssSecmodDirectory = /home/vdsuser/vds-fips/nssdb
nssModule = fipsNote“/usr/lib64” is the folder under which the NSS libraries reside and “/home/vdsuser/vds-fips/nssdb” is the NSS database.
-
Edit the java.security configuration file located at <RLI_HOME>\jdk\jre\lib\security and add the following line (10 is the next sequential number available in this example):
security.provider.10=sun.security.pkcs11.SunPKCS11 /home/vdsuser/vds-fips/nss_fips.cfg
>[!note] The new line adds the PKCS11 provider with the appropriate configuration file configured in the step above.
-
Open the Server Control Panel > Settings Tab.
-
For PKCS11 key types, the Server Certificate Key Store is irrelevant and not used, so you can leave the default value.
-
Set the Server Certificate Key Type to PKCS11.
-
Click Change next to the Server Certificate Password parameter. Enter the password associated with the certificate database and click Save. The Server Certificate Password must be the same value as the keystore password.
-
Restart the RadiantOne service.
-
Now, the public key associated with the new server certificate must be added to the RadiantOne client truststore. The following command uses certutil to export the public key and store it in a file named cacert.cer.
# certutil -L -d /home/vdsuser/vds-fips/nssdb/ -n "vds" -r > /home/vdsuser/vds-fips/cacert.cer -
Go to the Main Control Panel > Settings tab. Go to Security > Client Certificate Truststore. On the right, click Import.
-
Enter an alias to uniquely identify the public key certificate in the truststore. Then, depending on the location of the certificate, choose to import the file from the server or the local box from where you are accessing the Control Panel from. After browsing to the certificate, click Open and then OK to exit the Import window.
WarningAny client that needs to connect to the RadiantOne service via LDAPS or HTTPS (for the web service interface) must import this public key certificate into their trust store (unless they already trust the CA who signed it).
-
Save the changes.
-
Restart the RadiantOne service. If RadiantOne is deployed in a cluster, each node has its own server certificate and must be updated independently.
WarningIf Jetty is configured to use the same SSL certificate as RadiantOne (jetty.ssl.useVDSSSLConfig=true in <RLI_HOME>/vds_server/conf/jetty/config.properties), and you modify the RadiantOne server certificate outside of the RadiantOne Main Control Panel (e.g. using command line utilities like keytool), you must manually update the Jetty settings.
If you use the RadiantOne SAML Attribute service, manually update the certificate keystore path in <RLI_HOME>/vds_server/conf/saml/server/AttributeService.properties.
Updating Certificate Settings for Jetty (HTTPS Access to the Main Control Panel)
For HTTPS access to the Main Control Panel, the Jetty web server uses the RadiantOne SSL server certificate by default, but could be updated to use a different store/certificate. To modify the default behavior and configure a separate server certificate for Jetty, modify the <RLI_HOME>/vds_server/conf/jetty/config.properties file and set jetty.ssl.useVDSSSLConfig=false. Then, you can use the <RLI_HOME>/bin/advanced/updateControlPanelSSLConfig command line utility to configure the Jetty certificate properties. Below is an example of the command properties.
If Jetty is configured to use the same SSL certificate as RadiantOne (jetty.ssl.useVDSSSLConfig=true), and you modify the RadiantOne server certificate outside of the RadiantOne Main Control Panel (e.g. using command line utilities like keytool), you must use the tool mentioned below to manually update the Jetty settings.
C:\radiantone\vds\bin\advanced>updateControlPanelSSLConfig
Command line options:
-i, --instance <instance name>: required, the instance to configure. The default is vds_server.
-k, --keystorePassword <password>: optional, the keystore password. This must be the same as the server certificate key password.
-f, --keystore <file>: optional, the JKS Keystore location
Restart Jetty after making changes to the SSL configuration.
The certificate key password is expected to be the same as the keystore password.
Logs
Use the Server Control Panel to collect logs from all nodes in a RadiantOne cluster into a single zip archive, with optional time filtering.
Ensure that the RadiantOne service and Control Panels are running on all nodes.
Download Cluster Logs
-
Log into the Main Control Panel and navigate to Dashboard.
-
Launch Server Control Panel by clicking
in the Overview section of the Main Control Panel’s Dashboard tab. -
Go to the Logs Viewer tab and click Download Cluster Logs.
-
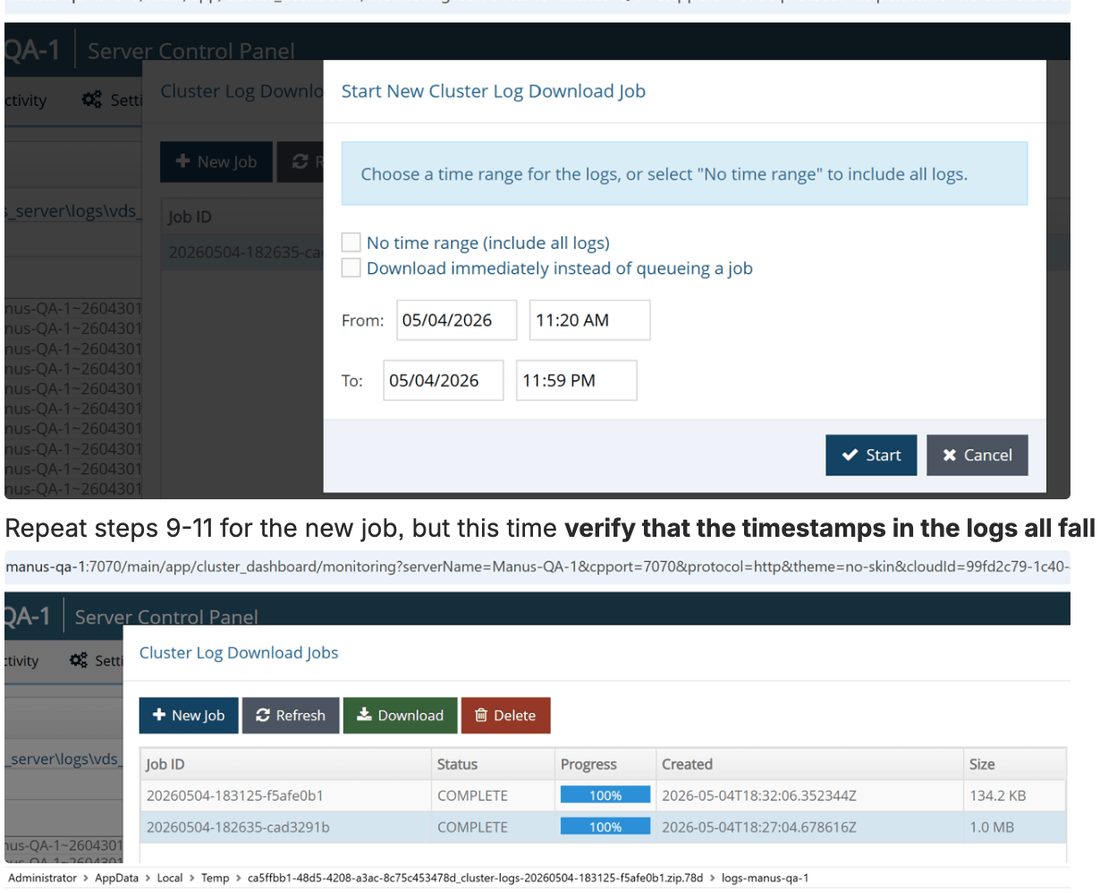
Click New Job in the modal.
-
Optionally set a Start/End time range to filter by time range. Leave blank to include all logs and rollovers.
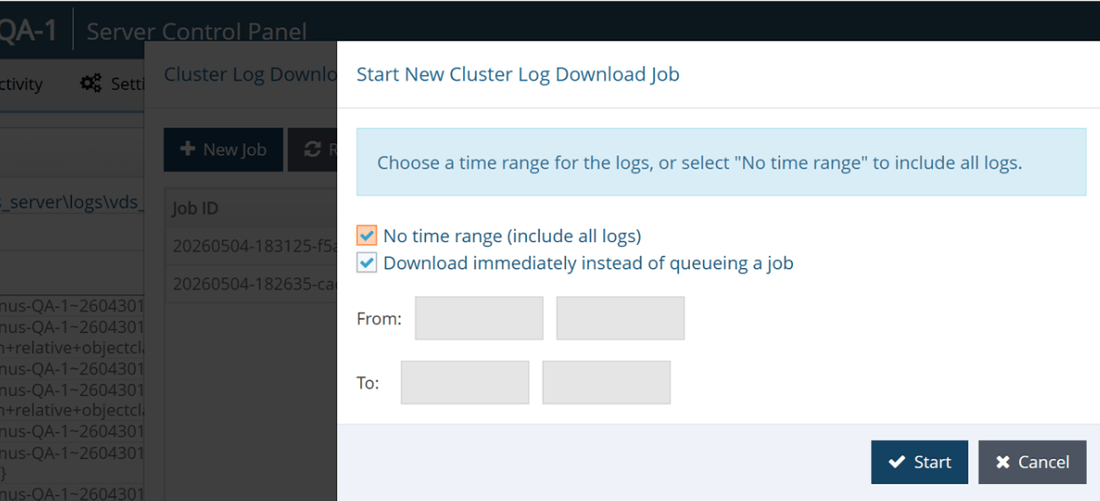
-
Choose your download mode:
- Download Immediately checked — downloads the zip directly to your browser immediately.
- Download Immediately unchecked — queues a background job. When complete, select it in the jobs table and click Download. Archives are saved to
<RLI_HOME>/work/cluster-logs.

-
Click Start to download the logs based on your configuration.
Tasks Tab
From the Server Control Panel > Tasks tab, you can start and stop the scheduler and manage defined tasks. When you perform various actions in the tools or wizards, a notification appears alerting you that the task has been defined and added to the scheduler. These tasks can be viewed and updated in the task list section of the Tasks tab. You can define a task as re-occurring in addition to setting the execution interval. You can also configure the JVM parameters for tasks that run inside their own dedicated JVM.

The following operations are considered tasks and generate an event in the Task Scheduler when they occur:
- Initializing a persistent cache
- Initializing a RadiantOne Directory (HDAP) store
- Re-indexing a cache
- Exporting entries to an LDIF file
- Importing entries from an LDIF file
- Login Analysis (initiated from the Global Identity Builder)
- Custom tasks can be defined
Task Scheduler Configuration
Task Scheduler parameters can be modified by clicking Config in the Task Scheduler section. The Scheduler Configuration menu appears and allows you to modify the default JVM parameters and the lifespan of terminated tasks in the scheduler.

By default, each task executes in its own dedicated JVM. If the option “Dedicated JVM” is not checked in the specific task configuration, then the task executes inside the JVM of the scheduler. Users can customize the default JVM parameters to allow more memory, or change the performance settings. Users can customize the default JVM parameters to allow more memory to the virtual machine, or change the performance settings. However, tuning the JVM of the task scheduler is less important than tuning the dedicated JVM for the individual task. For a full list of possible behavioral and performance options, please see the link below.
http://www.oracle.com/technetwork/java/javase/tech/vmoptions-jsp-140102.html
You can specify the number of days that completed tasks are kept on the task list for users to see. For example, if you set the parameter to “10 days” then after 10 days all of the tasks with a status of “Finished” are deleted from the system.
Task List
When operations are added as tasks, they appear in the Task List section, with information about the task displayed. Completed tasks by default are not displayed in the Task List unless the “Terminated” checkbox is checked. When there is a checked box by “Recurrent” this means that the task occurs more than once, on a regularly scheduled basis. The Last Termination date shows when the task was last executed.

To edit an existing task, click the pencil icon. The Task Configuration menu displays all task components. The name and status are shown, but cannot be changed. To make the task non-recurring (the task no longer repeats) uncheck the “Recurrent” box, the task runs one final time and then the status automatically changes to “Finished.” The execution interval (the frequency at which the task is executed) can be modified by changing the hours, minutes, and second boxes.
By default, all tasks run in their own dedicated JVM and the memory allocated for the task automatically expands up to ¼ of the total machine memory. For example, if the machine where RadiantOne is installed has 16 GB of RAM, the task memory expands up to 4 GB to process a task. If you prefer, you can define a max Java heap size in the JVM parameters instead of leveraging this default expansion. Other custom settings can be entered in the JVM Parameters as well. For a full list of possible behavioral and performance options, please see the link below.
http://www.oracle.com/technetwork/java/javase/tech/vmoptions-jsp-140102.html
If the “Dedicated JVM” option is unchecked, the task runs inside the JVM of the Task Scheduler.
Users must click “Update Task” before closing out of the task configuration screen to save the changes.

Custom Tasks
Certain operations like initializing a persistent cache or RadiantOne Directory store, re-indexing a persistent cache or RadiantOne Directory store, exporting or importing an LDIF file, and login analysis, are performed as tasks. Custom tasks can also be configured.
-
Create a task in the com.rli.scripts.tasks package by extending one the abstract tasks in the com.rli.task package (e.g. KillableTask).
-
Use your preferred Java IDE to create a jar for the task by exporting it. Customize the script generate the JAR file.
-
Click Browse to navigate to <RLI_HOME>/lib/ and provide a jar file name (e.g. customTask.jar).
-
Click Finish.
-
Create a properties file (e.g. customTask.properties) with the information about the task. An example of the file contents is shown below. Save this file to: <RLI_HOME>\vds_server\conf\scheduler<someName>.properties
#Wed Jun 02 16:36:30 PDT 2021
arguments="-p" "29148"
isvolatile=false
_exitstatus=0
newjvm=false
runonerror=true
exec.order=16
repeat.seconds=8
disabled=false
exec.queue=customTask
taskname=customTask
main.class=com.rli.scripts.tasks.CustomTask
jvmargs=
A brief description of each property is outlined in the table below.
Property | Value |
|---|---|
arguments | Provides arguments for readArguments method of the task. -p is process id. |
isvolatile | Has a value of true or false. If false, the task is not deleted after it runs. If true, the task is deleted after it runs. |
_exitstatus | Returns the status when the task has completed. |
newjvm | Has a value of true or false. If false, the task uses global task scheduler JVM to execute. If true, the task will start a new JVM to run the task in. |
runonerror | Has a value of true or false. If false, the task will not execute if the previous task failed. If true, the task will run even if the previous task failed. |
exec.order | Order of execution of the task within the queue. |
repeat.seconds | Interval in seconds, to run the task. If 0, then it is non-recurrent and only runs once. |
disabled | Has a value of true or false. If false, the task does not start when the RadiantOne process starts. If true, the task starts when the RadiantOne process starts. |
exec.queue | Adds a task to queue with the name indicated in this property. |
taskname | The value of this property is the name shown in the tasks list on the Tasks tab in the Server Control Panel. |
main.class | The value of this property is the name of the custom task java package name. |
jvmargs | Only applicable if newjvm=true. This property can be used to customize the Java arguments for the task. E.g. -Xms1024m -Xmx1024m |
-
Navigate to the Server Control Panel associated with the RadiantOne leader node and go to the Tasks tab.
-
Click Restart (and Yes to confirm) to restart the Task Scheduler. After restart, the custom task should appear in the list of tasks. The task can be managed from here.

Logs related to tasks are located in <RLI_HOME>/vds_server/logs/scheduler/task.<task_name>.log
Log Viewer Tab
On the Server Control Panel > Logs Viewer Tab, you will find the logging console.
Only users that belong to the Directory Administrators group have access to the Log Viewer tab.
Select the log file from the drop-down list. You can also set a filter to limit your view of the log based on certain criteria (this only filters on the subset of log data visible in the log window), refresh the log view and/or choose to refresh continuously.

If you change the log location of RadiantOne server log, the Log Viewer tab on the Server Control Panel cannot be used to view the log contents. A basic text viewer (like Notepad) must be used instead.
For complete details on logs and troubleshooting, please see the RadiantOne Logging and Troubleshooting Guide.
Delegated Administration of RadiantOne
Any user that can bind to RadiantOne can potentially administrator the server if they belong to the proper group. A user can belong to multiple groups and the value(s) of the vdPrivilege operational attribute assigned to the group entry dictates the operations that members are authorized to do. The following administration groups are defined for RadiantOne:
Directory Administrator Role – members of this group can perform all operations (all operations that the other groups defined below can perform) in addition to:
-
Change privileges for the delegated roles
-
Update username and password properties for data sources via LDAP modify command
These functions are dictated by the following values of the vdPrivilege attribute in the group entry:
- acl-read
- acl-write
- admin-write
- config-lock
- config-read
- config-write
- data-source-read
- data-source-write
- data-store-read
- data-store-write
- globalidviewer-designer
- globalidviewer-read
- globalidviewer-write
- ics-admin
- instance-read
- instance-write
- logs-read
- naming-context-read
- naming-context-write
- security-write
- services-restart
- services-shutdown
- tasks-admin
- update-schema
The group entry is located in the RadiantOne namespace at: cn=directory administrators,ou=globalgroups,cn=config
Read Only Role – Members of this group can perform the following operations:
- Read RadiantOne configuration
- Read settings for any configured instances
- Read naming context configurations
- Read configured data sources and view synchronization topologies on the Synchronization Tab
- Log into the RadiantOne Insights, Reports and Administration console and access the Global Identity Viewer application
These functions are dictated by the following values of the vdPrivilege attribute in the group entry:
- config-read
- instance-read
- naming-context-read
- data-source-read
- globalidviewer-read
The group entry is located in the RadiantOne namespace at: cn=readonly,ou=globalgroups,cn=config
Namespace Administrator Role – Members of this group can perform the following operations:
- Read RadiantOne configuration
- Restart the RadiantOne service from Main Control Panel
- Create, update, or delete naming contexts
- Create, update, or delete backend mappings
- Create, update, and manage persistent cache
- Create, update, or delete data sources
- Create, update, or delete RadiantOne Directory (HDAP) stores
- Update RadiantOne LDAP schema
- Launch tasks
- View synchronization topologies and manage synchronization components on the Synchronization Tab
These functions are dictated by the following values of the vdPrivilege attribute in the group entry:
- config-read
- config-write
- services-restart
- update-schema
- naming-context-read
- naming-context-write
- data-source-read
- data-source-write
- data-store-read
- data-store-write
- tasks-admin
- ics-admin
The group entry is located in the RadiantOne namespace at: cn=namespaceadmin,ou=globalgroups,cn=config
Operator Role – Members of this group can perform the following operations:
- Read RadiantOne configuration
- Create, update, or delete RadiantOne Directory (HDAP) Stores
- Restart the RadiantOne service from the Main Control Panel
- Stop the RadiantOne service from the Main Control Panel
- Launch tasks
- View synchronization topologies and manage synchronization components on the Synchronization Tab
These functions are dictated by the following values of the vdPrivilege attribute in the group entry:
- config-read
- config-write
- services-restart
- services-shutdown
- data-store-read
- data-store-write
- tasks-admin
- naming-context-read
The group entry is located in the RadiantOne namespace at: cn=operator,ou=globalgroups,cn=config
Schema Administrator Role – Members of this group can perform the following operations:
- Read RadiantOne configuration
- Create, update or delete schema objects (objectclasses or attributes)
- Extend RadiantOne LDAP schema with objects and attributes from orx files
- Create, update or delete data sources
- View synchronization topologies and manage synchronization components on the Synchronization Tab
These functions are dictated by the following values of the vdPrivilege attribute in the group entry:
- config-read
- update-schema
- data-source-read
- data-source-write
The group entry is located in the RadiantOne namespace at: cn=schemaadmin,ou=globalgroups,cn=config
ACI Administrator Role – Members of this group can perform the following operations:
- Read RadiantOne configuration
- Create, update and delete access controls
- View synchronization topologies and manage synchronization components on the Synchronization Tab
These functions are dictated by the following values of the vdPrivilege attribute in the group entry:
- config-read
- acl-read
- acl-write
- naming-context-read
The group entry is located in the RadiantOne namespace at: cn=aciadmin,ou=globalgroups,cn=config
ICS Administrator Role – Members of this group can perform the following operations:
- Read RadiantOne configuration
- Stop and start pipelines on the Synchronization Tab
- Log into the RadiantOne Insights, Reports and Administration Console and access all applications
These functions are dictated by the following values of the vdPrivilege attribute in the group entry:
- config-read
- config-write
- naming-context-read
- data-source-read
- ics-admin
- ics-workflow-approve
- tasks-admin
- globalidviewer-read
- globalidviewer-write
- globalidviewer-designer
The group entry is located in the RadiantOne namespace at: cn=icsadmin,ou=globalgroups,cn=config
ICS Operator Role – This role varies from the ICS Admin role in that this role cannot perform uploads from the Synchronization tab, nor can it modify connector properties. Members of this group can perform the following operations:
- Read RadiantOne configuration
- Log into the RadiantOne Insights, Reports and Administration Console and access all applications
These functions are dictated by the following values of the vdPrivilege attribute in the group entry:
- config-read
- ics-operator
The group entry is located in the RadiantOne namespace at: cn=icsoperator,ou=globalgroups,cn=config
Managing Default Delegated Administration Roles
As mentioned above, the groups used for delegated administration are Directory Administrator, Namespace Administrator, Operator, Read Only, Schema Administrator, ICS Administrator, ICS Operator and ACI Administrator. These roles can be assigned to static members or dynamic members. Both are described below. Any user that is assigned to one of the delegated administration roles can login to the Control Panels and manage certain server settings based on the privileges (vdPrivilege attribute) assigned to the role.
Remember that you might require a User ID to DN Mapping configuration depending on the ID that users log in with (their full DN versus just an ID).
Delegated administrators do not have default permissions to manage virtual entries in the directory. If this is required, assign the proper access controls for the delegated admin groups.
Managing Explicit Members
It is generally advised to assign only local (in a RadiantOne Directory store) user accounts to delegated admin roles. Although you can assign any user in the RadiantOne namespace to a delegated admin role, use caution with this approach because if the backend isn’t accessible, then the user login to the Control Panel will fail and the user will not be able to administer RadiantOne. Also, performance can be degraded because RadiantOne must delegate the bind (authentication) to the backend instead of processing it locally.
-
Log into the Main Control Panel as the super user and click on the Directory Browser tab.
-
Navigate below ou=globalgroups,cn=config node to locate all of the groups.
-
Select the group you want to manage and click
 (Manage Group). From here you can remove users from groups and search for new users (located anywhere in the virtual namespace) to add to groups.

Managing Dynamic Members
It is generally advised to assign only local (in a RadiantOne Directory store) user accounts to delegated admin roles. Although you can assign any user in the RadiantOne namespace to a delegated admin role, use caution with this approach because if the backend isn’t accessible, then the user login to the Control Panel will fail and the user will not be able to administer RadiantOne. Also, performance can be degraded because RadiantOne must delegate the bind (authentication) to the backend instead of processing it locally.
-
Log into the Main Control Panel as the super user and click on the Directory Browser tab.
-
Navigate below ou=globalgroups,cn=config node to locate all of the groups.
-
Select the group you want to manage and on the right side, select the objectclass attribute.
-
Choose Modify Attribute > Add Value.
-
Enter a new value of groupOfURLS and click OK.
-
Select the group entry and click
(Manage Group). -
Click Edit Dynamic Members. From here you can manage the criteria for dynamic members.
-
Click Add Member(s).
-
Enter the base DN where users/potential group members are located, or click
 to navigate to this location.
 -
Select the scope associated with the base DN to locate potential members.
-
Enter an LDAP filter that qualifies group members (e.g. l=Casper, meaning all users that have a location of Casper would be a member of the group).
-
Click Confirm.
-
Either add more members, or click Close to close the window.
-
After the configuration, the group entry has a memberURL attribute that contains the criteria for group members.
-
Now, configure RadiantOne to translate the dynamic group criteria into static members by setting Special Attributes Handling for Dynamic Groups. Navigate to the Main Control Panel > Settings tab.
-
Switch the Control Panel to Expert Mode.
-
After the browser reloads, navigate to the Settings tab > Interception > Special Attributes Handling.
-
In the Dynamic Group section click Add.
-
Click Choose and either navigate to the exact dynamic group entry or the parent node where all of your dynamic groups are located. For example, if you wanted all of the delegated admin groups to be dynamic, you can select the cn=config branch in the RadiantOne namespace like shown in the screen below.
-
Click OK.

- Set the member attribute to either member or uniqueMember (to match your membership attribute) and click Save in the upper right.
Any user that is dynamically assigned to a delegated admin group can log in to the Control Panel and administer the server based on the role they are associated with.
Managing Default Delegated Administration Users
As mentioned above, the groups used for delegated administration are Directory Administrator, Namespace Administrator, Operator, Schema Administrator, ACI Administrator, ICS Administrator, ICS Operator, and one role for Read Only access.
Delegated administrators do not have default permissions to manage virtual entries in the directory. If this is required, assign the proper access controls for the delegated admin groups.
Default administrative users are included as members of these groups. They are as follows:
-
Member of the ACI Administrator Group.
-
Member of the Namespace Administrator Group.
-
Member of the Operator Group.
-
Member of the Schema Administrator Group.
-
Member of the Directory Administrator Group.
-
Member of the ICS Administrator Group.
-
Member of the ICS Operator Group.
-
Member of the Read Only Group.
You can use the default users for delegated administration of RadiantOne activities, or you can add your own users to the various admin roles as described in the Managing Delegation Administration Roles. To use the default users, you can log in with any of the following (depending on the RadiantOne configuration you want to manage). For details on what activities these users can perform, please see Delegated Administration of RadiantOne.
for details on how to update the default delegate admin user’s passwords, see the RadiantOne Hardening Guide.
user: aciadmin
password: <set to the same password you defined for the super user (cn=directory manager) during the installation>
user: namespaceadmin
password: <set to the same password you defined for the super user (cn=directory manager) during the installation>
user: operator
password: <set to the same password you defined for the super user (cn=directory manager) during the installation>
user: schemaadmin
password: <set to the same password you defined for the super user (cn=directory manager) during the installation>
user: superadmin
password: <set to the same password you defined for the super user (cn=directory manager) during the installation>
user: icsadmin
password: <set to the same password you defined for the super user (cn=directory manager) during the installation>
user: icsoperator
password: <set to the same password you defined for the super user (cn=directory manager) during the installation>
user: readonly
password: <set to the same password you defined for the
super user (cn=directory manager) during the installation>
The reason you can login with just the user ID as opposed to the full DN is because a default user ID to DN mapping has been configured for the cn=config branch in RadiantOne. This allows RadiantOne to identify the proper user DN based on the ID they log into the Main Control Panel with. This default mapping is shown below.

Leveraging Existing Groups for Delegated Administration
As an alternative to using the default delegated admin groups for enforcing authorization in the Control Panels, you can leverage your existing groups for these roles. Your groups and members must be in either a RadiantOne Directory store, or persistent cache. If you choose to use your own existing groups and users, the default delegated admin users will not be able to log into the Control Panel.
If your users and groups are in a persistent cache, the bind (credentials-checking) step during the login to the Control Panel is delegated to the backend directory for validation. If the backend isn’t accessible, then the user login to the Control Panel will fail and the user will not be able to administer RadiantOne. Also, performance can be degraded because RadiantOne must delegate the bind to the backend instead of processing it locally.
To configure groups and users for delegated administration, follow the steps below.
-
The groups and users that you want to use for delegated administration must all be located under the same root naming context. Either import your groups and users into a RadiantOne Directory store (e.g. import an LDIF file), or create a virtual view of groups and users and configure it as persistent cache. For assistance on creating RadiantOne Directory stores, see the RadiantOne Namespace Configuration Guide. For assistance on configuring persistent cache, see the RadiantOne Deployment and Tuning Guide.
-
(Optional) If your groups and users are in persistent cache, go to the Main Control Panel > Directory Namespace > Cache node and select your cache branch. On the Properties tab on the right, enter vdPrivilege in the Extension Attributes list and click Save.

-
Navigate to the Main Control Panel > Directory Browser tab.
-
Navigate to the group location and select the group that you want to be associated with a delegated administrator role. Click Add Attribute and enter the name vdPrivilege and enter a value associated with the delegated admin role.

Image 56: Modify Attribute > Add Value
- Select the vdPrivilege attribute and click Modify Attribute > Add Value.

Image 56: Adding the vdPrilvilege Attribute
-
Add a required value for the role. The required values and corresponding roles are described in Delegated Administration Roles.
-
In the Add Value window, click
 to add another value. Repeat this step to add all required values as outlined in Delegated Administration Roles. Click Confirm after all values have been added. In the example below, a group named Management has been assigned the privileges required for the Directory Administrator role.
Image 57: Example of Assigning an Existing Group to the Directory Administrator Role
NoteDelegated administrators do not have default permissions to manage virtual entries in the directory. If this is required, assign the proper access controls for the delegated admin groups.
-
Go to the Main Control Panel > Zookeeper tab (requires Expert Mode).
-
Navigate to /radiantone/v1/cluster/config/vds_server.conf.
-
Click Edit Mode.
-
Locate the “roleBase” property and set the value to the root naming context where your users and groups are located (e.g. “roleBase” : “o=companydirectory”,).
-
Locate the “roleName” property and set the value to the RDN/attribute name containing the group name (e.g. “roleName” : “cn”,).
-
Locate the “roleSearch” property and if the group objectclass stores the members in the uniqueMember attribute, set the value to: "(uniqueMember:1.2.840.113556.1.4.1941:={0})",
If the group objectclass stores the members in the member attribute, set the value to "(member:1.2.840.113556.1.4.1941:={0})",
-
Click Save.
-
To test, logout of the Control Panel and login with a user that is a member of one of your existing groups. Make sure the user can perform the activities associated with their role as outlined in Delegated Administration Roles. Remember, you must either use the full user DN as the login name, or define the proper User to DN mapping rules to allow the user to login with just an “ID”.

Delegated Administration Roles
The roles and corresponding required permissions are described in the table below. For descriptions of each permission, see Delegated Administration Permissions.
Role | Required Permissions (Value of vdPrivilege) |
|---|---|
Directory Administrator | admin-write |
Read Only | config-read |
Namespace Administrator | config-readconfig-write |
Operator | config-read |
Schema Administrator | config-read |
ACI Administrator | config-read |
ICS Administrator | config-read |
Approvers | config-read |
ICS Operator | config-read |
Global ID Viewer Design | config-read |
Global ID Viewer Write | config-read |
Delegated Administration Permissions
The permissions and corresponding required vdPrivilege values are described in the table below.
vdPrivilege Value | Permission |
|---|---|
acl-read | View access controls |
acl-write | Create, update and delete access controls |
admin-write | Modifying within Settings -> Server Front End -> Administration |
config-lock | Managing Main Control Panel -> Settings -> Configuration -> Configuration Lock |
config-read | Read RadiantOne configuration |
config-write | Write access to RadiantOne configuration |
data-source-read | Read configured data sources |
data-source-write | Create, update, and delete data sources |
data-store-read | View RadiantOne Directory stores |
data-store-write | Create, update, or delete RadiantOne Directory stores |
globalidviewer-designer | Edit and delete templates and queries in the Global Identity Viewer |
globalidviewer-read | Log into the RadiantOne Global Identity Viewer. Cannot access the Main Control Panel |
globalidviewer-write | Can modify attribute values in the Global Identity Viewer |
ics-admin | Stop and start pipelines on the Sync Tab |
ics-operator | Access the Synchronization tab and read topologies |
ics-workflow-approve | Access the Approvals Application in the RadiantOne Insights, Reports and Administration Console |
instance-read | Read settings for any configured instances |
instance-write | Modify settings for any configured instances |
logs-read | Reading Server Control Panel's Log Viewer tab |
naming-context-read | Read naming context configurations |
naming-context-write | Create, update, or delete naming contexts |
security-write | Modifying the following: |
services-restart | Restart the RadiantOne service from Main Control Panel |
services-shutdown | Stop the RadiantOne service from the Main Control Panel |
tasks-admin | Launch tasks |
update-schema | Extend RadiantOne LDAP schema with objects and attributes from orx files |
Configuration Lock
The RadiantOne super user account (e.g. cn=directory manager) and members of the cn=directory administrators group (cn=directory administrators,ou=globalgroups,cn=config) can enable a lock on all configuration changes. This ensures that no changes are being made while the configuration is being backed up and/or migrated. To lock the configuration, navigate to Main Control Panel > Settings > Configuration > Configuration Lock. Toggle the Configuration Changes property to the Locked position. Click Save.
When the configuration is locked, no one can make changes to the RadiantOne configuration (either from the UI or command line tools). In the UI, an
 icon appears at the top of the Control Panel, configuration options are read-only, and FID can be restarted but not stopped. Command-line operations that display information still function, but operations that modify the configuration do not. Only the RadiantOne super user, or a member of the cn=directory administrators group, can unlock the configuration. When they log into the Control Panel, there is a message along with a button, prompting them to unlock the configuration.
When other users log into the Control Panel, there is a message prompting the user to contact the Directory Manager to unlock the configuration.

