SSL Settings
SSL settings are applicable to clients connecting to the RadiantOne service via LDAPS and involve enabling SSL/TLS and Start TLS, indicating how mutual authentication should be handled, client certificate DN mapping (for enforcing authorization), managing the certificates in the default Java truststore (cacerts), which cipher suites are supported by RadiantOne, certificate revocation and inter nodes communications (relevant only for cluster deployments). These subjects are described in this section.
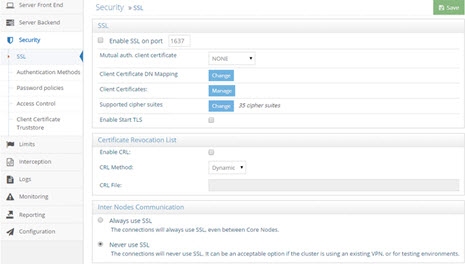
Figure 1: SSL Settings
Enable SSL
SSL/TLS is enabled by default and TLS v1.2 and v1.3 are supported. During the installation of RadiantOne a self-signed default certificate is generated. For steps on replacing the self-signed certificate, see Replacing the Default Self-Signed Certificate.
By default the SSL port is set to 636 and this is defined during the installation of RadiantOne.
You must restart the RadiantOne service and Jetty service (hosting the Control Panel) after changing any SSL-related settings. RadiantOne loads the server certificate when it is started, so in order for the newly added certificate to take effect, restart the server.
Forbidding Access on the Non-SSL Port
For steps to disable access on the non-ssl ports, please see the RadiantOne Hardening Guide.
Supported Cipher Suites
To view the cipher strength levels enabled in RadiantOne, go to the Main Control Panel > Settings Tab > Security section > SSL sub-section and click Change next to Supported Cipher Suites. The ciphers that are checked are enabled. To change the enabled ciphers, check/uncheck the desired values. The list of ciphers is conditioned by the SSL protocols enabled in RadiantOne (Enabled SSL Protocols as seen in the UI) which is dictated by the jdk.tls.disabledAlgorithms and jdk.tls.legacyAlgorithms in <RLI_HOME>\jre\lib\security\java.security. if you make any changes to the java.security file, restart the RadiantOne service and the Jetty service that hosts the Control Panel.
After changing the Supported Cipher Suites in the interface, save your changes and restart the RadiantOne service and the Jetty service that hosts the Control Panel. If you modify the java.security file to adjust the supported SSL protocols, the cipher strength options seen in the UI change to match the enabled SSL protocols. Only enable ciphers that match your company security policy.
Enabled SSL Protocols
The SSL/TLS protocol options are SSL v3, TLSv1, TLSv1.1 TLSv1.2 and TLS v1.3. Some of the less secure protocols in this list (SSL v3, TLSv1, TLSv1.1) are disabled by default in the <RLI_HOME>/jdk/jre/lib/security/java.security file, noted in the jdk.tls.disabledAlgorithms property.
SSLv2Hello isn't supported since all applicable ciphers have been deprecated in OpenJDK v1.8.0_432-b06.
Out of the available protocols, not in the disabled list, you can limit which ones you want RadiantOne to support. You can limit the protocols from the Main Control Panel > Settings Tab > Security section > SSL sub-section. Click Change next to Enabled SSL Protocols. Select the protocols to support and click OK. Restart the RadiantOne service on all nodes.
If you want to support one of the less secure protocols, edit the java.security file and remove the protocol from the jdk.tls.disabledAlgorithms value. Then, make sure it is enabled in RadiantOne. Restart RadiantOne on all nodes. If a protocol is enabled in RadiantOne, but in the list of disabled algorithms in the java.security file, it will not be supported at runtime for SSL communication.
Only enable the SSL protocols that comply with your company’s security policy.
Enable STARTTLS
Start TLS allows clients to request a secure channel to RadiantOne at any time without having to establish a new connection on a different port. For example, a client can process an LDAP search operation on a normal connection and then, without closing the connection, request a secure layer over the same connection with StartTLS for the use of changing passwords or viewing encrypted attributes. After finishing the use of the secure channel, the client can switch back to the non-secure channel on the same connection. The flexibility offered by the Start TLS extension allows for the secure LDAPS channel to be turned on and off on demand.
To enable Start TLS for clients to access RadiantOne:
-
Go to the Main Control Panel > Settings Tab > Security section > SSL sub-section.
-
Check the Enable SSL option and then check the Enable Start TLS option.
-
Save the changes.
-
Restart the RadiantOne service.
When using Start TLS, the default server certificate included with the RadiantOne installation does not work. You must generate a new certificate (either self-signed or requested from a Certificate Authority) that contains the proper machine and domain name of the RadiantOne machine. Also, the host name specified from the client should match the value in the certificate. If you try to use the default self-signed certificate included with the RadiantOne installation, the following error message (‘xxxxx’ being your server name) is returned: javax.net.ssl.SSLPeerUnverifiedException: hostname of the server 'xxxxx' does not match the hostname in the server's certificate.
Debug SSL
SSL is enabled by default, but SSL logging is disabled by default. When SSL logging is enabled, SSL events have an entry in vds_server.log. This log file is located in <RLI_HOME>\vds_server\logs. SSL events are logged at INFO level or higher, so log settings for FID – Server must be at least at INFO level.
For more information on log levels, refer to the RadiantOne Logging and Troubleshooting Guide.
To enable SSL logging:
-
From the Main Control Panel, click Settings > Logs > Log Settings.
-
From the Log Settings to Configure drop-down menu, select FID – Server.
-
Verify that the Log Level drop-down menu is set to one of the following: INFO, DEBUG, or TRACE.
-
If you change the log level, click Save.
-
Navigate to the Main Control Panel > Settings > Security > SSL.
-
In the SSL section, check the Debug SSL box.
-
Click Save.
-
On the Main Control Panel’s Dashboard tab, restart the RadiantOne service.
Certificate-based Authentication: Support for Mutual Authentication
A certificate is an electronic document that identifies an entity which can be an individual, a server, a company, or some other entity. The certificate also associates the entity with a public key.
For normal SSL communications, where the only requirement is that the client trusts the server, no additional configuration is necessary (if both entities trust each other). For mutual authentication, where there is a reciprocal trust relationship between the client and the server, the client must generate a certificate containing his identity and private key in his keystore. The client must also make a version of the certificate containing his identity and public key, which RadiantOne must store in its truststore. In turn, the client needs to trust the server; this is accomplished by importing the server's CA certificate into the client truststore.
Certificate-based authentication (mutual authentication) requires the use of SSL or StartTLS for the communication between the client and RadiantOne.
The diagram below shows how certificates and the SSL protocol are used together for authentication.
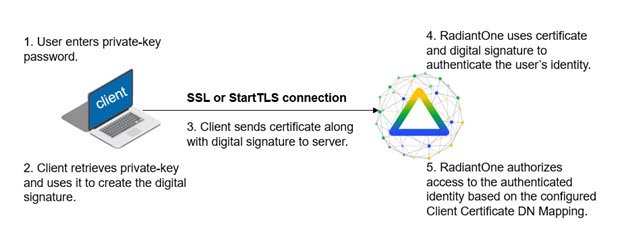
Figure 2: Mutual Authentication
There are three options for mutual authentication and this can be set from the Main Control Panel > Settings Tab > Security section > SSL > Mutual Auth. Client Certificate drop-down menu: Required, Requested and None (default value). If mutual authentication is required, choose the Required option. If this option is selected, it forces a mutual authentication. If the client fails to provide a valid certificate which can be trusted by RadiantOne, authentication fails, and the TCP/IP connection is dropped.
If mutual authentication is not required, but you would like RadiantOne to request a certificate from the client, choose the Requested option. In this scenario, if the client provides a valid/trusted certificate, a mutual authentication connection is established. If the certificate presented is invalid, the authentication fails. If no certificate is presented, the connection continues (using a simple LDAP bind) but is not mutual authentication.
If you do not want RadiantOne to request a client certificate at all, check the None option.
If the client certificate is not signed by a known certificate authority, it must be added in the RadiantOne client truststore.
Requiring Certificate-based Authentication
If you want to require certificate-based authentication:
-
The client must trust the RadiantOne server certificate (import the RadiantOne public key certificate into the client truststore, unless the server certificate has been signed by a certificate authority known/trusted by the client).
-
The RadiantOne service must trust the client (import the client’s public key certificate into the RadiantOne client truststore, unless the client certificate is signed by a known/trusted certificate authority).
-
From the Main Control Panel > Settings Tab > Security section > SSL, make sure either SSL and/or StartTLS is enabled.
-
From the Main Control Panel > Settings Tab > Security section > SSL > Mutual Auth. Client Certificate drop-down menu, select Required.
-
From the Main Control Panel > Settings Tab > Security section > SSL, click Change next to Client Certificate DN Mapping and define your mappings.
The Client Certificate DN Mapping is only accessible by a member of the Directory Administrator role/group.
- Click Save and restart the RadiantOne service. If RadiantOne is deployed in a cluster, restart RadiantOne on all nodes.
Client Certificate DN Mapping
To authorize a user who authenticates using a certificate (e.g. SASL External) you must set a client certificate DN mapping. This maps the user DN (Subject or Subject Alternate Name from the certificate) to a specific DN in the RadiantOne namespace. After, the DN in the RadiantOne namespace determines authorization (access controls).
To avoid problems with special characters, RadiantOne normalizes the certificate subject prior to applying the certificate DN mapping.
To set the client certificate DN mapping:
-
Go to the Main Control Panel > Settings Tab > Security Section > SSL sub-section.
-
Click Change next to the Client Certificate DN Mapping property.
The Client Certificate DN Mapping is only accessible by a member of the Directory Administrator role/group.
There are different ways to determine the DN from the subject or subject alternative name in the certificate (using regular expression syntax).
Setting a specific subject or subject alternative name to DN in the virtual namespace:
cn=lcallahan,dc=rli,dc=com (the user DN in the certificate) -> (maps to) cn= laura Callahan,cn=users,dc=mycompany,dc=com
Specify a Base DN, scope of the search, and a search filter to search for the user based on the subject or subject alternative name received in the certificate:
uid=(.+),dc=rli,dc=com -> dc=domain1,dc=com??sub?(sAMAccountName=$1)
If RadiantOne received a certificate subject of uid=lcallahan,dc=rli,dc=com then it would look for the virtual entry based on:
dc=domain1,dc=com??sub?(sAMAccountName=lcallahan)
Then, authorization would be based on the user DN that is returned.
As another option, multiple variables can be used (not just 1 as described in the previous example). Let’s take a look at an example mapping that uses multiple variables:
cn=(.+),dc=(.+),dc=(.+),dc=com -> (maps to) ou=$2,dc=$3,dc=com??sub?(&(uid=$1)(dc=$3))
If RadiantOne received a subject from the certificate that looked like: cn=laura_callahan,dc=ny,dc=radiant,dc=com, the search that would be issued would look like:
ou=ny,dc=radiant,dc=com??sub?(&(uid=laura_callahan)(dc=radiant))
RadiantOne uses the DN returned in the search result to base authorization on.
If the subject in the SSL certificate is blank, you can specify that a Subject Alternative Name (SAN) should be used. You can use an alternative name in the mapping by specifying {alt} before the regular expression. For example: {alt}^(.+)$ uses the first alternative name found. You can be more specific and specify which alternative name in the certificate that you want to match by specifying the type [0-8]. For example: {alt:0}^(.+)$ uses the otherName alternative name. The type number associated with each is shown below.
otherName [0]
rfc822Name [1]
dNSName [2]
x400Address [3]
directoryName [4]
ediPartyName [5]
uniformResourceIdentifier [6]
iPAddress [7]
registeredID [8]
For example, {alt:0}^(.+)@my.gov$ defined as the Certificate DN captures "james.newt" for the certificate shown below.
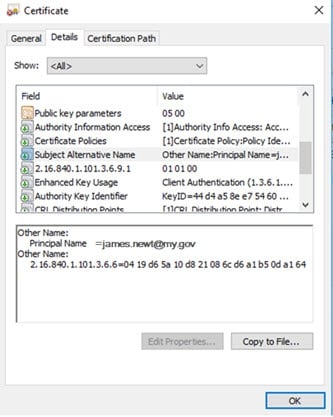
Figure 3: Example SSL Certificate
If all mapping rules fail to locate a user, anonymous access is granted (if anonymous access is allowed to RadiantOne).
As an alternative to anonymous access, it is generally recommended that you create a final mapping that results in associating the authenticated user with a default user that has minimum access rights. An example is shown below where the last mapping rule matches to a user identified in RadiantOne as “uid=default,ou=globalusers,cn=config”.
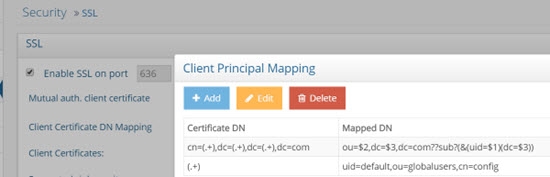
Figure 4: Example Default Mapping Rule
Testing Certificate DN Mapping Rules
The test-cert-mapping command can be used to test the subject (or SAN) associated with a given certificate against the existing certificate to DN mappings. This allows you to verify your client principal mapping rules. For information about the test-cert-mapping command see, the Radiantone Command Line Configuration Guide.
Processing Multiple Mapping Rules
Many Client Certificate DN Mapping rules can be configured. They are processed by RadiantOne in the order they appear.
The first DN mapping rule in the list is applied first. IF the user is found with the first mapping rule, then no other rules are evaluated. ONLY if the user is NOT found using the first DN mapping rule will the other rules be evaluated. If all mapping rules fail to locate a user, anonymous access is granted (if anonymous access is allowed to RadiantOne).
For example, let’s say two DN Mapping rules have been configured:
dc=domain1,dc=com??sub?(sAMAccountName=$1)
uid=$1,ou=people,ou=ssl,dc=com
The first DN Mapping rule will be evaluated like:
dc=domain1,dc=com??sub?(sAMAccountName=laura_callahan)
If Laura Callahan’s entry is found from the search, authorization is based on this user DN (and the groups this user is a member of). If the account is not found, then the second mapping rule is evaluated. If all mapping rules fail to locate a user in the virtual namespace, the user who authenticated with the certificate is considered anonymous.
Only when the first DN mapping rule fails to find a user will the other DN mapping rules be used.
Remember, changing any parameters related to SSL requires a restart of the RadiantOne service.
Client Certificates (Default Java Truststore)
For RadiantOne to connect via SSL to an underlying data source, or accept client certificates for authentication, the appropriate client certificate needs imported (unless they are signed by a trusted/known Certificate Authority). For classic RadiantOne architectures (active/active or active/passive), these certificates can be imported into the default Java trust store (<RLI_HOME>\jdk\jre\lib\security\cacerts).
If RadiantOne is deployed in a cluster, import the client certificates into the cluster level truststore instead of the default one so they can be dynamically shared across all cluster nodes.
To manage the client certificates contained in the default Java trust store, click Manage next to the Client Certificates property.
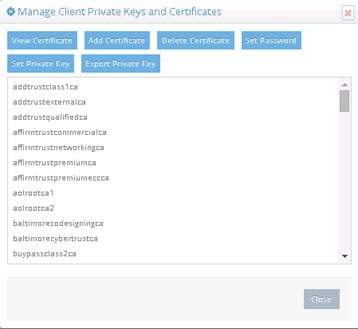
Figure 5: Managing Client Certificates in the Default Java Truststore
Viewing Client Certificates
To view a certificate, select the certificate in the list and click View Certificate. Valuable information about the certificate is shown (who issued the certificate, who the certificate was issued to, when the certificate is set to expire, status…etc.). From this location, you have the option to copy the certificate to a file.
Adding Client Certificates
To add a certificate:
-
Click Add Certificate.
-
Browse to the location of the client certificate file and click OK.
-
Click Add Certificate.
-
Enter a short, unique name (alias) for the certificate and click OK.
-
Enter the Key Store Password and click OK. The default password is changeit.The added certificate appears in the list.
-
Click Save in the upper right corner.
-
Restart the RadiantOne service.
Deleting Client Certificates
To delete a certificate:
-
Select the desired certificate and click Delete Certificate.
-
Click Yes to confirm the deletion.
-
Click Save in the upper right corner.
-
Restart the RadiantOne service.
Set Key Store Password
To change the Key Store password (which by default is changeit):
-
Click Set Password.
-
Enter the old password, new password, and confirm the new password. Click OK.
-
Save Save in the upper right corner.
Certificate Revocation List
A Certificate Revocation List (CRL) is a list identifying revoked certificates, signed by a Certificate Authority (CA) and made available to the public. The CRL has a limited validity period, and updated versions of the CRL are published by the CA when the previous CRL’s validity period expires.
RadiantOne supports CRL checking and relies on the underlying Java security libraries (JSSE) to handle this logic during the SSL/TLS handshake process before the LDAP bind is received by the server. Both CRLDP and OCSP are supported. For CRLDP (CRL Distribution Point), there are URIs specified by the certificate's "CRL Distribution Points", by which the servers hosting CRL can be reached. For OCSP (Online Certificate Status Protocol), the URIs are specified in the certificate in the extended attribute “authorityInfoAccess”, by which the servers enforcing CRL checking can be reached. More details about OCSP can be found in RFC 2560.
Enable CRL
If clients are connecting to RadiantOne with certificates (establishing mutual authentication) and the client certificate should be validated to ensure it has not been revoked prior to accepting it, the Enable CRL parameter needs checked. From the Main Control Panel go to the Settings tab > Security > SSL. Then, on the right side, check the Enable CRL option.
CRL Methods
There are three different supported CRL checking methods; dynamic, static and failover. These methods are described below.
The tradeoff between a static CRL file and a dynamic CRL checking would be that a dynamic CRL would be more robust and correct but the size of the CRL file may impact the performance of the revocation checking logic.
Dynamic
CRLDP and OCSP are used to determine certificate validity and revocation status. OCSP is checked first. If OCSP returns the certificate's status as unknown, then the CRLDP is used.
The location of the OCSP responder is determined implicitly from the certificate being validated. To explicitly specify the location of the OCSP responder, set the following property using the vdsconfig utility on the RadiantOne instance.
C:\radiantone\vds\bin>vdsconfig set-property -name ocspResponderURL -value "http://ocsp.example.net:80"
This command can also be run through ADAP. For assistance with changing configuration through ADAP, see: VDS Config Utility
This property is used when the Authority Information Access extension (defined in RFC 5280) is absent from the certificate or if you want to override the value in the certificate.
Failover
CRLDP and OCSP are used to determine certificate validity and revocation status (OCSP is checked first). If the checking fails to get the CRL from CRLDP and using OCSP, then it attempts to check the certificate’s status against the static CRL file(s) specified in the CRL file/directory parameter. The CRL file(s) are loaded only once when the RadiantOne service starts.
The location of the OCSP responder is determined implicitly from the certificate being validated. To explicitly specify the location of the OCSP responder, set the following property using the vdsconfig utility on the RadiantOne instance.
C:\radiantone\vds\bin>vdsconfig set-property -name ocspResponderURL -value "http://ocsp.example.net:80"
This command can also be run through ADAP. For assistance with changing configuration through ADAP, see: VDS Config Utility
This property is used when the Authority Information Access extension (defined in RFC 5280) is absent from the certificate or if you want to override the value in the certificate.
Static
The certificate is validated against a preloaded local CRL file (this can be many files zipped together or could be a file system directory where all CRL files are located). The certificate authority’s CRL file must be downloaded and the location of the file must be specified in the CRL file/directory parameter. The CRL file(s) are loaded only once when the RadiantOne service starts.
To select the CRL method, from the Main Control Panel got to the Settings tab > Security > SSL. Then, on the right side, once the Enable CRL option is checked, the CRL Method drop-down list is available. Select the desired method from this list. Click Save to apply your changes to the server.
OcspResponderURL
If the certificate does not include a URI, enter the OCSP responder URL in this field. If this field is populated, the specified OCSP responder is contacted to determine revocation status.
CRL File/Directory
If the static (or failover) CRL checking mechanism has been selected, the value of the Server Certificate Revocation List File parameter should point to the CRL file downloaded from the certificate authority. This can be a file containing multiple CRL files if needed. Client certificates can be validated against this list.
The Server Certificate Revocation List File parameter is configurable from the Server Control Panel > Settings tab. If you are deployed in a cluster, each node must have the CRL file on their host machine and the location can vary. Therefore, you must go into the Server Control Panel associated with each node and set the location of the CRL file.
Inter Nodes Communication
Within a cluster, nodes must be able to communicate with each other. This is required for block replication (replicating data across RadiantOne Universal Directory stores) which uses the Admin HTTP Service HTTP/HTTPS and redirecting write operations to the leader node which uses LDAP/LDAPS. If the communication across the cluster nodes should use SSL, choose the Always use SSL option. If your cluster nodes are running in a secured environment (and in general they should be), you can choose to never use SSL. Forcing the use of SSL will slow down the communication speed between nodes.
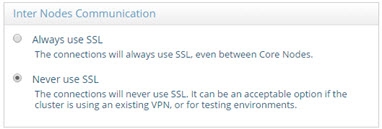
Figure 6: Inter Nodes Communication
Client Certificate Trust Store (Cluster Level Trust Store)
Many RadiantOne installed components (e.g. Control Panel) act as client’s to the local RadiantOne service and might require SSL access. Therefore, any time you change the RadiantOne server certificate, you must import the corresponding public key certificate into the Client Certificate Trust Store (unless the signer of the server certificate is already trusted).
Also, the certificates in the Client Certificate Trust Store are used by RadiantOne to connect via SSL to underlying data sources. Therefore, the appropriate client (public key) certificate (associated with the server certificate of the backend) needs imported into the Client Certificate Trust Store (unless they are signed by a trusted/known Certificate Authority).
RadiantOne loads all client certificates from the default Java truststore (<RLI_HOME>/jdk/jre/lib/security/cacerts) when it starts. Then, it dynamically loads all other certificates from the Client Certificate Trust Store. This allows client certificates to be dynamically added at any time without needing to restart the RadiantOne service. When RadiantOne is deployed in a cluster, all nodes share the contents of the Client Certificate Trust Store.
It is not recommended to import client certificates into the default Java truststore (<RLI_HOME>/jdk/jre/lib/security/cacerts) since this is overwritten each time there is a RadiantOne patch that requires a Java update and requires a restart of the RadiantOne service every time you add new certificates. For these reasons, it is recommended to use the RadiantOne Client Certificate Trust Store instead.
Import client certificates into the truststore from the Main Control Panel > Settings Tab > Security section > Client Certificate Truststore. Certificates can be viewed, imported, exported or deleted from here.
When RadiantOne is deployed in a cluster, the public key associated with each server node must be stored in the client certificate truststore if you want the nodes to be able to communicate with each other over SSL. Keep this in mind if you ever change the server certificates on any of the cluster nodes.
Viewing Client Certificates
To view a certificate, select the certificate in the list and click View. Valuable information about the certificate is shown (who issued the certificate, who the certificate was issued to, when the certificate is set to expire, status…etc.).
Adding Client Certificates
To add a certificate:
- Click Import.
- Enter a short, unique name (alias) for the certificate.
- Browse to the location of the client certificate file and click OK.
- Click Save in the upper right corner.
Deleting Client Certificates
To delete a certificate:
- Select the desired certificate and click Delete.
- Click Yes to confirm the deletion.
- Click OK to exit the confirmation.
- Click Save in the upper right corner.
Exporting Client Certificates
To export a certificate:
- Select the desired certificate and click Export.
- Enter a location to export the file to.
- Enter a name for the exported file.
- Click OK to export the certificate to a file.
- Click OK to exit the confirmation.
- Click Save in the upper right corner.
If RadiantOne is deployed in a cluster, all nodes share the contents of the client certificate truststore.
