ADAP External Token Validators
External token validators allow applications to use an access token to call an API on behalf of itself. The API then responds with the requested data. This section assumes that your OIDC provider is already set up.
The processes described in this section are not hardened against security risks. For more information on hardening RadiantOne, refer to the RadiantOne Hardening Guide.
Getting an Access Token
This section describes using the Postman REST client to obtain an access token.
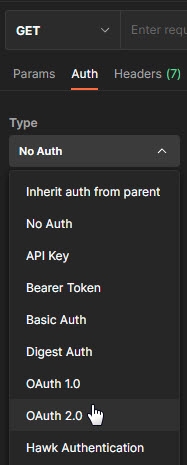
- Start a new request.
- Click the Auth tab.
- From the Type drop down menu, select OAuth 2.0. The Current Token section displays.
-
In the Configure New Token section, enter the Client ID and client secret.
NoteThese values were created during the OIDC provider configuration process.
-
Provide the access token URL.
NoteThis value can be found using the using the metadata URL from the Authorization Server.
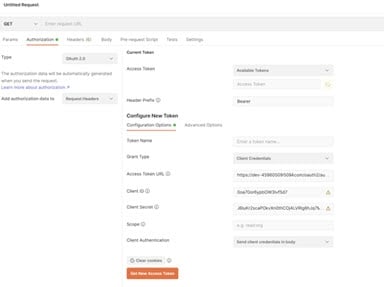
- Click Get New Access Token. The new access token's details are displayed.
-
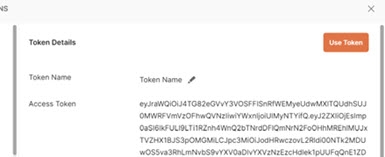
Copy this token and decode it for the values needed by the FID server. You can do this at https://jwt.io/.
-
Keep the decoded token. Several values contained within are required for mapping attributes.
RadiantOne Configuration
This section describes configuring proxy authorization, configuring an ADAP external token validator, and attribute mapping.
Configuring Proxy Authorization
The RadiantOne ADAP (or SCIM) service queries the RadiantOne LDAP service using proxy authorization.
To configure proxy authorization:
-
In the Main Control Panel, navigate to Settings > Server Front End > Supported Controls.
-
Enable Proxy Authorization and click Save.
-
Navigate to Settings > Security > Access Control.
-
Enable the “Allow Directory Manager to impersonate other users” option and click Save.
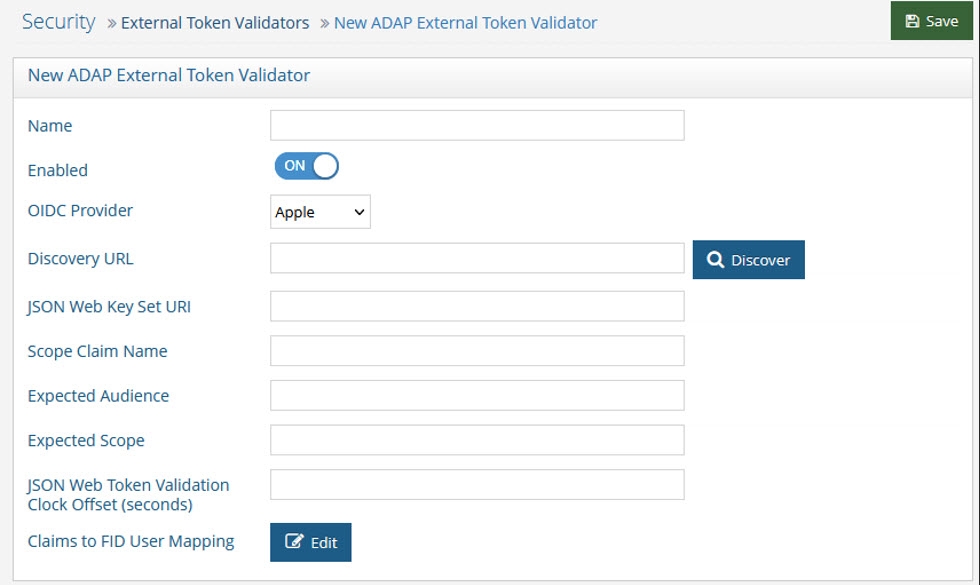
Configuring ADAP External Token Validator
To add an external token validator:
-
In the Main Control Panel, navigate to Settings > Security > External Token Validators.
-
Click Add. The New ADAP External Token Validator page displays.
-
Name the external token validator.
-
Toggle the Enable switch to On.
-
Select an OIDC provider from the drop-down menu (if applicable, to assist with populating the Directory URL syntax). Otherwise, skip this step and enter your own Discovery URL.
-
If the Discovery URL is not loaded automatically, paste the Metadata URI from your OIDC authorization server into the Discovery URL field.
-
Click Discover. The JSON Web Key Set URI auto-populates.
-
Use the Expected Audience from your OIDC client to populate the Expected Audience field.
-
Other values can be obtained from the decoded access token. See the Getting An Access Token section for more information.
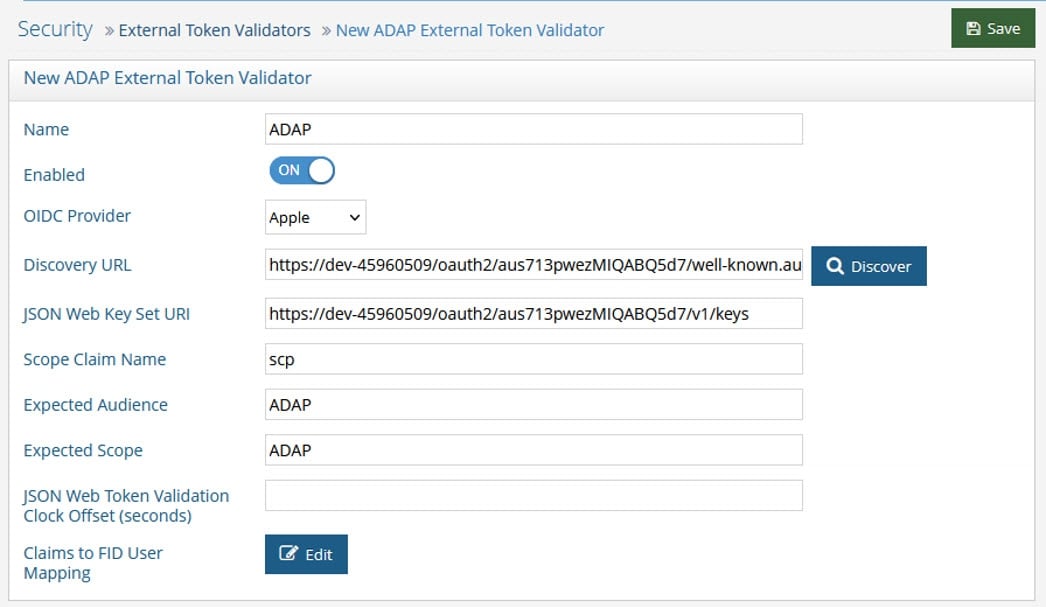
-
(Optional) Enter a value for the JSON Web Token Validation Clock Offset. This is used during the validation of JWTs to account for slight differences in time between the issuer of the token and the recipient. This clock offset is measured in seconds and provides a buffer that can help prevent issues related to time discrepancies, especially around the token's iat (issued at), nbf (not before), and exp (expiration) claims.
-
Click Edit next to Claims to FID User Mapping. The OIDC to FID User Mappings page displays.
-
Click Add.
-
Define either a search expression or a simple DN Expression. In this example, a search expression is defined as shown below.

-
Click OK. Click OK again to close the OIDC to FID User Mappings window.
-
Click Save.
Attribute Mapping
Map a uniquely identifying attribute to a corresponding claim value in the token (refer to the Getting An Access Token section for more information). In the following image, the attribute mail is mapped to the claim value email.
In some cases, creating a new attribute may be required.
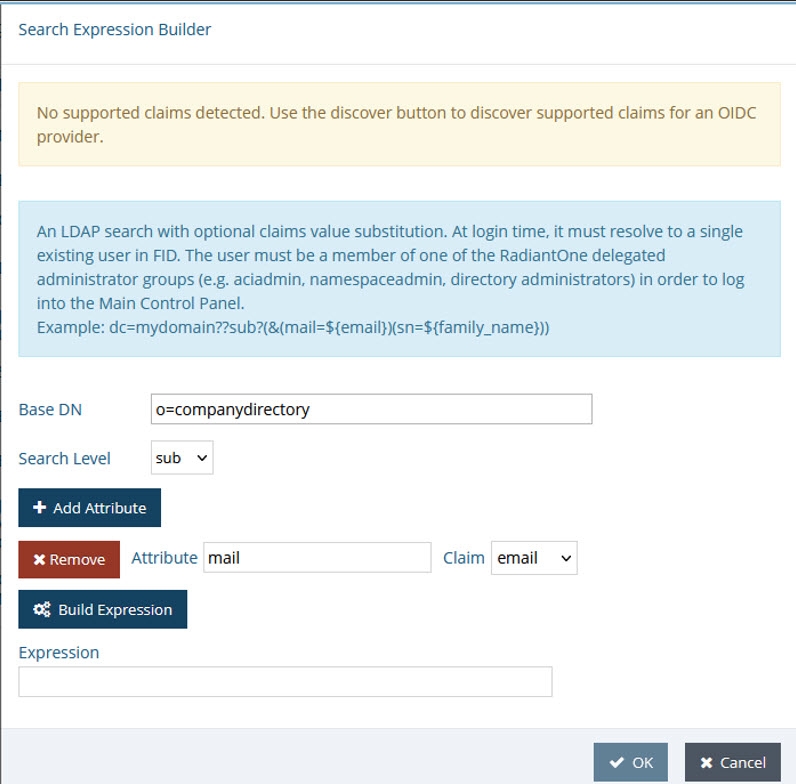
Figure 27: The Search Expression Builder
Completing the Request with Postman
To complete the request with Postman:
- Request a new access token (see Getting An Access Token).
- Click Use Token. This inserts an Authorization header that inserts your bearer token.
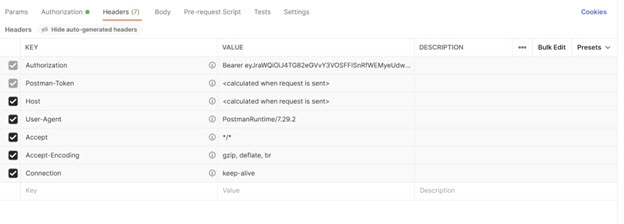
Figure 28: Requesting a new access token
- Send the bearer token to the FID ADAP. In this example, a basic ADAP search is performed.
Field | Value |
|---|---|
URL Syntax | http:// |
Example URL | |
Method | Get |

Figure 29: Sending the bearer token to RadiantOne