Script
Using a script for transformation allows for complex logic to be applied before sending changes to the destination. If you choose to use a script only, without attribute mappings, the transformation gets all change events sent by the capture connector. The script logic must filter out events that you do not want to process. If you use attribute mappings in conjunction with a script, a source event filter can be configured in the mappings to dictate which captured events to process.
If you use both script and attribute mappings, the attribute mappings are applied first.
- On the Main Control Panel > Global Sync tab, select the topology on the left.
- Select Configure next to the pipeline on the right.
- Select the Transformation component and choose either Script or Script and Mappings from the Transformation Type drop-down list.
- Expand the Script section that appears below the Transformation Type and select Edit.
- You can edit and test the script in the window provided. Basic validation is checked when using the script window.
- After the script compiles successfully, select Save. Scripts are saved at:
\vds_server\custom\src\com\rli\scripts\fidsync\{PIPELINE_NAME}and can be viewed or downloaded from Main Control Panel > Settings > Configuration > File Manager.
Leverage existing Java classes
To leverage existing classes in your transformation scripts, perform the following:
- The jar file must be copied in
/vds_server/custom/lib. Use Main Control Panel > Settings > Configuration > File Manager for uploading the jar file. - The class must be imported in the transformation script.
- Example of importing the class in your transformation script:
import com.rli.connectors.changeevent.ChangeOperation;
Custom logging in the transformation script
The add your own log statements into the script, use the following:
log(Level.INFO, "Some message");
The message is logged into /vds_server/logs/sync_engine/sync_engine.log. You can view and download the sync_engine log from Environment Operations Center.
Test the script
When your script has been modified, you can test it by emulating changes from the source.
- On the Main Control Panel > Global Sync tab, select the topology on the left.
- Select Configure next to the pipeline on the right.
- Select the Transformation component and choose either Script or Script and Mappings from the Transformation Type drop-down list.
- Expand the Script section that appears below the Transformation Type and select Edit.
- Select Test.
- Select the source event type (e.g.
INSERT,UPDATE,DELETE) to test. - Enter an Event ID. This is a DN that matches the location in the RadiantOne namespace for the source entries. (e.g.
uid=Aaron_Medler,ou=Accounting,o=companydirectoryassumingo=companydirectoryis the source naming context in RadiantOne). - Add source attribute names and values. Attribute names are in the left column and corresponding value in the right column. Select in the cell, type the value and select Enter. Attribute types can be simple or complex. The definitions for "simple" and "complex" are based on SCIM (http://www.simplecloud.info/specs/draft-scim-core-schema-01.html). Use the red X button next to the attribute to remove it from the test.
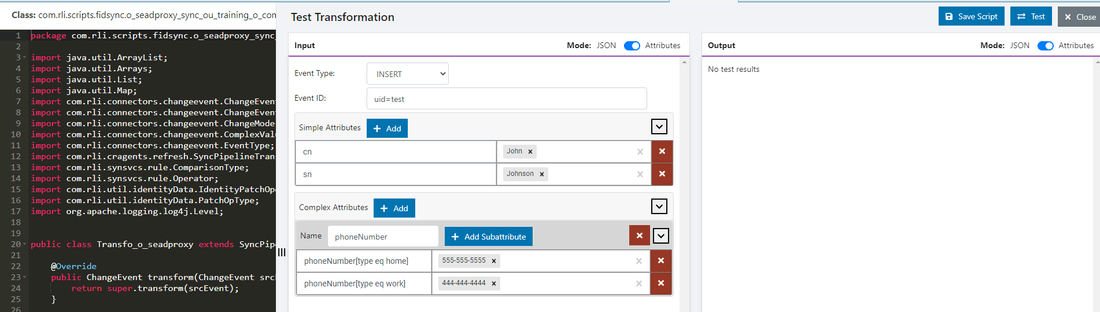
- Select Test
- The results of the script logic are shown in the Output section.
- When you are finished testing the mappings, select CLOSE to go back to the "Configure Pipeline" screen.