Chapter 1: Securing RadiantOne Configuration and Administration
The options available for securing the RadiantOne configuration and administration are discussed in this chapter.
Protect and Monitor Access to the Directory Manager Account
The directory manager account (e.g. cn=Directory Manager by default, this is defined during RadiantOne installation) is a super user account that is managed locally by RadiantOne without password or lockout policies. To mitigate against online password cracking attacks against this account, use a strong password that is:
- At least 9 characters long
- Does not contain any dictionary words
- Contains a mixture of uppercase, lowercase, numbers and special characters
Provide this password only to trusted administrators with business need for super user access. Other accounts used by RadiantOne are managed by backend data sources and subject to lockout policies associated with those backend data sources.
Limit Usage of Directory Manager Account
Knowledge and usage of the RadiantOne super user (e.g. cn=Directory Manager) credentials should be limited. It is highly recommended to use the delegated administrator accounts to manage RadiantOne configuration instead of the super user account. Add your users to the appropriate delegated administrator groups to define the roles they should have for managing the RadiantOne configuration. For details on what activities the delegated administrators can perform, please see the RadiantOne System Admin Guide.
For details on updating the RadiantOne super user (e.g. cn=directory manager) credentials, see the RadiantOne System Administration Guide.
Update Default Delegated Admin Account Passwords
There are eight groups used for delegated administration are Directory Administrator, Namespace Administrator, Operator, Schema Administrator, ACI Administrator, ICS Administrator, ICS Operator, and one role for Read Only access. Default administrative users are included as members of these groups. They are as follows:
uid=aciadmin,ou=globalusers,cn=config Member of the ACI Administrator Group.
uid=icsadmin,ou=globalusers,cn=config Member of the ICS Administrator Group.
uid=icsoperator,ou=globalusers,cn=config Member of the ICS Operator Group.
uid=namespaceadmin,ou=globalusers,cn=config Member of the Namespace Administrator Group.
uid=operator,ou=globalusers,cn=config Member of the Operator Group.
uid=readonly,ou=globalusers,cn=config Member of the Read Only Group.
uid=schemaadmin,ou=globalusers,cn=config Member of the Schema Administrator Group.
uid=superadmin,ou=globalusers,cn=config Member of the Directory Administrator Group.
You can use these default users for delegated administration of RadiantOne activities, or you can add your own users to the various admin roles as described in the Managing Delegation Administration Roles section in the RadiantOne System Administration Guide. To use the default users, you can log in to the Main Control Panel with any of the following (depending on the configuration you want to manage). For details on the privileges and associated activities these users can perform, please see the RadiantOne System Administration Guide.
user: aciadmin password: <set to the same password you defined for the super user (cn=directory manager) during the installation>
user: icsadmin password: <set to the same password you defined for the super user (cn=directory manager) during the installation>
user: icsoperator password: <set to the same password you defined for the super user (cn=directory manager) during the installation>
user: namespaceadmin password: <set to the same password you defined for the super user (cn=directory manager) during the installation>
user: operator password: <set to the same password you defined for the super user (cn=directory manager) during the installation>
user: readonly password: <set to the same password you defined for the super user (cn=directory manager) during the installation>
user: schemaadmin password: <set to the same password you defined for the super user (cn=directory manager) during the installation>
user: superadmin password: <set to the same password you defined for the super user (cn=directory manager) during the installation>
By default, the password for the delegated admin accounts is set to the same password you defined for the super user (cn=directory manager) during the installation of RadiantOne. It is recommended that you change these passwords to match your company security policy and/or follow the same recommendations as detailed in Protect and Monitor Access to the Directory Manager Account. You can also define strong password policies to ensure further protection of these accounts. Or you can delete the default users and assign your own.
To change the password:
-
Log in to the Main Control Panel as the directory manager and select the Directory Browser tab.
-
Navigate below cn=config > ou=globalusers.
-
Select the entry representing the user whose password you want to change. On the right side, select the userPassword attribute.
-
From the Modify Attribute drop-down menu, select Edit. An editable userpassword field displays above the attribute list.
-
Change the value here in the userpassword field. Click OK.
Below is an example of changing the aciadmin user’s password.
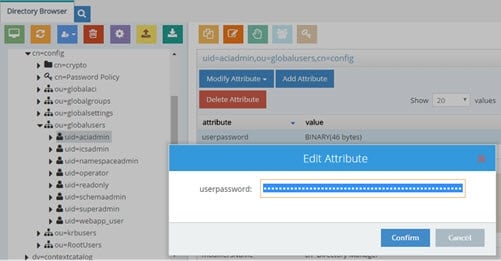
Figure 1.1 : Changing Passwords
Configure Strong Password Policies
RadiantOne offers advanced password policy settings that can be a combination of the following:
-
Allowing users to change their own passwords (require existing password to change).
-
Password strength (minimum length, required uppercase characters, required special characters, required digits and required lowercase characters, required to pass a dictionary check).
-
Password history (prevent password re-use).
-
Forcing passwords changes after reset.
-
Maximum password age.
-
Allowing grace logins after password expires.
-
Multiple password storage schemes are supported (e.g. Salted SHA-1, Salted SHA-256, Salted SHA-384, Salted SHA-512, BCrypt, SCrypt, and PBKDF2)
-
Account lockout – if a user has not authentication successfully for longer than a specified period of time or if a user has reached the failed login threshold.
-
Account expiration.
For details on password policy properties, see the RadiantOne System Administration Guide.
Assign Appropriate Personnel to Delegated Administration Roles
There are eight default delegated administration groups/roles available for managing the RadiantOne configuration. Only members of these groups can login to the Main Control Panel.
The eight groups used for delegated administration are Directory Administrator, Namespace Administrator, Operator, Schema Administrator, ACI Administrator, ICS Administrator, ICS Operator, and one role for Read Only access. To add or remove members, log into the Main Control Panel as the super user and click on the Directory Browser tab. Navigate below ou=globalgroups,cn=config node to locate all of the groups. Select the group you want to manage and click the Manage Group button. From here you can remove users from groups and search for new users (located anywhere in the RadiantOne namespace) to add to groups. For complete configuration steps, see the RadiantOne System Administration Guide.
It is recommended that only users required to configure and administer RadiantOne get assigned to these groups.
Leverage Corporate Identity Provider and Strong Authentication Practices to Login to the Control Panel
Log into the Control Panel using strong authentication methods like MFA and/or PIV Card/Certificate as an alternative to using username and password. For details on this configuration, please see the RadiantOne System Administration Guide.