Security
To access the RadiantOne service via LDAP, the LDAP client must authenticate itself. This process is called a “bind” operation and means, the client must tell the LDAP server who is going to be accessing the data so that the server can decide what the client is allowed to see and do (authorization). After the client successfully authenticates, RadiantOne checks whether the client is allowed to perform subsequent requests. This process is called authorization and is enforced via access controls.
RadiantOne supports three types of authentication: anonymous, simple and SASL.
Anonymous:
Clients that send an LDAP request without doing a "bind" are treated as anonymous. Clients who bind to RadiantOne without a password value are also considered anonymous.
Simple:
Simple authentication consists of sending the LDAP server the fully qualified DN of the client (user) and the client's clear-text password. To avoid exposing the password in clear over the network, you can use SSL (an encrypted channel). For details on configuring SSL, please see the SSL Settings section.

SSL Settings
SSL settings are applicable to clients connecting to the RadiantOne service LDAPS endpoint and involve indicating how managing the certificates in the default Java truststore (cacerts), which cipher suites are supported by RadiantOne, and certificate revocation. These subjects are described in this section.
Enable SSL
SSL/TLS is used by default and cannot be disabled.
Supported Cipher Suites
To view the cipher strength levels enabled in RadiantOne, go to the Main Control Panel > Settings Tab > Security section > SSL sub-section and click View next to Supported Cipher Suites.
Enabled SSL Protocols
To view the enabled SSL protocols enabled in RadiantOne, go to the Main Control Panel > Settings Tab > Security section > SSL sub-section. Click View next to Enabled SSL Protocols.
Debug SSL
SSL is enabled by default, but SSL logging is disabled by default. When SSL logging is enabled, SSL events have an entry in vds_server.log. SSL events are logged at INFO level, so log settings for VDS – Server must be at least at INFO level. You can view and download the vds_server.log from the Server Control Panel > Log Viewer.
For more information on log levels, refer to the RadiantOne Logging and Troubleshooting Guide.
To enable SSL logging:
-
From the Main Control Panel, click Settings > Logs > Log Settings.
-
From the Log Settings to Configure drop-down menu, select VDS – Server.
-
Verify that the Log Level drop-down menu is set to one of the following: INFO, DEBUG, or TRACE.
-
If you change the log level, click Save.
-
Click Security -> SSL.
-
In the SSL section, check the Debug SSL box.
-
Click Save.
-
Restart the RadiantOne service.
Authentication Methods
This section is accessible only in Expert Mode.
Simple LDAP Bind
For accounts stored in RadiantOne Directory (HDAP) stores, the following table lists the potential LDAP response codes returned during bind operations.
Condition | Bind Response Error Code and Message |
|---|---|
User Name and Password are Correct. Bind is successful. | Error code 0 |
Valid User Name with Incorrect Password. Bind is unsuccessful. | Error code 49, Reason 52e - invalid credentials |
Invalid User Name/DN. Bind is unsuccessful. | Error code 49, Reason 525 – User not found |
Valid User Name with Expired Password. Bind is unsuccessful. | Error code 49, Reason 532 – Password expired. Password has expired. |
User Name and Password are Correct. Account is locked due to nsAccountLock attribute set to true. Bind is unsuccessful. | Error code 53, Reason 533 - Account disabled: Account inactivated. Contact system administrator to activate this account. |
Valid User Name with Incorrect Password. Account locked due to too many bind attempts with invalid password. Bind is unsuccessful. | Error code 19, Reason 775 – Account Locked: The password failure limit has been reached and the account is locked. Please retry later or contact the system administrator to reset the password. |
Valid User Name with no password. Bind might succeed; it depends on the “Bind Requires Password” setting. | If “Bind Requires Password” is enabled, error code 49, invalid credentials, is returned. If “Bind Requires Password” is not enabled, the user is authenticated as Anonymous. |
User Name and Password are Corrrect. Account is locked due to inactivity. Bind is unsuccessful. | Error Code 50, Reason 775 – Account Locked. This account has been locked due to inactivity. Please contact the system administrator to reset the password. |
No User Name with no password. Bind is successful. | Error code 0. User is authenticated as Anonymous. |
RadiantOne Directory Attribute Encryption
Attribute encryption prevents data from being readable while stored in a RadiantOne Directory store, any temporary replication stores/attributes (cn=changelog, cn=replicationjournal, cn=localjournal), backup files, and exported LDIF files (must use the LDIFZ file extension). Attribute values are encrypted before they are stored in the RadiantOne Directory store, and decrypted before being returned to the client, as long as the client is authorized to read the attribute (based on ACLs defined in RadiantOne), is connected to RadiantOne via SSL, and is not a member of the special group (e.g. cn=ClearAttributesOnly,cn=globalgroups,cn=config).
There are two items to configure. One is the criteria for the key generation used to encrypt/decrypt the attributes. Two is the list of attributes you want to encrypt.
Key Generation
To define the criteria used to generate an encryption key:
-
Navigate to Main Control Panel > Settings Tab > Security section > Attribute Encryption sub-section.
-
On the right, click Define Key Generation.
-
Select the desired cipher from the drop-down list or select AWSKMS if you want to use your own Customer Master Key (CMK) in Amazon Web Services (AWS) Key Management Service (KMS) and have configured the necessary settings in ZooKeeper.

- If you selected a cipher suite in the previous step, enter a security key. This value is used to auto-generate an encryption key. If you plan on deploying multiple clusters that will participate in inter cluster replication for encrypted attributes, take note of the value you enter here as you must use it when configuring the security key in the other clusters.
An encryption key is auto-generated based on the cipher and security key value provided. This key is used across nodes in a cluster to encrypt/decrypt the attributes configured for encryption. If inter-cluster replication is deployed, all clusters must be configured with the same cipher and security key.
Using Amazon Web Services (AWS) with a Customer Master Key (CMK)
Instead of using the default key generation, you have the option to use a customer master key stored in AWS. The following steps describe the configuration.
Key rotation is optional in AWS for KMS. If enabled, the default key rotation is once every 365 days. For details on AWS Key Management Service, please see the AWS documentation.
-
Log into your AWS account to create your CMK (Customer Master Key).
-
With your CMK information, log into the Main Control Panel and go to the ZooKeeper tab.
-
On the ZooKeeper tab, navigate to /radiantone/v2/doccluster/config/vds_server.conf, click Edit Mode, and locate the following properties:
  "awsAccessKeyId" : null,
  "awsSecretAccessKey" : null,
  "awsKmsCMKRegion" : null,
  "awsKmsCMKAlias" : null,
-
For the “awsAccessKeyId” property, overwrite the null value with your AWS Access Key ID.
-
For the “awsSecretAccessKey” property, overwrite the null value with your AWS Access Key Secret.
-
For “awsKmsCMKRegion” property, overwrite the null value with your AWS region (e.g. "us-east-2").
-
For “awsKmsCMKAlias” property, overwrite the null value with (e.g. "alias/My_Master_Key”).
-
Click Save.
-
Navigate to Main Control Panel > Settings > Security > Attribute Encryption and click Define Key Generation in the relevant section.
-
Select the AWSKMS option from the drop-down list and click OK.
-
Click OK to confirm.
-
Define the attributes to encrypt as outlined in the next section.
Attributes to Encrypt
No attributes are encrypted by default. To configure a list of attributes to encrypt:
-
Navigate to the RadiantOne Directory (HDAP) store (or configured persistent cache branch) on the Main Control Panel > Directory Namespace tab.
-
Enter a comma-separated list of attribute names in the Encrypted Attributes property.
-
Click Save.
-
Click Re-build Index (if your configuration is a RadiantOne Directory Store) or Initialize to reinitialize the cache (if your configuration is a Persistent Cache).
Attributes listed in the Encrypted Attributes property are added to the Non-indexed attribute list by default. This means these attributes are not searchable by default. Indexing encrypted attributes is generally not advised as the index itself is less secure than the attribute stored in RadiantOne Directory/persistent cache. However, if you must be able to search on the encrypted attribute value, it must be indexed. Only “exact match/equality” index is supported for encrypted attributes. To make an encrypted attribute searchable, remove the attribute from the list of nonindexed attributes and then click Re-build Index or Initialize (to reinitialize) if the branch is a persistent cache.
Accessing Encrypted Attributes
Attribute values are encrypted before they are stored in the RadiantOne Directory/persistent cache, and decrypted before being returned to the client, as long as the client is authorized to read the attribute (based on ACLs defined in RadiantOne), is connected to RadiantOne via SSL, and not a member of the special group containing members not allowed to get these attributes (e.g. cn=ClearAttributesOnly,cn=globalgroups,cn=config).
Using Main Control Panel to Access Encrypted Attributes
When viewing RadiantOne Directory/persistent cache entries or exporting them to an LDIF file from the Main Control Panel > Directory Browser tab, make sure you are connected via SSL, otherwise the attributes are returned/exported as encrypted.
Operations performed on the Directory Browser tab are based on an SSL connection to RadiantOne, and the attributes defined as encrypted are returned decrypted as long as the user you’ve connected to the Main Control Panel with is authorized to read those attributes and this user is not a member of the Clear Attributes Only Group (which by default is the ClearAttributesOnly group located at,ou=globalgroups,cn=config).
Querying Changelog Entries that Contain Encrypted Attributes
When entries containing encrypted attributes are updated and logged into the RadiantOne changelog (e.g. cn=changelog), a client that is connected to RadiantOne via SSL, and is NOT a member of the special Clear Attributes Only Group (which by default is the ClearAttributesOnly group located at,ou=globalgroups,cn=config) can see encrypted attributes in clear text. If the client is connected to RadiantOne via SSL and is a member of the special Clear Attributes Only Group, the value in the “changes” attribute is returned encrypted.
Clear Attributes Only Group
To apply a deny-by-exception policy to encrypted attributes, you can add users to the ClearAttributesOnly group. Members of this group cannot get encrypted attributes in clear, even if ACLs dictate they can read the encrypted attribute(s) and they are connecting to RadiantOne via SSL.
The table below summarizes the behavior of this special group when a user is connected to RadiantOne via SSL.
Is user a member of the special group? | Attributes In DIT | Values in “changes” attribute In Changelog |
|---|---|---|
No | Clear text | Clear text |
Yes | Not displayed | Encrypted |
To add a user to the Clear Attributes Only group:
-
In the Main Control Panel, click the Directory Browser tab.
-
Expand cn=config and then expand ou=globalgroups.
-
Select cn=ClearAttributesOnly.
-
On the right, click
 (Manage Group).
 -
From here you can add users to the group.
To change the default group, on the Main Control Panel, go to the Zookeeper tab (requires Expert Mode). Expand radiantone > <version> > <clustername> > config and select vds_server.conf. Modify the value for "encryptedAttributeBlacklistGroupDn" to the full DN that points to the group entry to which the exclusion behavior should apply.
Updating Encrypted Attributes
To update encrypted attributes, the client must connect to RadiantOne via SSL and be authorized (via ACLs) to read and update the attribute and not be in the special Clear Attributes Only Group. When editing entries from the Main Control Panel > Directory Browser tab > selected RadiantOne Directory store, the attributes defined as encrypted are shown in clear as long as the user you’ve connected to the Main Control Panel is authorized to read those attributes and is not a member of the blacklisted group. In this case, the connected user can also update the encrypted attribute if permissions allow for it.
Changing an Encryption Key
If you need to change the encryption security key, follow the steps below.
-
Go to Main Control Panel > Directory Namespace tab.
-
Select the naming context representing the RadiantOne Directory (HDAP) store.
-
On the right, remove all values from the encrypted attributes list.
-
Click Save.
-
Click Re-build Index.
-
Repeat steps 1-5 for each store that has encrypted attributes.
-
Go to Main Control Panel > Settings tab > Security > Attribute Encryption.
-
Click Define Key Generation. This option is only available if you removed encrypted attributes and rebuilt the index for all applicable stores.
-
Go to Main Control Panel > Directory Namespace tab.
-
Select the naming context representing the RadiantOne Directory (HDAP) store.
-
On the right, add required attributes to the encrypted attributes list.
-
Click Save.
-
Click Re-build Index.
-
Repeat steps 9-13 for all stores that require encrypted attributes.
LDIF File Encryption
Using the LDIFZ format when exporting entries produces a zipped and encrypted LDIF file. This prevents data from being readable while stored in exported LDIF files. This setting is required to support LDIFZ file exports.
Key Generation
To define the criteria used to generate an encryption key:
-
Navigate to Main Control Panel > Settings Tab > Security section > Attribute Encryption sub-section.
-
On the right, for LDIFZ Encryption Key, click Define Key Generation.
-
Select the desired cipher from the drop-down list or select AWSKMS if you want to use your own Customer Master Key (CMK) in Amazon Web Services (AWS) Key Management Service (KMS) and have configured the necessary settings in ZooKeeper. If unlimited Java security libraries are enabled, there are more available ciphers in this drop-down list.
-
If you selected a cipher suite in the previous step, enter a security key. This value is used to auto-generate an encryption key. If you plan on deploying multiple clusters that will participate in inter cluster replication and you are going to initialize RadiantOne Directory (HDAP) stores from an exported LDIFZ file, take note of the value you enter here as you must use it when configuring the LDIFZ cipher and security key in the other clusters.
Changing an Encryption Key
If you need to change the LDIFZ encryption security key, follow the steps below.
-
Go to Main Control Panel > Settings tab > Security > Attribute Encryption.
-
On the right, for LDIFZ Encryption Key, click Define Key Generation.
-
Select the cipher and enter a security key.
-
Click OK.
-
Click Save.
LDIFZ files generated with the old encryption key are no longer usable.
Requiring LDIFZ for Exports
The Secure LDIF Export option allows you to enforce the use of the encrypted LDIFZ format when exporting entries from the Directory Browser tab. With this setting enabled, using the unencrypted LDIF format for exports is not supported.
Enabling secure LDIF exports requires first defining an LDIFZ encryption key. See the Changing an Encryption Key section for more information.
To enable the secure LDIF export option:
-
In the Main Control Panel, click the Settings tab.
-
Navigate to the Security section and select Attribute Encryption.
-
In the Secure LDIF Export section, click the Enabled switch.
-
Click Save.
This feature works with the LDIFZ Encryption option as outlined in the table below.
LDIFZ Encryption Key | Secure LDIF Export | Available Export Formats:
| Available Export Formats:
|
undefined | Disabled | 🗹 | ⌧ |
undefined | Enabled | N/A because you can�’t enable Secure LDIF if the LDIFZ encryption key is not defined. | N/A because you can’t enable Secure LDIF if the LDIFZ encryption key is not defined. |
defined | Disabled | 🗹 | 🗹 |
defined | Enabled | ⌧ | 🗹 |
ADAP External Token Validators
External token validators allow applications to use an access token to call an API on behalf of itself. The API then responds with the requested data. This section assumes that your OIDC provider is already set up.
The processes described in this section are not hardened against security risks. For more information on hardening RadiantOne, refer to the RadiantOne Hardening Guide.
Getting an Access Token
This section describes using the Postman REST client to obtain an access token.
- Start a new request.
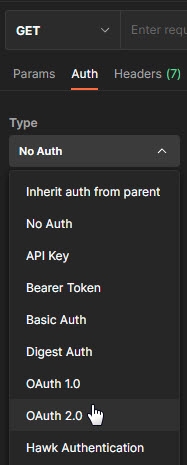
- Click the Auth tab.
- From the Type drop down menu, select OAuth 2.0. The Current Token section displays.
-
In the Configure New Token section, enter the Client ID and client secret.
NoteThese values were created during the OIDC provider configuration process.
-
Provide the access token URL.
NoteThis value can be found using the using the metadata URL from the Authorization Server.
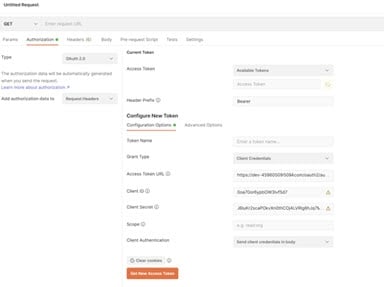
- Click Get New Access Token. The new access token's details are displayed.
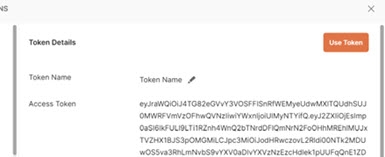
-
Copy this token and decode it for the values needed by the FID server. You can do this at https://jwt.io/.
-
Keep the decoded token. Several values contained within are required for mapping attributes.
RadiantOne Configuration
This section describes configuring proxy authorization, configuring an ADAP external token validator, and attribute mapping.
Configuring Proxy Authorization
The RadiantOne ADAP (or SCIM) service queries the RadiantOne LDAP service using proxy authorization.
To configure proxy authorization:
-
In the Main Control Panel, navigate to Settings > Server Front End > Supported Controls.
-
Enable Proxy Authorization and click Save.
-
Navigate to Settings > Security > Access Control.
-
Enable the “Allow Directory Manager to impersonate other users” option and click Save.
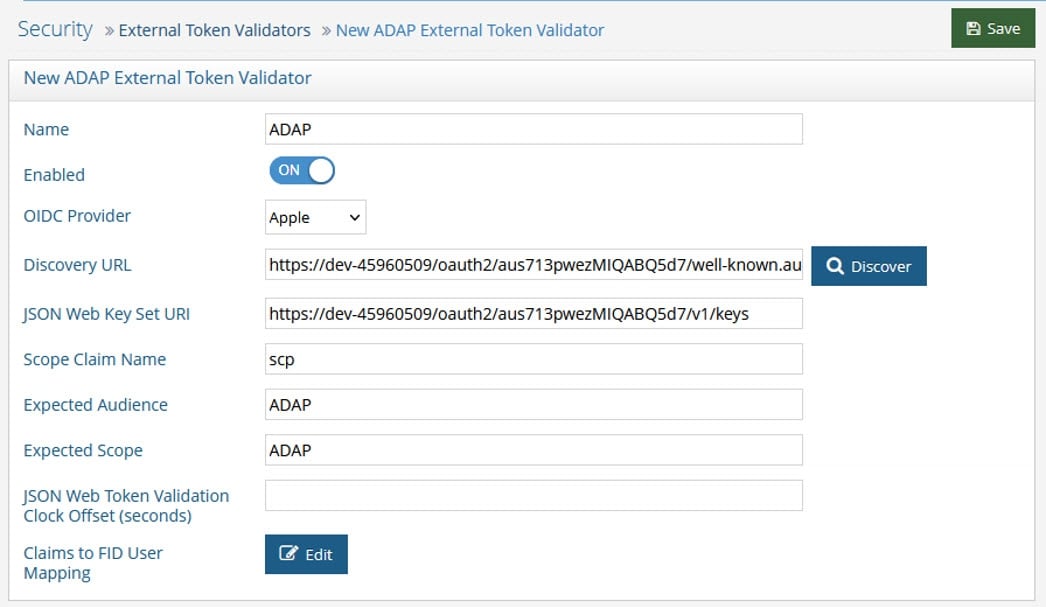
Configuring ADAP External Token Validator
To add an external token validator:
-
In the Main Control Panel, navigate to Settings > Security > External Token Validators.
-
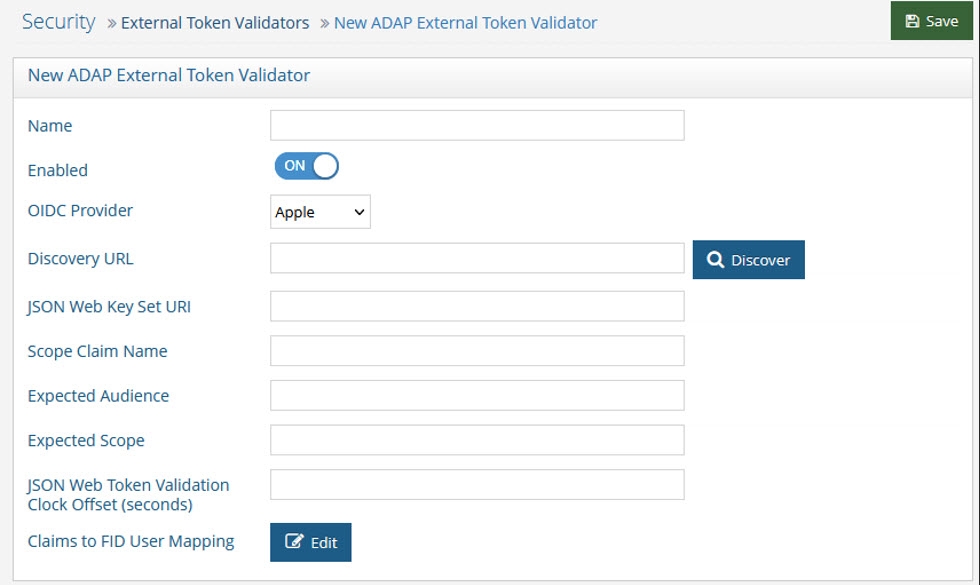
Click Add. The New ADAP External Token Validator page displays.
-
Name the external token validator.
-
Toggle the Enable switch to On.
-
Select an OIDC provider from the drop-down menu (if applicable, to assist with populating the Directory URL syntax). Otherwise, skip this step and enter your own Discovery URL.
-
If the Discovery URL is not loaded automatically, paste the Metadata URI from your OIDC authorization server into the Discovery URL field.
-
Click Discover. The JSON Web Key Set URI auto-populates.
-
Use the Expected Audience from your OIDC client to populate the Expected Audience field.
-
Other values can be obtained from the decoded access token. See the Getting An Access Token section for more information.
-
(Optional) Enter a value for the JSON Web Token Validation Clock Offset. This is used during the validation of JWTs to account for slight differences in time between the issuer of the token and the recipient. This clock offset is measured in seconds and provides a buffer that can help prevent issues related to time discrepancies, especially around the token's iat (issued at), nbf (not before), and exp (expiration) claims.
-
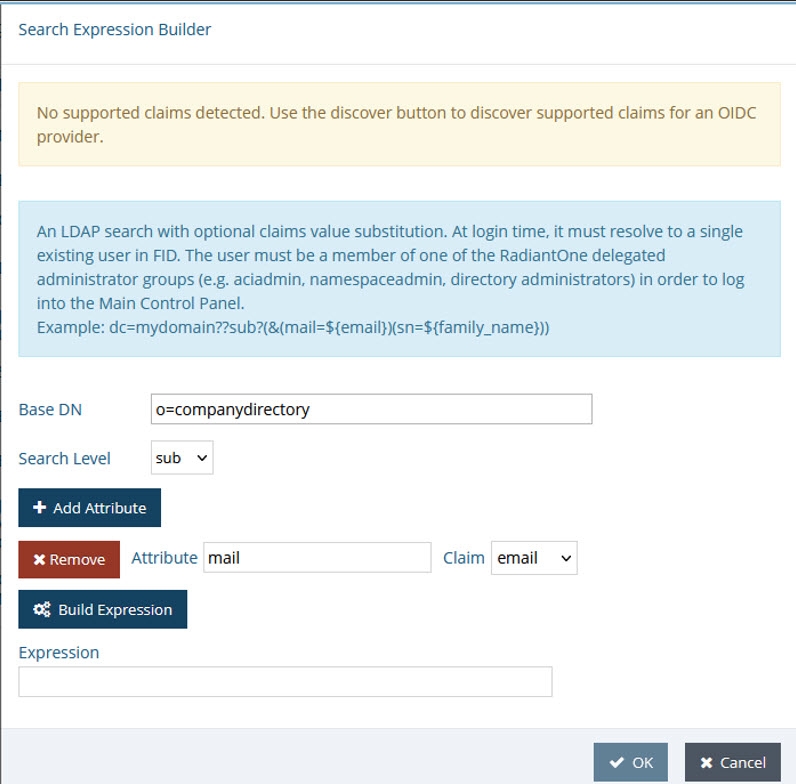
Click Edit next to Claims to FID User Mapping. The OIDC to FID User Mappings page displays.
-
Click Add.
-
Define either a search expression or a simple DN Expression. In this example, a search expression is defined as shown below.

-
Click OK. Click OK again to close the OIDC to FID User Mappings window.
-
Click Save.
Attribute Mapping
Map a uniquely identifying attribute to a corresponding claim value in the token (refer to the Getting An Access Token section for more information). In the following image, the attribute mail is mapped to the claim value email.
In some cases, creating a new attribute may be required.
Completing the Request with Postman
To complete the request with Postman:
- Request a new access token (see Getting An Access Token).
- Click Use Token. This inserts an Authorization header that inserts your bearer token.
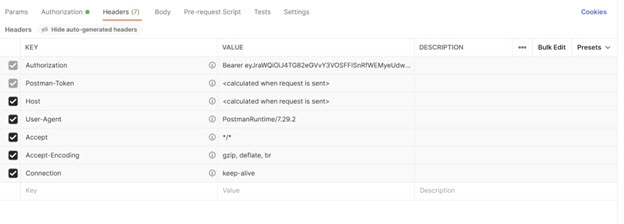
- Send the bearer token to the FID ADAP. In this example, a basic ADAP search is performed.
Field | Value |
|---|---|
URL Syntax | http:// |
Example URL | |
Method | Get |

DoS Filter
DoS filter settings allow you to limit the number or frequency of interactions, such as the number of incoming requests, that RadiantOne has. This is useful for limiting exposure to abuse from request flooding that might result from a misconfigured client or from maliciousness. If enabled, the filter keeps track of the number of requests per second from a connection. If a limit is exceeded, the request is either rejected, delayed, or throttled.
Requests in excess of the per-second limit are throttled by being queued for delayed processing, and eventually rejected altogether if they continue to accumulate. An unthrottled request is processed immediately without intervention by the filter.
To enable DoS filtering:
-
In the Main Control Panel, navigate to Settings > Security > DoS Filter. The DoS Filter page is displayed.
-
Make changes to the following settings as required and click Save.
-
Click Enable DoS Filter.
-
Max Requests per Second per Connection – The maximum number of requests from a connection per second. Requests above this limit will be delayed for processing and eventually dropped if they continue to accumulate. The default value is 25.
-
Minimum Delay in Milliseconds – Over-limit requests will be delayed this long before being processed. Set to -1 to immediately discard over-limit requests, or set to 0 for no delay.
-
Max Over-limit Requests Pending – After Max Requests per Second per Connection + Throttled Requests total requests within a one-second period is reached, additional messages are ignored and discarded.
-
Max Processing Time in Milliseconds – The maximum allowable time to process a request.
-
Max Idle Tracker in Milliseconds – Sets the maximum amount of time to keep track of request rates for a connection before discarding it.
-
Insert Header – Check this option to insert the Dos filter headers into the response.
-
Track Session – Check this option to have usage rates tracked by session (if a session exists).
-
Track Remote Port – Set this option to have usage rates tracked by IP and port if session tracking is not used.
-
IP Whitelist – Enter a comma-separated list of IP addresses that are not to be rate-limited. Each entry is IP address, either in the form of a dotted decimal notation A.B.C.D or in the CIDR notation A.B.C.D/M
NoteRadiantOne FID automatically whitelists all hosts that are members of the cluster so that node-to-node communications are unaffected; these hosts do not need to be added to the whitelist. This whitelist displays only the hosts that are added manually.
-
HTTP Response Code – When the DoS filter cancels the processing of a request, it sends back an HTTP response code. Use this setting to change that code. The default value is 430.
Security and Access Controls
When RadiantOne receives a request, it uses the user in the bind operation, and the access control instructions (ACIs) defined in order to allow or deny access to directory information. The server can allow or deny permissions such as read, write, search, or compare.
ACI are not enforced for the RadiantOne super user (e.g. cn=directory manager).
With ACI, you can control access to targets such as:
- the entire virtual namespace
- a specific subtree
- specific entries in the virtual namespace
- a specific set of entry attributes
- specific entry attribute values
You can define access to the following subjects:
- a particular user
- all users who belong to a specific group
- all users of the directory
Access controls are set from the Main Control Panel > Settings Tab > Security section > Access Control sub-section.
The general ACI syntax is as follows:
(TARGET_DN)(SCOPE)(ATTRIBUTES)(VERSION; ACI_NAME; ALLOW/DENY (OPERATIONS) SUBJECT;)
The following default ACIs are defined:
- All users have read access to the directory for search, compare, and read operations.
If you delete the default read access, this does not delete read access to the RootDSE for RadiantOne. If you want to remove access to the RootDSE, check the *Enable Root DSE" option after you delete the default global read access. This denies access to the RootDSE to everyone except cn=directory manager. You can also add a new ACI that dictates RootDSE access. Below is an example of allowing public access to the RootDSE:
(target="ldap:///")(targetscope="base")(targetattr="*")(version 3.0; acl "RootDSE accessible to public"; allow (read,search,compare) userdn="ldap:///anyone";)
- Users in the group cn=directory administrators,ou=globalgroups,cn=config have full access to the RadiantOne configuration as it is equivalent to cn=directory manager access. However, unlike cn=directory manager, users in this Directory Administrators group are subject to ACIs when accessing data in the RadiantOne namespace.
Access controls defined in RadiantOne are associated with an objectclass named vdACI.
Access Control Terms & Definitions
ACI Description
Each access control instruction has a description which explains the context of the rule.
Location (Target DN)
The location is the target where the access control is to be applied and is a distinguished name.
It is recommended that you set access permissions at the root of your tree. When setting the target, you can navigate to the specific branch that you want to protect.
When setting access controls on a sub-branch, you do not see which access controls have been set up at the parent nodes in the tree. This increases the chance that you may have conflicting access controls defined. Defining access controls at the root helps prevent creating conflicting access rules.
Target Filter
You can also add an LDAP filter condition on the target resource (location) to protect.
For example, you can define the target resource as: all the entries under dv=address book,o=vds that have the attribute securitylevel set to 'secret'.
To create this example, from the Main Control Panel > Settings Tab > Security section -> Access Control sub-section, browse to the dv=address book,o=vds branch and click Add.

Scope
The scope of an access control rule can be entry level (base), one level or subtree level. Entry level pertains to the single entry specified in the Target DN. One level pertains to the entry specified in the Target DN and all child branches one level below it. Subtree level pertains to the entry specified in the Target DN as well as all child branches below this point. Examples of entry level and subtree level access controls are shown below.


Target Attributes
The rule can indicate “equal to” (=) or “not equal to” (!=). Select the desired condition in the drop-down list.

The access rule can apply to “all” attributes or choose the “custom” option and click Select to narrow the list.
By default, the root ACI prevents only the target attribute aci from being returned. This default ACI is shown below.

To improve security, if you want to also prevent userpassword from being returned, you can do so as shown in the following example ACI.
(targetattr != "aci || userPassword")(target = "ldap:///")(targetscope = "subtree")(version 3.0;acl "grant read access to anyone";allow (read,compare,search) (userdn = "ldap:///anyone");)
If you do not want to return the userPassword attribute for anyone other than self, you can do so as shown in the following example ACI.
(targetattr = "userPassword")(target = "ldap:///")(targetscope = "subtree")(version 3.0;acl "Allow Access to userPassword to self";allow (all) (userdn = "ldap:///self");)
Authentication Context
The Authentication Context section offers settings related to the days and times of the week during which the identity is allowed to access data.
Indicate the days and times during the week which the access control instruction is applicable. Select a week day and then enter a time range. Click
 to add the time range. Multiple time ranges per day are supported.
Permissions
If no access permissions have been defined, the default behavior is to grant read access to all attributes except “aci” to everyone. This default is set on the Main Control Panel > Settings Tab > Security section > Access Control sub-section. Select the “root” node. Click Edit or Manual Edit to view/edit it.

Type
You can explicitly allow or deny access permissions by selecting the applicable option from the drop-down.

Operations
The specific operations a user can perform on directory data are defined below. You can allow or deny all operations, or you can assign one or more of the following:
All
Indicates that the subject has the following rights to the targeted entry: read, write, search, delete, compare, and selfwrite. The All access right does not give the following rights to the target entry: proxy.
Example of syntax when all operations are selected:
(targetattr = "homePhone")(target = "ldap:///dv=address book,o=vds")(targetfilter = "(securitylevel=secret)")(targetscope = "subtree")(version 3.0;acl "myaci";allow (all) (userdn = "ldap:///all");)
Read
Indicates whether users can read the directory entries and the attributes of entries specified in the ACI. This permission applies only to the search operation.
Search
Indicates whether users can search on the targets specified in the ACI. This permission applies only to the search operation. The Search right is checked once, and after the search is allowed or denied, it is not checked again. If the search is allowed, the read right is then applied to each entry to be returned as a result of the search and to each attribute of each entry.
Add
Indicates whether users can create entries.
Delete
Indicates whether users can delete entries.
Compare
Indicates whether users can compare data they supply in the request with data stored in the directory. With compare rights, the directory returns a success or failure message in response to an inquiry, but the user cannot see the value of the entry or attribute.
Write
Indicates whether users can modify an entry by adding, modifying, or deleting attributes. This permission applies to the modify and modRDN operations.
Self Write
Indicates whether users can add or delete their own DN in an attribute of the target group entry. The syntax of this attribute must be a distinguished name. This right is used only for group management. Self write works with proxy authorization: it grants the right to add or delete the proxy DN from the group entry (not the DN of the user from the Bind operation).
Proxy
Authorization for RadiantOne data is checked based on the user who authenticated. The authorization ID (DN) is linked to the authenticated ID (DN) for the same connection. With the proxy authorization control enabled, the client can switch the user ID (for authorization purposes) without having to re-authenticate with a new connection.
If there is the need to base authorization on a different user than the one who authenticated, you can use the proxy authorization control. This is primarily useful in environments where an application must authenticate many users and doesn’t want to maintain an open connection to RadiantOne for each of them. With this approach, the application can authenticate the user, and after, impersonate that user for authorization purposes. The application can use its own service account when connecting to RadiantOne and pass the needed control along with the user DN of the person they want to represent for authorization in their requests. RadiantOne then checks the proxy authorization rules that have been configured in access controls to make sure the service account is allowed to represent the person passed in their request. If so, the service account is allowed to perform any operations the person they are impersonating would be allowed to do.
The proxy option indicates whether the subject can access the target with the rights of another entry. You can grant proxy access using the DN of any user in the directory except the special cn=directory manager user. In addition, you cannot grant proxy rights to the cn=directory manager user. If the branch you are protecting with access controls is a local LDAP/HDAP store, then this requires the Proxy Authorization control enabled for RadiantOne.
Subjects
A subject is whom the access control rule applies to. The subject types that can be associated with access control rules are described below:
It is recommended to define access controls on subjects that are located in a RadiantOne Directory (HDAP) store or persistent cache. This prevents possible performance or network issues involved with RadiantOne connecting to a backend directory in order to enforce authorization. If your ACI’s require subjects that are located in backend directories, make sure that the backend is configured for high availability and that the RadiantOne data source is configured with the failover servers appropriately.
- Users – applicable to any specific user(s).
- Groups – applicable to a group of users. If the group is a nested group in HDAP, enable Main Control Panel > Settings > Security > Access Control > Enable Nested Groups and configure Linked Attribute settings from Main Control Panel > Settings > Interception > Special Attributes Handling.
- Tree Branch - Applicable to the DN specified as part of the subject and all entries below it in the virtual directory tree. The defined access permissions apply to any user found in the tree branch you choose.
- Group Owner - applicable to the owner, manager, or role of the group. You can define the target, scope, attributes and permissions using the Control Panel and then select this ACI and click Manual Edit to refine the subject for this complex scenario. See below for an example:
(targetattr="*")(target="ldap:///o=My Company?manager,owner,role")(targetscope = "subtree")(version 3.0;acl "Group owner access only";allow (all)(userdn = "ldap:///self");)
The above ACI will dictate that: if the binding user is the "manager", or the "owner", or bearing the "role" of the targeted entity, then the binding user has the access to targeted entry; otherwise, the access is denied.
- Public – anyone connected to the directory is considered public. This also includes anonymous users.
- Self – applicable to the user whose authenticated DN matches the DN of the entry that is being accessed.
- Authenticated – applicable to any user who successfully authenticates.
- Parent – applicable to the entry only if their bind DN is the parent of the targeted entry. For example, to allow users to modify any child entries of their bind DN, create the following ACI on the dv=address book,o=vds node:
(targetattr = "*")(target = "ldap:///dv=address book,o=vds")(targetscope = "subtree")(version 3.0;acl "myaci";allow (write) (userdn = "ldap:///parent");)
ACI Evaluation Rules
The ACI evaluation rules that RadiantOne follows are:
-
When the RadiantOne service starts, all ACIs defined in the entries below "ou=aggregate,ou=globalaci,cn=config" are loaded.
-
To determine if an operation is allowed or denied, RadiantOne looks in the ACI list for the target of the operation to collect all target-matched aci values.
-
RadiantOne separates the aci values into two lists; one list contains all the aci values that match the target and denies the required access, and the other list contains all the aci values that match the target and allows the required access.
-
If the deny list contains any aci values after this procedure, access is immediately denied.
-
If the deny list is empty, then the allow list is processed. If the allow list contains any aci values, access is allowed.
If both lists are empty, access is denied.
To troubleshoot/trace ACI evaluation decisions, RadiantOne server log level must be set to DEBUG. When DEBUG level is set, the evaluation rules can be seen in vds_server.log. This log can be viewed and downloaded from Server Control Panel > Log Viewer.
Setting Access Controls
To define access controls:
Access rights can be defined by any user who is a member of the ACI Administrators group or the Directory Administrators group. For details on all administrative groups available for RadiantOne, please see Delegated Administration of RadiantOne.
-
From the Main Control Panel > Settings Tab > Security section > Access Control sub-section, select the Enable ACI checkbox on the right side in the Authorization section and click Save.
-
In the Access Control section, select root.
Although there is not an absolute requirement, it is generally recommended to define all your access controls at the root level so you can come back to this single level and see all configured access controls across the entire virtual namespace.
-
To set the maximum number of entries displayed under a branch, enter a value in the Size Limit field and click Refresh. This step is optional.
-
Click Add. The Edit ACI pane is displayed.
The Target Scope pull-down menu value defaults to subtree, and the Target Attributes value defaults to All.
-
Enter an ACI description.
-
Click Choose to navigate to the target DN.
-
In the Target Scope drop-down list, select base, onelevel or subtree.
-
In the Target Filter, enter an applicable LDAP filter to narrow the entries affected by the access control rule. This step is optional.
-
For the Target Attributes, select either “equal to” (=) or “not equal to” (!=) from the drop-down list. Then choose to either have the access rule apply to “all” or “custom”. If custom is selected, click SELECT to narrow the list.
If you choose custom, and your attribute doesn’t appear in the list, you must update the RadiantOne LDAP schema appropriately before setting the ACI. For details on this, please see Extending RadiantOne LDAP Schema. After the schema has been updated, go back to the Settings tab > Security section > Access Controls sub-section and follow the steps mentioned above to add the custom attribute list.
-
In the Permissions section, select either to allow or deny.
-
Select the operations that you want allowed or denied.
-
In the Authentication Context section, configure bind rules as needed.
-
In the Apply to section, select the subjects that will be allowed or denied access.
To assign users, groups or users associated in a specific tree/branch, click LDAP SEARCH.
To assign public, click ALLOW PUBLIC.
To assign self, click ALLOW SELF.
To assign all authenticated users, click ALLOW AUTHENTICATED.
To assign permissions associated with the parent, click ALLOW PARENT.
-
Click Save when finished.
Client Certificate Trust Store (Cluster Level Trust Store)
The certificates in the Client Certificate Trust Store are used by RadiantOne to connect via SSL to underlying data sources. Therefore, the appropriate client (public key) certificate (associated with the server certificate of the backend) needs imported into the Client Certificate Trust Store (unless they are signed by a trusted/known Certificate Authority).
Client certificates can be added to the Client Certificate Truststore at any time without needing to restart the RadiantOne service. All RadiantOne cluster nodes share the contents of the Client Certificate Truststore.
Import client certificates into the truststore from the Main Control Panel > Settings Tab > Security section > Client Certificate Truststore. Certificates can be viewed, imported, exported or deleted from here.
Viewing Client Certificates
To view a certificate, select the certificate in the list and click View. Valuable information about the certificate is shown (who issued the certificate, who the certificate was issued to, when the certificate is set to expire, status…etc.).
Adding Client Certificates
To add a certificate:
- Click Import.
- Enter a short, unique name (alias) for the certificate.
- Browse to the location of the client certificate file and click OK.
- Click Save in the upper right corner.
Deleting Client Certificates
To delete a certificate:
- Select the desired certificate and click Delete.
- Click Yes to confirm the deletion.
- Click OK to exit the confirmation.
- Click Save in the upper right corner.
Exporting Client Certificates
To export a certificate:
- Select the desired certificate and click Export.
- Enter a location to export the file to.
- Enter a name for the exported file.
- Click OK to export the certificate to a file.
- Click OK to exit the confirmation.
- Click Save in the upper right corner.
Password Policies
When using a RadiantOne Directory store or persistent cache (with password policy enforcement enabled), you can establish password policies for managing things such as password length, quality, reset frequency, lockout…etc. Password policies are only enforced for RadiantOne Directory stores and persistent caches (that contain the user passwords and have enabled the enforcement of password policies) not any other kind of backend configuration (proxies, databases…etc.).
Password content strength rules are only enforced when the password value that is sent in the modify request is NOT hashed. If the client sends a hashed value for the password in the modify request, RadiantOne cannot reverse the hash to get the actual value to validate it against password content strength rules. If the client passes a hashed password value, the default behavior is to bypass the password policy check and accept the value as is. This functionality allows RadiantOne to support legacy LDAP replacement use cases where existing entries with hashed passwords can be directly imported into a RadiantOne directory.

Privileged Password Policy Group
To allow users to bypass password policies, you can add them to the PrivilegedPasswordPolicyGroup group. This group can be useful, for example, if you want a helpdesk user to reset a user’s password. The password policies are not checked, so this user can set a password that does not meet the password content criteria, could be in history, etc.
In addition to PrivilegedPasswordPolicyGroup group members, password policies also do NOT apply to the RadiantOne super user account (cn=directory manager for example) or any member of the cn=directory administrators,ou=globalgroups,cn=config group (or the specific Directory Administrators group you have set on the Main Control Panel > Settings Tab > Server Front End > Administration sub-section).
To assign users to the Privileged Password Policy Group:
-
In the Main Control Panel, click the Directory Browser tab.
-
Expand cn=config and ou=globalgroups.
-
Select cn=PrivilegedPasswordPolicyGroup.
-
On the right, click Manage Group.
-
Add privileged accounts to this group.
Password Policy Configuration
From the Main Control Panel > Settings Tab > Security section > Password Policies sub-section, you can configure the following:
Password Policy Scope
There is a default password policy that is enforced at a global level for all RadiantOne Directory stores and persistent cache (if password policy enforcement is enabled), no matter where a user account is located. You can override the default policy with a custom one that is applicable only to a certain subset of the user population (determined by group they are a member of, or the location of the entry in the virtual namespace).
If a given user entry is affected by both a global and local policy, the local policy takes precedence. For more details, see Password Policy Precedence. To enable password policy enforcement for a persistent cache branch, check the Enable Password Policy Enforcement option on the cache settings. For more details on persistent cache, see the RadiantOne Deployment and Tuning Guide.
Default Password Policy
In the ‘Choose a Password Policy’ drop-down menu, the default password policy is named Default Policy. Choose this option to edit the components of the global default policy.

Custom Password Policy
To create a custom password policy, next to the ‘Choose a Password Policy’ drop-down, click New. Enter a policy name applicable to the intended usage and click OK.
The ‘Subject’ of the custom policy can be either Sub-tree or Group and is based on a specific base DN. Click CHOOSE to select a base DN. If the subject is set to sub-tree, this means that all user entries below the chosen base DN (which must be a RadiantOne Directory store or persistent cache) are affected by the custom policy. If the subject is set to group, this means that all users that are a member of the group specified in the base DN are affected by the custom policy. The group DN can represent a static group (unique members listed in the group entry) or a dynamic group (associated with the groupOfURLs object class and contains a memberURL attribute dictating the members). RadiantOne evaluates dynamic membership automatically to enforce password policies. If a user is affected by a policy defined for sub-tree and for group, the one associated with the group takes precedence.
Custom policy properties override those defined in the default policy. The only exception is the password content properties where you can choose to enable the enforcement of the custom policy, or choose to use the default policy. Keep in mind that a value of 0 (zero) in a custom policy for password content means an unlimited amount is allowed. It does not mean that it is undefined.
An example of a custom password policy is shown below. It is applicable to all users who are located in a RadiantOne Directory store and are a member of the Special Users group identified in the DIT as cn=special users,ou=globalgroups,cn=config.
If you define multiple custom password policies associated with groups (as the Subject), they should not have the same precedence if they share members. If a user is affected by multiple group-based policies, the one with the highest precedence (lowest numeric value in the precedence setting) is enforced.

An example of a custom password policy applicable to all users below a specific container is shown below. This custom policy is enforced for all users in a RadiantOne Directory store located below o=local.
Precedence level is not configurable for policies defined on a sub tree. Multiple password policies configured with sub tree subject, should not be configured for the same location. If multiple policies impact the same branch, the policy defined at the lowest point is enforced.

Password Policy Precedence
If the user entry has a pwdPolicySubentry attribute that contains a DN pointing to a password policy located below cn=Password Policy,cn=config in RadiantOne, this policy takes precedence and is enforced for the user. If the user entry doesn’t have a pwdPolicySubentry attribute, or if the value points to a non-existent policy below cn=Password Policy,cn=config, then RadiantOne evaluates other configured password policies that affect the user.
The examples below describe how password policies are enforced.
-
If a user has a pwdPolicySubentry attribute that matches a policy configured in RadiantOne, this policy is enforced. No other password policies are considered.
-
If a user is affected by both a global and local policy, the local policy takes precedence.
-
If a user is affected by both a group-based policy and a sub-tree based policy, the group policy takes precedence.
-
If a user is affected by multiple group-based policies, the one with the highest precedence (lowest numeric value in the precedence setting) is enforced.
-
If a user is affected by multiple sub-tree based policies, the one with the deepest DN value is enforced.
Items to keep in mind:
-
The precedence value is a number between 1 and 1000. 1 is the highest level. 1000 is the lowest level. This value is stored in the policyPrecedence attribute of the password policy entry in RadiantOne.
-
The default password policy always has the lowest precedence level (a numeric value of 1000).
-
Each custom password policy defined for groups is associated with a precedence level. This level dictates which policy is enforced for a user that is associated with many group policies. For example, if a user is a member of many groups and each group is associated with a different password policy, the precedence number determines which policy to enforce.
-
Multiple password policies configured with sub tree subject, should not be configured for the same location. If multiple policies impact the same branch, the policy defined at the lowest point (deepest DN) is enforced.
-
If you define multiple custom password policies associated with groups (as the Subject), they should not have the same precedence if they share members.
Password Policy Associated with Control Panel Delegated Administrator Roles
The default delegated administrator roles and users associated with the RadiantOne Control Panel are located in the cn=config naming context. To define a custom password policy for users associated with these roles, select the sub-tree subject and enter cn=config for the location (or any location where the users are located). An example is shown below where the passwords for the delegated administrator accounts expire after 5 days.

If you want a custom password policies to be associated with a specific delegated administrator role, select the "group" subject in the password policy, and click Choose to navigate to the group entry that is associated with the role.
Password Changes

User must change password after reset
This value is stored in the pwdMustChange attribute of the cn=Password Policy entry and has a value of True or False. If True, the user must change their passwords when they first bind to the directory after their password has been reset. The bind error message returned from RadiantOne is “You must change your password before submitting any other requests”.
The applicable password policy must indicate: "User must change password after reset" and "User may change password".
Actions considered as a reset that will trigger the “You must change your password before submitting any other requests” bind error are:
-
A new user account is added. In order to be considered a password reset, the account must be created by a user other than the cn=directory manager, or any member of the cn=directory administrators group.
-
An existing user account’s password is changed by a user other than themselves, cn=directory manager, or any member of the cn=directory administrators group (cn=directory administrators,ou=globalgroups,cn=config).
If this attribute is not present, or if the value is False, users are not required to change their password upon binding after the password administrator resets the password.
User may change password
This value is stored in the pwdAllowUserChange attribute of the cn=Password Policy entry. This value indicates whether users can change their own passwords. If enabled, the value is True, if not the value is False.
Require existing password in order to change password
This value is stored in the pwdSafeModify attribute of the cn=Password Policy entry. This value is either True (if enabled) or False. This value specifies whether the existing password must be sent along with the new password when being changed.
Allow a password to be changed after a certain number of days
This value is stored in the pwdMinAge attribute of the cn=Password Policy entry. It holds the number of seconds that must elapse between modifications to the password. If this attribute is not present, 0 seconds is assumed. From the Main Control Panel, you can indicate the length of time in any combination of days, hours and/or minutes using “d” for days (e.g. 1d), “h” for hours (e.g. 4h), and “m” for minutes (e.g. 5m). A value of 1d 5h 45m would indicate a password could be changed after 1 day, 5 hours and 45 minutes.
Your password policy must uphold the following rule: pwdMinAge + pwdExpireWarning < pwdMaxAge.
Keep a password history
This value is stored in the pwdInHistory attribute of the cn=Password Policy entry. It holds the maximum number of used passwords to store in the pwdHistory attribute. If this attribute is not present, or if the value is 0, used passwords are not stored in the pwdHistory attribute and the value may be reused.
Password Expiration

Password never expires
This value is stored in the pwdMaxAge attribute of the cn=Password Policy entry. If this option is enabled, then the value is 0d.
Password expires after a certain amount of time
This value is stored in the pwdMaxAge attribute of the cn=Password Policy entry. If this option is enabled, the value contains the amount of time after which a modified password expires. If this attribute is not present, or if the value is 0d, the password does not expire. If not 0d, the value must be greater than or equal to the value of pwdMinAge (the Allow a password to be changed after a certain number of days parameter). From the Main Control Panel, you can indicate the length of time in any combination of days, hours and/or minutes using “d” for days (e.g. 1d), “h” for hours (e.g. 4h), and “m” for minutes (e.g. 5m). A value of 1d 5h 45m would indicate a password expires after 1 day, 5 hours and 45 minutes.
Your password policy must uphold the following rule: pwdMinAge + pwdExpireWarning < pwdMaxAge.
If a user’s password is expired, the next time a client (on the user’s behalf) connects to RadiantOne, the bind will fail and the additional information returned to the client indicates the password has expired. An example using an ldapsearch command line client by a user identified as “tuser” is shown below.
ldapsearch -h 10.11.12.164 -p 2389 -D "uid=tuser,ou=people,o=global" -w password -b "o=global" "(uid=tuser)"
ldap_simple_bind: Invalid credentials
ldap_simple_bind: additional info: Password has expired.
During the bind, RadiantOne calculates if the user’s password has expired and returns the bind response and additional information to the client. It is up to the client to prompt the user to reset their password, if this functionality is desired.
The user entry stored in RadiantOne doesn’t contain an attribute that indicates a user’s password has expired. However, the entry contains an attribute (passwordExpWarned) indicating when the password expiring warning was send in the bind response.
dn: uid=tuser,ou=people,o=global
passwordExpWarned: 20170622194148.238Z
Send a warning before the password expires
This value is stored in the pwdExpireWarning attribute of the cn=Password Policy entry. It contains the amount of time before a password is due to expire in which case an expiration warning message is returned to an authenticating user. From the Main Control Panel, you can indicate the length of time in any combination of days, hours and/or minutes using “d” for days (e.g. 1d), “h” for hours (e.g. 4h), and “m” for minutes (e.g. 5m). A value of 1d would indicate a password expiration warning should be sent 1 day prior to the password expiring.
If this attribute is not present, or if the value is 0d no warnings are returned. If not 0d, the value must be smaller than the value of the pwdMaxAge attribute.
Your password policy must uphold the following rule: pwdMinAge + pwdExpireWarning < pwdMaxAge.
When this is configured, a control is returned with the BindResponse (even if the client doesn’t specifically request it) indicating the amount of time until expiration. An example is shown below.
PasswordExpiringControl {2.16.840.1.113730.3.4.5 false secondsUntilExpiration=432000}
Allow a certain number of login attempts after the password expires
These are known as grace logins. The value of this parameter is stored in the pwdGraceAuthNLimit attribute of the cn=Password Policy entry. The parameter specifies the number of times an expired password can be used to authenticate. If this attribute is not present, or if the value is 0, authentication fails if the password has expired.
During the grace login attempts, bind requests are processed. However, the subsequent operation after the bind must be a modifyRequest to change the password. Otherwise, an error message is returned indicating “You must change your password before submitting any other requests”.
Password Content
Password content strength rules are only enforced when the password value that is sent in the modify request is NOT hashed. If the client sends a hashed value for the password in the modify request, RadiantOne cannot reverse the hash to get the actual value to validate it against password content strength rules. If the client passes a hashed password value, the default behavior is to bypass the password policy check and accept the value as is. This functionality allows RadiantOne to support legacy LDAP replacement use cases where existing entries with hashed passwords can be directly imported into a RadiantOne directory.
The following are the password content options.
- Password minimum length
- Minimum required digit (0-9) characters
- Minimum required uppercase (A-Z) characters
- Minimum required lowercase (a-z) characters
- Minimum required special characters
- Password encryption
If more complex password content is required, the Password Strength Rule can be used.
Each of these properties is described below.

Enabled
This option is only applicable to custom password policies.
Custom policies can enforce specific password content criteria or inherit from the default policy. If enabled, the custom policy password contents are enforced and override the conditions defined in the default policy. A value of 0 means unlimited, NOT undefined.
If not enabled, the default policy dictates the password content criteria.
Password minimum length
This value is stored in the pwdMinLength attribute of the cn=Password Policy entry. This attribute holds the minimum number of characters that must be used in a password. If this attribute is not present, no minimum password length is enforced.
Minimum Required Digit Characters
This value indicates the number of required numerical characters required in passwords.
Minimum Required Uppercase Characters
This indicates the number of uppercase characters required in passwords.
Minimum Required Lowercase Characters
This value indicates the number of lowercase characters required in passwords.
Minimum Required Special Characters
This value indicates the number of special characters required in passwords.
Minimum Required Altered Characters
This value indicates the number of characters that must vary between the old password and the new password. This option requires enabling both “User must change password after reset” and “Require existing password in order to change password” in the Password Change section of the password policy.
This leverages the Damerau Levenshtein algorithm to determine the variation of characters between the old and new passwords.
Restrictions on Using Accountname or Username
This value is stored in the pwdEnableNotContainNames attribute of the cn=Password Policy entry and has a value of true or false. If true, the user’s password must not contain the user’s accoutname or parts of the user’s full name that exceed two consecutive characters.
For the accountname value, the sAMAccountname attribute is checked first. If sAMAccountname is not found, the uid attribute is checked. If uid is not found, rdn value is checked. For the user’s full name, the attribute displayName is checked. If displayName is not present, cn is checked. If the cn attribute is not found, the full name is computed (givenName+sn) and checked. These checks are not case-sensitive.
Password Encryption
The passwords that are stored in a RadiantOne Directory store may be hashed using any of the following methods: CRYPT, MD5, PBKDF2AD, Salted SHA-1, Salted SHA-256, Salted SHA-384, Salted SHA-512, and SHA-1. The least secure methods of CRYPT, MD5, and SHA-1 have been hidden as options from the Main Control Panel.
PBKDF2AD is the required password encryption expected in Azure AD. Therefore, if your HDAP store (or persistent cache) will be synchronized to Azure AD, and passwords are a part of the synchronization, use the PBKDF2AD encryption option to store passwords in the RadiantOne Directory.
Automatic Update to Stronger Password Hash
If the “Update stored passwords to stronger encryption after successful bind” is enabled, user accounts that contain a password hashed with a less secure method than allowed for the current password policy are automatically updated to the stronger hash after a successful bind. The only exception to this is for passwords that have a current hash of: PKCS5S2, PBKDF2, PBKDF2AD, SCRYPT, BCRYPT, SMD4, or MD4, in which case the hashing is not changed. This value is stored in the pwdEnableAlgorithmUpgrade attribute of the cn=Password Policy entry and has a value of True or False.
The strength order is as follows:
CLEAR -> CRYPT -> MD5 -> SHA1 -> SSHA1 -> SHA256 -> SSHA256 -> SHA384 -> SSHA384 -> SHA512 -> SSHA512 -> (PKCS5S2 | PBKDF2 | PBKDF2AD | SCRYPT | BCRYPT | SMD4 | MD4)
PKCS5S2, PBKDF2, PBKDF2AD, SCRYPT, BCRYPT, SMD4, and MD4 are considered as special hashes of the strongest ranking.
Password Strength Rule
The default options for enforcing password content are based on an AND operation. For example, if you set a minimum password length, minimum number of required digits, and a minimum number of required uppercase letters, the rule would be expressed as follows.
<min password length> AND <min # of digits> AND <min # uppercase letters>.
The Password Strength Rule option allows you to define and test password strength requirements that are more complex using an OR condition. For example, you could use the Password Strength Rule option to require a password to have 'n' number of special characters OR 'n' number of Upper Case characters. In another example, a password strength rule requiring at least six total characters, with at least one lower case, at least one uppercase letter, and at least one digit OR one symbol would be expressed in the Password Strength Rule field as follows.
^.(?=.{6,})(?=.[a-z])(?=.[A-Z])(?=.[\d\W]).*$
Another example would be if you do not want to allow special characters to be used in the password. This would be expressed in the Password Strength Rule field as: 1+$
Checking the Password Strength Rule box disables and overrides all other password Content options except Password minimum length and Password encryption.
Enter your password strength rule using regular expression syntax.
Click Test to compile your expression.
Enable Dictionary Check
The Enable Dictionary Check option is comparable to the Strong Password Check plug-in found in legacy LDAP directories. This enables RadiantOne to verify that a user’s password doesn’t contain unallowed strings from a specified dictionary file. This can be used as a method to enforce strong password policies.
The default behavior uses an exact match comparison of the password to a dictionary value. To enforce a contains match comparison, go to the Main Control Panel > Zookeeper tab, navigate to /radiantone/<version>/<clusterName>/config/vds_server.conf and click EDIT MODE. Set the following: "enablePwdPolicyDictionarySubstringCheck" : true
The value of “true” must be in all lowercase, as shown above.
You can also set this property using the vdsconfig command line utility, set-property command. For details, see the Radiantone Command Line Configuration Guide.
To enable this feature:
-
From Main Control Panel, navigate to the Settings tab >Security > Password policies section.
-
Locate the Password Content section and check the option to Enable Dictionary Check. This value is stored in the pwdEnableDictionary attribute of the cn=Password Policy entry and has a value of True or False.
-
Click Browse to navigate to the dictionary file (see Note below). The value for the location of the dictionary file is stored in the pwdDictionaryFile attribute of the cn=Password Policy entry.
NoteThe dictionary file must be a text-formatted file containing one dictionary word per line. You can upload your dictionary file using Classic Control Panel > Settings Tab > Configuration > File Manager. You can also edit the contents of the dictionary file using File Manager. Then, in step 3 above, navigate to the location where you saved the dictionary file.
-
Click Save.
Account Activity and Lockout
Accounts may be automatically locked under two circumstances:
-
If a user has not authenticated successfully to RadiantOne for longer than a specified period of time.
-
If a user has reached the failed login threshold.
Keep Track of User’s Last Successful Login Time
If you want to keep track of a user’s last successful login time, enable the option to “Keep track of the user’s last successful logon time” in the Account Activity section of the password policy.
You can exclude pwdLastLogonTime changes from the RadiantOne changelog by setting the following property in ZooKeeper at /radiantone/<Config_Version>/<RadiantOne_ClusterName>/config/vds_server.conf: "skipLoggingIntoChangelogForPwdLastLogonTime" : "true",
This alleviates excessive writing into the changelog when you have a large volume of user login activity. This property is enforced globally and affects all password policies.
You can indicate the frequency that RadiantOne records the time of the last successful authentication. The default value is 0s meaning that the last login time is updated on every successful authentication. To change the default, indicate the length of time in any combination of days, hours and/or minutes using “d” for days (e.g. 1d), “h” for hours (e.g. 4h), and “m” for minutes (e.g. 5m). For example, a value of 1d indicates the last login time is updated if at least 1 day has passed since the last successful authentication. Subsequent successful authentications, within this time frame, do not change the last login time.
There is a performance impact on RadiantOne if you keep track of last successful logins because a write operation is performed with a successful bind. It is recommended that you indicate a frequency for writing the last login and that you test the usage of this feature to determine if the degradation in performance is acceptable for your usage.
If accounts should be automatically locked when a user has not authenticated successfully for a predetermined amount of time, indicate the threshold (number of days) in the “Account Activity” section of the password policy where you see “Lock user’s account if the user is idle longer than
Lock Accounts Based on Number of Failed Logins
If accounts should be locked out after a failed login threshold is met, check the Accounts may be locked out option in the password policy, and establish the criteria.
- How may login failures are allowed? Enter this value for X (Lockout account after X login failures).
This value is stored in the pwdMaxFailure attribute of the cn=Password Policy entry and contains the number of failed login attempts to allow. This corresponds to the operational attribute for the user entry named pwdFailureTime which stores the time(s) of the login failure(s).
- How often to reset the failure count? Enter this value for X (Reset failure count after X minutes).
This value is stored in the pwdFailureCountInterval attribute of the cn=Password Policy entry. This is the temporary interval of time in which RadiantOne keeps track of the number of failed login attempts. For example, if the number of login failures allowed is 2 and the reset failure account is 5 minutes, this means if a user login fails twice within 5 minutes, the account will be locked. If the user logs in unsuccessfully once and then doesn’t try again until after the 5-minute interval has passed, the number of unsuccessful login attempts is reset and the new failed login attempt counts as the first failure instead of the second failure. This relates to the number of values for the pwdFailureTime operational attribute in the user’s entry which is used to determine how many failed logins have been attempted.
Once an account is locked, the reset failure count is irrelevant in terms of determining how many failed login attempts have occurred.
-
How long is an account locked out?
Lockout forever
Lockout duration X minutesThis value is stored in the pwdLockoutDuration attribute of the cn=Password Policy entry. This relates to the operational attribute pwdAccountLockedTime in the user’s entry which includes a timestamp indicating when the user’s account became locked. Once a lockout duration has passed, or a user’s password has been reset by an administrator, the account is unlocked. Any user (other than the locked out user) that has the proper permissions (ACI’s) can reset the user’s password.
Unlocking Accounts
If a user’s account is locked, it can become unlocked by resetting the user’s password. Any user (other than the locked out user) that has the proper permissions (ACI’s) can reset the user’s password. If the lockout policy has a duration period, the account is automatically unlocked after the duration has passed.
Operational Password Attributes Stored in User Entries
Since these attributes are defined as operational attributes, they do not appear in the user entries unless specifically requested in the search from the client.
pwdHistory
Stores the previous values used for passwords to prevent users from re-using previous passwords. The number of passwords that are stored is determined by the value set in the pwdInHistory attribute of the Password Policy.
pwdChangedTime
A Generalized Time attribute containing the time the password was last changed.
pwdLastLogonTime
Stores the user’s last successful login time (bind) if the “Keep track of the user’s last successful logon time” is enabled.
pwdAccountLockedTime
A Generalized Time attribute containing the time at which the account was locked. If the account is not locked, this attribute is not present.
If the maximum consecutive login failures (pwdMaxFailure) have been reached during a certain period of time (pwdFailureCountInterval), the user entry will have the operational attribute of: pwdAccountLockedTime and it will contain the time the account became locked.
passwordExpWarned
A Generalized Time attribute containing the time at which the password expiration warning was first sent to the client.
pwdFailureTime
A multi-valued Generalized Time attribute containing the times of previous consecutive login failures. If the last login was successful, this attribute is not present. The number of values will be no more than the value defined in Number of Login Failures for the password policy.

If the last login was successful, this attribute is not present.
Once the Reset Failure count has passed, the values of the pwdFailureTime attribute are updated during the next unsuccessful login attempt and the values are removed if the next login is successful.
pwdGraceUseTime
A multi-valued Generalized Time attribute containing the times of the previous grace logins.
pwdPolicySubentry
An attribute that contains the DN of the password policy associated with the user. RadiantOne does not write to this attribute or allow password policies to be defined on individual users from the Main Control Panel. However, if the entry was imported from another directory, this attribute could have a value that dictates which password policy affects the user. If the value matches a policy defined in RadiantOne, this policy is enforced for the user. If the value does not match a policy defined in RadiantOne it is ignored and other configured policies below cn=Password Policy,cn=config are checked. If multiple policies affect the user, the one with the highest priority (based on precedence level) is enforced.
pwdReset
A Boolean attribute containing the value TRUE if the password has been reset and must be changed by the user. If a user’s password is set/reset by the RadiantOne super user (e.g. cn=directory manager), a member of the cn=directory administrators group (cn=directory administrators,ou=globalgroups,cn=config), or the user himself, this does not trigger pwdReset set to TRUE. Only when a user’s password is set/reset by other users (e.g. helpdesk) is the pwdReset set to TRUE. When the affected user logs in with the new password for the first time, they are not allowed to perform operations until they reset their password. For example, if the user attempts a search, RadiantOne responds with error code 53 and a message indicating “You must change your password before submitting any other requests”. After the user updates their password, pwdReset is removed from their entry.
If a user resets their password, RadiantOne performs the following checks based on the password policy:
- Check if the user is allowed to change their password
- Check minimum password age
- Check if old password is provided with new password (if the “Require Existing Password in order to Change Password” policy is enabled)
- Check the password length
- Check the password quality (correct number of required characters – upper/lower/number…etc.)
- Check if the password is in the history
- Check if the password contains unallowed strings based on a dictionary file
After the BIND response is returned, it is up to the client to prompt the user accordingly (depending on what kind of password policy response or control was returned).
RadiantOne returns one of the following responses to the client application:
Modify Response Code | Meaning |
|---|---|
53 | User password changes are not allowed. If the “User may change password” is NOT enabled, and a user tries to change their password, they get this error. |
19 | This code could mean any of the following: |
Limits
The settings found in the Main Control Panel > Settings Tab > Limits section are related to enforcing search size limits and activity quotas. These settings prevent against Denial of Service (DoS) attacks towards RadiantOne. Remember to save any changes you make to limits.
Changing any property in the Limits section requires a restart of the RadiantOne service to take effect. If RadiantOne is deployed in a cluster, restart the service on all nodes.
Global Limits
The following parameters are configured from the Main Control Panel > Settings Tab > Limits section > Global Limits sub-section.
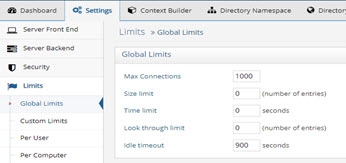
Maximum Connections
The maximum number of client connections the server can accept concurrently (connecting at the exact same time).
Manually Closing a Client Connection
A connection can be manually closed by issuing an LDAP search to RadiantOne with the connection ID. The connection ID can be viewed from the Server Control Panel > Usage & Activity tab > Connections & Operations.
With the connection ID, connect to RadiantOne as the super user (e.g. cn=directory manager) and perform a search request with a base DN of, action=closeconnection,ID=<connectionID>. An example is shown below using the ldapsearch utility. This example closes the connection associated with ID 148300.
C:\SunKit>ldapsearch -h 10.11.10.40 -p 2389 -D "cn=directory manager" -w password -b action=closeconnection,ID=148300 (objectlcass=*)
Size Limit
The maximum number of entries a search operation can return. This allows for limiting the number of entries LDAP clients can receive from a query. By default this value is set to 0 which means there is no restriction on the size.
This parameter is a global parameter for RadiantOne.
Time Limit
The time (in seconds) during which a search operation is expected to finish. If a search operation does not finish within this time parameter, the query is aborted. By default, this value is set to 0 which means there is no restriction on time.
Look Through Limit
The look through limit is the maximum number of entries you want the server to check in response to a search request. You should use this value to limit the number of entries the server will look through to find an entry. This limits the processing and time spent by the server to respond to potentially bogus search requests (for example, if a client sends a search filter based on an attribute that is not indexed). By default, this is set to 0, which means that there is no limit set for the number of entries that the server will look through.
This property is not used by RadiantOne Directory (HDAP) stores.
Idle Timeout
The length of time (in seconds) to keep a connection open without any activity from the client. The default is 900, which means the idle connection is kept open for 900 seconds and then closed by the server.
Custom Limits
Custom limits are more fine-grained than global limits and can be defined in the Classic Control Panel > Settings > Limits > Custom Limits section. Custom limits can be configured for the pre-defined users: “Anonymous Users”, and “Authenticated Users”. They can also be more granular and associated with users belonging to any group or located below any branch/naming context (subtree) in RadiantOne.
Multiple custom limits are not allowed for anonymous users and authenticated users.
Custom limits override any Global Limits defined in the Classic Control Panel > Settings tab > Limits section > Global Limits sub-section. The order of precedence (highest to lowest) for global and custom limits containing the same subject is: Group, Sub-tree, Authenticated Users, Anonymous Users, Global. For custom limits defined within the same root naming context, the limit defined for the deepest entry in the tree will take precedence. For example, if a custom size limit of 3 is defined for a subject location of ou=Novato,ou=California,dc=USA and a size limit of 5 is defined for a subject location of ou=California,dc=USA, if a user of uid=Svc1,ou=Novato,ou=California,dc=USA connects to RadiantOne, the custom size limit of 3 will be enforced.
This section is accessible only in Expert Mode. Click the "Logged in user" menu and choose Expert Mode.
Granular Limits
To define custom limits:
-
Click ADD in the Custom Limits section.
-
Select a subject from the drop-down list. The possible subjects are described below.
- Sub-tree - the location (base DN) in the RadiantOne namespace containing the users that are affected by the custom limits.
- Group – a group entry in the virtual namespace. All members of this group are affected by the custom limits.
- Anonymous users – any authenticated users or anonymous users.
- Authenticated Users – any authenticated users.
-
Click CHOOSE to browse and select a subject location – if sub-tree is selected, the subject location is the base DN containing the users that are affected by the custom limits. If group is selected, the subject location is the DN of the group entry. All members of this group are affected by the custom limits. If authenticated users or anonymous users are selected, subject location is irrelevant.
-
Enter a value for maximum connections. This is the maximum number of concurrent connections the subject can create. By default, this value is set to 0 which means there is no restriction on maximum connections.
-
Enter a value for size limit. This is the maximum number of entries a search operation can return. This allows for limiting the number of entries LDAP clients can receive from a query. By default, this value is set to 0 which means there is no restriction on the size.
-
Enter a value for idle timeout. This is the length of time (in seconds) to keep a connection open without any activity from the client. By default, this value is set to 0 which means there is no restriction on idle time.
-
Click OK.
-
Click Save. The RadiantOne service needs to be restarted. You can restart the service in your environment from Environment Operations Center.
Number of Processing Queues
If you are running RadiantOne on a multi-processor machine, performance and efficiency of the server might improve by increasing the value for the Number of Processing Queues parameter. The default value is 2 and is sufficient for most deployments. As a general guideline, this value should never exceed 3.
This parameter does not affect the actual number of processors that get used. However, it does improve the utilization of the available processors.
A better indicator for performance is the number of threads allocated for each processing queue. This value can be seen/changed in the Max Concurrent Working Threads parameter. For more details, see the next section.
After making changes, click Save. RadiantOne must be restarted for the changes to take effect. If deployed in a cluster, restart the service on all nodes.
Maximum Concurrent Working Threads
This is the number of threads the virtual directory server uses for handling client requests. In other words, this defines the number of concurrent LDAP requests RadiantOne can handle. If there are backends involved (e.g. proxy views without persistent cache), then you must also consider how the backend handles the level of concurrency you define here as well because requests made to RadiantOne may directly result in concurrent requests sent to the backend(s).
The default value is 16, which means 16 worker threads allocated per processing queue defined in the Number of Processing Queues property. This amount is sufficient for most deployments and generally should not be modified unless recommended by Radiant Logic. You might be able to increase this number if:
-
You are using a multiprocessor system - Multiprocessor systems can support larger thread pools than single processor systems. See the Number of Processors parameter above.
-
Clients connecting to RadiantOne perform many time-consuming operations simultaneously (like complex searches or updates).
-
RadiantOne needs to support many simultaneous client connections.
It is difficult to provide an exact formula for determining the optimal number of maximum concurrent working threads to set because it depends on the machine and environment where RadiantOne is running. Generally, the value for concurrent working threads should not be modified unless recommended by Radiant Logic. If it is modified, you must verify the value you set with testing. Incrementally change the value and retest. In the test results, you should start to see performance peak and then a decrease. The peak in the curve should represent the optimal setting.
Max Pending Connection Requests
The max pending connection property represents a queue of server socket connections associated with requests from clients. This is not managed by the RadiantOne process. As soon as a TCP connection is established to RadiantOne, the connection is removed from the pending queue. A maximum number of pending client requests can be set in the Max Pending Connection Requests parameter. This parameter should not be changed unless advised by a Radiant Logic Support Engineer.
Access Regulation
After a client connects to the RadiantOne service, the amount of activity they perform can be limited by configuring access regulation. The activity checking can be performed based on the user that connects to RadiantOne.
The “Restrictions Checking Interval” parameter indicated in the Per User section is the time frame in which the activity (max binds and max operations) is monitored. Once the time interval is reached, the counts are reset. For example, if Special Users Group checking is enabled, and the checking interval, max bind operations per checking interval and max operations per checking interval are set to 300, 30 and 10 respectively, during a 5 minute (300 secs) period, anyone who is a member of the special users group can bind no more than 30 times to the RadiantOne service and not perform more than 10 operations. This count resets every 5 minutes. If a user attempts to perform more than the allowed number of operations, the RadiantOne service refuses the operation and the client must wait until the checking interval resets.
Per User
The following groups of users found on the Main Control Panel > Settings tab > Limits section > Per User sub-section allow you to configure fine-grained activity control:
Members of the Administrators group specified on the Main Control Panel > Settings Tab > Server Front End > Administration section do not have any access limitations in terms of max connections or max operations per second.
Anonymous
An anonymous user is a client who connects anonymously (no username or password) to the RadiantOne service. To enable checking for this category of user, check the Enable Access Checking option in the Anonymous section of the Per User Category sub-section. Enter a number for the maximum bind operations that anonymous users are allowed to perform. Also enter a number for the maximum number of operations per checking interval they are allowed to issue. Any parameters that are set to 0 have no limits applied. The restrictions checking interval dictates the number of seconds the server should wait before determining if these thresholds are reached.
Authenticated Users
An authenticated user encompasses any client who successfully authenticates no matter which group they are a member of. To enable checking for this category of users, check the Enable Access Checking option in the Authenticated Users section of the Per User Category sub-section. Enter a number for the maximum bind operations that authenticated users are allowed to perform. Also enter a number for the maximum number of operations per checking interval they are allowed to issue. Any parameters that are set to 0 have no limits applied. The restrictions checking interval dictates the number of seconds the server should wait before determining if these thresholds are reached.
Special Users Group
Special Users are anyone who successfully binds and is a member of the special user group defined on the Main Control Panel > Server Front End > Administration section. To enable checking for this category of users, check the Enable Access Checking option in the Special Users Group section in the Per User Category sub-section. Enter a number for the maximum bind operations that users in the Special Users Group are allowed to perform. Also enter a number for the maximum number of operations per checking interval they are allowed to issue. Any parameters that are set to 0 have no limits applied. The restrictions checking interval dictates the number of seconds the server should wait before determining if these thresholds are reached.
Authorization
The settings found in the Main Control Panel > Settings Tab > Security section > Access Control > Authorization section are for global authorization settings. These settings dictate whether RadiantOne enforces defined access controls, allows anonymous access, requires passwords for bind operations, and if nested groups are supported. Each setting is described in more details below.
Enable ACI
The checking of ACIs by RadiantOne can be enabled or disabled by using the Enable ACI checkbox. Check the box to enable and uncheck to disable. For specific details about setting ACI, please see Security and Access Controls.
Allow Anonymous Access
If RadiantOne should allow anonymous access, then check the Allow Anonymous Access checkbox. If RadiantOne should not allow anonymous access, uncheck this box. By default, anonymous access is allowed. This is the default global access permission for anonymous users and is enforced before subsequent ACI rules. In other words, even if anonymous access were allowed as a general policy, subsequent ACI rules could prevent anonymous users from accessing any data. For details on access controls that can be set, please Security and Access Controls.
Allow Directory Manager to Impersonate Other Users
Proxy authorization allows the user that creates a connection to RadiantOne to impersonate/request access on behalf of another user. This allows authorization to be enforced for a user other than the one that creates the connection/binds to RadiantOne. By default, the RadiantOne super user (e.g. cn=directory manager) is not allowed to impersonate other users. If you want this special user to be able to impersonate other users (to enforce authorization based on other users instead of as the super user), enable the “Allow Directory Manager to Impersonate Other Users” option. Also, verify that the Proxy Authorization Control is enabled for RadiantOne because this is the control that allows clients to request access on behalf of another user.

Bind Requires Password
If a user binds to RadiantOne and does not provide a password, the default behavior is to treat it like an anonymous user. This may introduce security problems for the client application, or in certain cases where machines like printers may bind against RadiantOne, that do not verify that the client actually provided a password. If the Bind Requires Password setting is enabled, and no password is specified in the bind request, RadiantOne tries to bind the specified user and return an invalid credential error to the client. If Bind Requires Password is not enabled, and a bind request comes in with a valid user DN and no password, it is considered an anonymous bind. Bind requires Password is enabled by default.
Enable Nested Groups
If you have groups stored in a RadiantOne Directory store and want to support groups as members, check the Enable Nested Groups option.
If Linked Attributes are not set, the member and the nested group must reside within the same naming context.
Processing nested groups is not efficient and is not enabled by default. When nested groups are used in RadiantOne ACLs for access controls, many recursive searches are required. Large groups with a mix of many members including other groups as members can have poor performance. Use nested groups with caution and validate your use case with performance testing to ensure response times meet your needs.
LDAP_MATCHING_RULE_IN_CHAIN
RadiantOne supports the LDAP_MATCHING_RULE_IN_CHAIN operator and allows clients to issue search filters using the 1.2.840.113556.1.4.1941 matching rule OID. This provides a method to look up the ancestry of an object and can be used in a search filter to retrieve all groups a user is a member of even when that group is nested (and is a member of another group). If the base DN in the RadiantOne namespace is associated with a proxy view, the search filter containing the matching rule OID is passed to the backend which must process the LDAP_MATCHING_RULE_IN_CHAIN. If the base DN in the RadiantOne namespace is associated with a persistent cache or a Directory store, RadiantOne processes the matching rule locally.
If you are using the Linked Attributes calculation in RadiantOne and the users and groups are local, in a persistent cache or RadiantOne Directory store, you must enable the Optimize Linked Attribute setting to support filters requesting isMemberOf/memberOf. This ensures good performance. For details on this setting, see the Namespace Configuration Guide (applicable to RadiantOne Directory stores) or the Deployment and Tuning Guide (applicable to persistent cache).

As a simple example, assume there is a group named All Users and that this group is a member of another group named Sales. The screen below shows the All Users group containing member Adan_Funston.

The screen below shows the Sales group containing the All Users group as a member.

A client can issue a search leveraging the matching rule OID to retrieve all groups Adan_Funston is a member of with the following search filter.
(uniqueMember:1.2.840.113556.1.4.1941:=uid=Adan_Funston,ou=Accounting,o=companydirectory)
A search request to RadiantOne with the above filter would return Sales and All Users as shown in the example client below.

Queries requesting an intersecting set of multiple memberships like in the following filter are not supported.**
(&(ismemberof:1.2.840.113556.1.4.1941:=cn=max,ou=groups,dc=data)(ismemberof:1.2.840.113556.1.4.1941:=cn=othergroup,ou=groups,dc=data))
- a-zA-Z0-9
