RadiantOne LDAP Schema
The schema details described in this section apply to the entire RadiantOne platform.
The default schema is contained in two LDIF files. They are, ldapschema_00.ldif and ldapschema_01.ldif. Radiant Logic specific object classes and attributes found in these files are assigned identifiers (oid) prefixed with 1.3.6.1.4.1.40747.1.X for attributes and 1.3.6.1.4.1.40747.2.X for object classes.
Extending the RadiantOne LDAP Schema
You can extend the schema in three different ways. Each is summarized below and further described in its own section after.
- Uploading an LDIF file that contains the new object classes and attributes in Main Control Panel > Settings > Configuration > File Manager. This file should be named ldapschema_<2 digit number greater than the existing file names>.ldif. After restarting the RadiantOne service, the new schema information is loaded into the server.
- Extending the Schema with Objects and Attributes Contained in .orx files.
- Creating new object classes and attributes in the Main Control Panel.
Extending RadiantOne Schema with Objects and Attributes from an LDIF File
The LDIF file should be properly named, formatted, and uploaded using Main Control Panel > Settings > Configuration > File Manager.
Use File Manager to view the contents of the existing schema files to understand the format required for the LDIF file and make sure your LDIF file follows this format.
The name of the LDIF file should be ldapschema_<any 2 digit number greater than the existing file names>.ldif. For example, the following schema files already exist by default: ldapschema_00.ldif, ldapschema_01.ldif, and ldapschema_05.ldif, so a new schema file could be ldapschema_03.ldif (any unused 2 digit number could be used).
If an object class or attribute is defined in multiple ldapschema files numbered between ldapschema_00.ldif and ldapschema_49.ldif, the ldapschema file with the largest number will override the definition in lower numbered files. For example, if an object class named domain is defined in both ldapschema_01.ldif and ldapschema_10.ldif, the definition from ldapschema_10.ldif is used.
The ldapschema_50.ldif is a special file generated from .orx schema definitions. If an object class or attribute is defined in multiple ldapschema files numbered between ldapschema_50.ldif and ldapschema_98.ldif, the ldapschema file with the largest number will override the definition in the lower numbered files but will not override any definition in files numbered between ldapschema_00.ldif through ldapschema_49.ldif. For example, ldapschema_90.ldif would override ldapschema_50.ldif, but would not override a definition in ldapschema_48.ldif.
The ldapschema_99.ldif overrides all previous definitions in ldapschema_00-98.ldif.
Extending the RadiantOne Schema with Objects and Attributes Contained in .orx Files
The metadata from any backend that is virtualized by RadiantOne is maintained in a file with a .orx extension. All .orx files are shown in the Main Control Panel > Settings Tab > Configuration section, when the ORX Schema node is selected. If you extracted a new schema, and it does not appear in the list, click Refresh List. To add the object classes and attributes contained in a file to the RadiantOne LDAP schema, check the Publish in Server Schema option next to the proper .orx file. After all schema files have been selected, click Generate LDAP Schema.
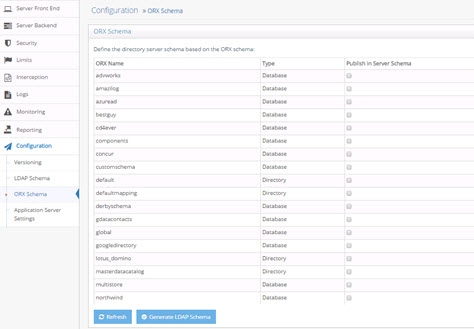
Figure 1: ORX Files Available for Extending RadiantOne LDAP Schema
The object classes and attributes contained in the select files are added to the RadiantOne LDAP schema and can be viewed from the Main Control Panel > Settings Tab > Configuration section, LDAP Schema node.
If you have already added object classes and attributes from some .orx files, then they automatically have a check mark in the Publish in Server Schema column. If you want them removed from the RadiantOne LDAP schema, uncheck them before clicking Generate LDAP Schema.
Extending the RadiantOne Schema with New Objects and Attributes from the Main Control Panel
Object classes and attributes can be manually defined from the Main Control Panel > Settings Tab > Configuration section > LDAP Schema.

Figure 2: Manually Defining New Object Classes and Attributes
Create New Object Class
-
Go to the Main Control Panel > Settings Tab > Configuration section > LDAP Schema node.
-
On the right side, a list of object classes that currently comprise the RadiantOne LDAP schema is displayed.
-
Click Add at the bottom.
-
Enter a name for the object class, parent (if it inherits from an existing object class), and OID (optional). Using the left and right arrow buttons, declare which attributes are required and which are optional.
-
An auxiliary object class is one that does not define the core type of an entry, but defines additional characteristics of that entry. If the object class you are creating should be auxiliary, check the Auxiliary Object Class option.
-
Click OK to add the new object class to the RadiantOne LDAP schema.
Create New Attribute
-
Go to the Main Control Panel > Settings Tab > Configuration section > LDAP Schema node.
-
On the right side, select the Attributes tab.
-
Click Add at the bottom.
-
Enter new attribute name, OID (optional), attribute aliases (optional), description (optional), and syntax (from the drop-down list).
-
Check whether the attribute allows multi-values.
-
Click Ok to add the new attribute to the RadiantOne LDAP schema.
Requesting the Schema Associated with Entries - subschemaSubentry
The subschemaSubentry attribute is an operational attribute that is returned by RadiantOne for every entry in the directory when it is specifically requested. The value of the subschemaSubentry attribute is the DN of the entry that contains schema information for this entry. An example of an LDAP search with subschemaSubentry requested is shown below.
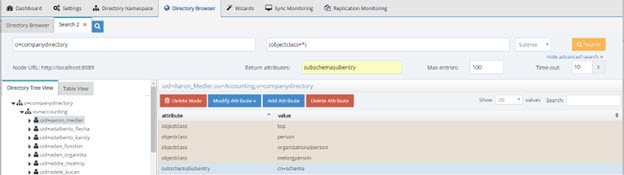
Figure 3: Requesting subschemaSubentry