Overview
In addition to handling LDAP queries for data stored in RadiantOne Directory stores or Persistent Cache, the RadiantOne service can also respond to SCIMv2 (System for Cross-domain Identity Management), and REST (ADAP) requests.
Since RadiantOne supports the standard LDAP v3 protocol and operations, and this API is well documented by the industry, this guide focuses solely on the Web Services APIs available.
The HTTPS web services endpoint is disabled by default. Enable the endpoint from Environment Operations Center > Environments > Selected Environment > Application Endpoints > REST. This is the endpoint for both SCIMv2 and REST (ADAP) queries.

Disabling Protocols
Even if the HTTPS web service endpoint is enabled, you can disable any web service protocols that are not used by clients from the Main Control Panel > Settings > Server Frontend > Other Protocols > Web Services section. Click in the Disabled Protocols property to reveal a drop-down list of options.
The LDAP option is legacy (replaced by ADAP) and includes the following endpoints: /ldap/html, /ldap/xml/ ldap/json/ and /vcs.
The monitor option excludes the following servlets /ping, /repmon, and /monitor.
If you disable “adap”, the Directory Browser tab in the Main Control Panel will not work anymore since it is an ADAP client to the RadiantOne service.

Figure 2: Disabled Protocols Options
Expert Mode
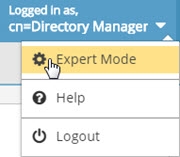
Some settings in the Control Panel are accessible only in Expert Mode. To switch to Expert Mode, click the Logged in as, (username) drop-down menu and select Expert Mode.

The Main Control Panel saves the last mode (Expert or Standard) it was in when you log out and returns to this mode automatically when you log back in. The mode is saved on a per-role basis.
Accessing the Web Services Welcome Page
You can access the welcome page by opening a browser and typing the following URL.
http[s]://endpoint
i.e. https://cp-rliqa.dc.federated-identity.com/main/app/settings/web_services
This displays the welcome screen and shows the supported services.
In order for the SCIM examples shown below to work properly, SCIM resource types must be created in RadiantOne. Go to the Main Control Panel > Settings Tab > Server Front End section > SCIM sub-section. On the Resource Types tab, create a new resource type named Users and another named Groups. Save the configuration. See SCIM for more information on configuring SCIM resource types.

Figure 3: RadiantOne Web Services Welcome Page