Transformations Overview
The transformation configuration contains the logic to translate a change in a source to an operation in the destination. The transformation can consist of attribute mappings and/or script logic. When deciding if the transformation configuration should use attribute mappings and/or scripting, keep the following in mind.
- When attribute mappings are used, the default behavior for processing insert and update source events is to translate the event into either an insert or update on the target. The Destination DN expression is used to find the target entry (lookup to see if the entry exists, to determine if an insert or update is needed). If the entry exists in the target and an insert event is detected in the source, the entry in the target is updated. If an update event happens in the source, and the entry does not exist in the target, it is inserted. If you do not want this default behavior, use a transformation script and customize the logic instead of using attribute mappings.
- Delete events are processed as deletes in the destination. If you need to translate a delete event into an update event (e.g. set
isActive=false), then use a transformation script and customize the logic instead of using attribute mappings.
To configure the transformation:
- From the Classic Control Panel > Synchronization Tab, select the topology on the left.
- On the right, select Configure on the pipeline.
- Select the Transformation component and choose the Transformation Type; Mappings, Script, or Script and Mappings. Depending on the type selected, new sections are displayed.

Script
Using a script for transformation allows for complex logic to be applied before sending changes to the destination. If you choose to use a script only, without attribute mappings, the transformation gets all change events sent by the capture connector. The script logic must filter out events that you do not want to process. If you use attribute mappings in conjunction with a script, a source event filter can be configured in the mappings to dictate which captured events to process.
If you use both script and attribute mappings, the attribute mappings are applied first.
- On the Classic Control Panel > Synchronization tab, select the topology on the left.
- Select Configure next to the pipeline on the right.
- Select the Transformation component and choose either Script or Script and Mappings from the Transformation Type drop-down list.
- Expand the Script section that appears below the Transformation Type and select Edit.
- You can edit and test the script in the window provided. Basic validation is checked when using the script window.
- After the script compiles successfully, select Save. Scripts are saved at:
\vds_server\custom\src\com\rli\scripts\fidsync\{PIPELINE_NAME}and can be viewed or downloaded from Classic Control Panel > Settings > Configuration > File Manager.
Leverage existing Java classes
To leverage existing classes in your transformation scripts, perform the following:
- The jar file must be copied in
/vds_server/custom/lib. Use Classic Control Panel > Settings > Configuration > File Manager for uploading the jar file. - The class must be imported in the transformation script.
- Example of importing the class in your transformation script:
import com.rli.connectors.changeevent.ChangeOperation;
Custom logging in the transformation script
The add your own log statements into the script, use the following:
log(Level.INFO, "Some message");
The message is logged into /vds_server/logs/sync_engine/sync_engine.log. You can view and download the sync_engine log from Environment Operations Center.
Test the script
When your script has been modified, you can test it by emulating changes from the source.
- On the Classic Control Panel > Synchronization tab, select the topology on the left.
- Select Configure next to the pipeline on the right.
- Select the Transformation component and choose either Script or Script and Mappings from the Transformation Type drop-down list.
- Expand the Script section that appears below the Transformation Type and select Edit.
- Select Test.
- Select the source event type (e.g.
INSERT,UPDATE,DELETE) to test. - Enter an Event ID. This is a DN that matches the location in the RadiantOne namespace for the source entries. (e.g.
uid=Aaron_Medler,ou=Accounting,o=companydirectoryassumingo=companydirectoryis the source naming context in RadiantOne). - Add source attribute names and values. Attribute names are in the left column and corresponding value in the right column. Select in the cell, type the value and select Enter. Attribute types can be simple or complex. The definitions for "simple" and "complex" are based on SCIM (http://www.simplecloud.info/specs/draft-scim-core-schema-01.html). Use the red X button next to the attribute to remove it from the test.
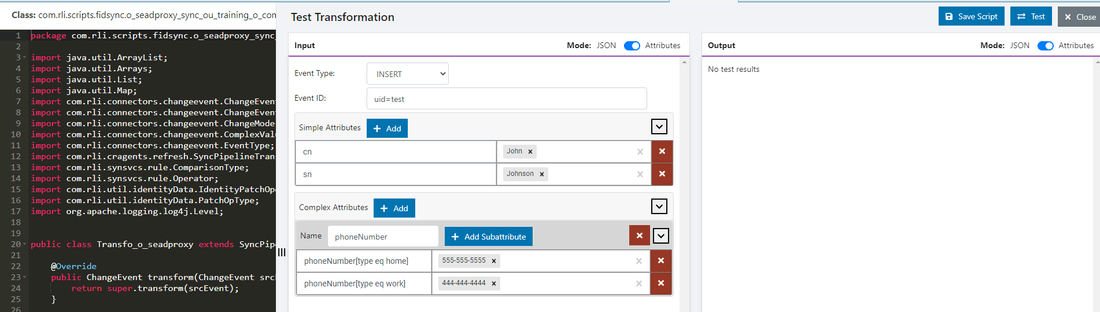
- Select Test
- The results of the script logic are shown in the Output section.
- When you are finished testing the mappings, select CLOSE to go back to the "Configure Pipeline" screen.
Attribute Mappings
Attribute mappings are the easiest approach to configure transformations without the need for writing scripts. A specific set of mappings can be defined for each type of object you are synchronizing (e.g. users, groups, devices).
Attribute mapping can be accomplished with any combination of the following: mapping a destination attribute from a source attribute, setting a constant value, using a function to compute a value, or setting a default value.
- Select the Mappings and/or Script and Mappings option from the Transformation Type drop-down list.
- Expand the Mappings section and select ADD.
- Enter a name to describe the mapping. Typically, this is the name of the object type the mapping is to be associated with. A good practice is to have the name indicate the source object and destination object (e.g. ADUsersToAzureADUsers) to make it easily identifiable in the list of mappings. Once you create a pipeline mapping and save it, you are not able to change the name.
- Select the object class associated with the source entries from the Source Object drop-down list. If you do not see the object class in the list, make sure you have extended the RadiantOne LDAP schema before reaching this step. If you want to listen for changes on all types of objects, you can use the -- All Objects -- option.
- Select the object class associated with the destination entries from the Destination Object drop-down list. If you do not see the object class in the list, make sure you have extended the RadiantOne LDAP schema before reaching this step. If you want to apply changes on all types of objects, you can use the -- All Objects -- option.
- Select EDIT for Source Event Filter to condition the events you want to process for synchronization. The event can be comprised of one or more expressions based on
AND,OR,NOTconditions. Any source event that does not match the filter is not processed by the attribute mappings. If no Source Event Filter is configured, every source event is processed by the attribute mappings. - Select EDIT for Destination DN to create an expression for computing the DN for the entry in the target. Use $ to insert an attribute in the expression. The DN suffix to reach the destination should match the location in the RadiantOne namespace where you mounted the virtual view of the target data source.
- In the Attribute Mappings section, you can:
A. Use the "AUTO MAP" option to automatically map source attributes to target attributes with the same nam1. B. Perform the attribute mapping directly in the table that lists all of the target attributes by clicking in the Source Type column and selecting one of the following options: Source Attribute, Constant or Function. If Source Attribute is selected, click in the Source Value column to display a list of source attributes to choose from. If Constant is selected, enter the value to set the destination attribute to. If Function is selected, click +Add in the Source Values column and select the Function to us1. C. Define attribute mappings with conditional filters by selecting Add below Attribute Mappings (outside of the table) and following the steps below. - Select a Destination Attribute from the drop-down list.
- Select the Source Value Type from the drop-down list.
- If Constant is selected for the Source Value Type, enter the value to set the destination attribute to in the Source Value(s) property. If Source Attribute is selected, select the attribute to use from the Source Value(s) drop-down list. If Function is selected, select ADD next to the Source Value(s) property and choose the function to use to compute the value of the attribute. See Functions Available for more details.
- (Optional) If a default value should be set in cases where the source attribute does not have a value for the attribute, enter the value in the Default Value property.
- If this attribute mapping should be applied when creating new entries in the destination, check the option "On Create Entry". Otherwise, uncheck this option and the mapping does not get applied when creating entries.
- If this attribute mapping should be applied when updating entries in the destination, check the option "On Update Entry". Otherwise, uncheck this option and the mapping does not get applied when updating entries.
- (Optional) Conditional Filter on the attribute mapping levels, describes the conditions that dictate if the attribute mapping gets applied. This attribute mapping only gets applied if the source attribute(s) value(s) matches the conditional filter.
- Select Save.
- Repeat steps 8-16 for each target attribute you want to define.
- Repeat steps 1-17 to create all mappings for the synchronization pipeline (e.g. mappings for all object types).
Destination DN
The Destination DN expression is used generate the DN for the entry in the destination and is based on one or more attributes from the source event. As an example, if the destination in a sync pipeline was the object=SUPPLIERS,o=hrdatabase view shown in the screen below, the Destination DN syntax could look like: SUPPLIERS=${employeeNumber},object=SUPPLIERS,o=hrdatabase where ${employeeNumber} indicates the employeeNumber attribute value from the source event is used to comprise the RDN (e.g. SUPPLIERS=1234,object=SUPPLIERS,o=hrdatabase). When processing insert and update events with attribute mappings, a lookup is performed in the destination based on the Destination DN expression, to see if the entry exists. If the entry does not exist, it is inserted. If it does exist, the entry is updated.

The corresponding Destination DN Expression to match the example described above is shown below.

As an alternative to using a specific source attribute in the DN expression, you can use the source entry's RDN value to compute the target DN with the following syntax:
${rdn[1]},{SUFFIX_IN_THE_RADIANTONE_NAMESPACE_CORRESPONDING_TO_THE_DESTINATION}
As an example, assume a source entry has a DN of CN=Anna Gold,o=activedirectory and the target DN expression is ${rdn[1]},o=companydirectory. The transformation would try to find an entry identified as CN=Anna Gold,o=companydirectory in the destination. If the entry did not exist, it would be inserted. If the entry exists, it would be updated.
DN expressions support a mix of constant (string) characters and attribute substitution, function substitution, and RDN substitution. The table below summarizes some examples of DN expressions.
Type of substitution | Examples |
|---|---|
Attribute Substitution | Source Event: |
Function Substitution | Source Event: |
RDN Substitution | Source Event: |
Source event filter
The source event filter is applied on each change event to determine if the attribute mappings are processed. If an entry passes the filter, the attribute mappings are evaluated.
A source event filter can be comprised of one or more conditions each of which is comprised of one or more expressions.
The filter window is blank by default and assumes a single expression will be used. An expression is based on a source attribute that can be conditioned (e.g. equals, not equals) on a value. Select a source attribute from the drop-down list, choose the condition and then enter a value. Based on the example below, only entries that have department=Sales are sent to the attribute mapping phase.

To configure a condition with multiple expressions or multiple conditions, start the filter by choosing and or or from the drop-down list.

After the first expression is configured, select Add Expression and a new line is added to the configuration. In the example below, only entries that have department=Sales AND title that starts with "Solution" are sent to the attribute mapping phase.

To remove an expression, select

To remove the entire filter, select

To accept the filter, select

You can also use the Add Condition button to add a nested condition.
Conditional filter
The conditional filter is applied on each source attribute of the change event to determine if the target attribute mapping gets applied. A conditional filter can be comprised of one or more conditions each of which is comprised of one or more expressions.
The filter window is blank by default. Select Add Expression or Add Condition to get started.
An expression is based on a source attribute that can be conditioned (e.g. equals, not equals) on a value. Select a source attribute from the drop-down list, choose the condition and then enter a value. Based on the example below, only entries that have employeeType that starts with Temp get this target attribute mapping applied.
The values are not case-sensitive.


The conditional filter can be based on one or more source attributes. To create a filter with one condition containing two expressions, select Add Condition and then select Add Expression. Define each expression. In the example below, the destination attribute named employeeType is populated with the value in the employeeType source attribute only if the source employeeType attribute starts with Temp and the source l attribute equals Seattle. If the source entry does not pass this filter, the employeeType target attribute is not populated with this attribute mapping.

A single destination attribute can have more than one mapping configuration, each with a conditional filter. In the example below, the destination attribute named employeeType is populated with the value in the description source attribute only if the source departmentNumber equals 50.

Based on the two attribute mappings for the employeeType destination attribute described above, the value can come from either the source employeeType or description attributes. The conditional filters determine which mappings are applied, if any.
When a target attribute has two different mappings, only one mapping is applied, the first one where the conditional filter evaluates true.

Auto Map
The Auto Map option is a quick way to auto-generate attribute mappings between the source and destination objects when they share common attribute names. The AUTO MAP option configures attribute mappings for each attribute defined in the source object and maps them to target attributes of the same name. After selecting AUTO MAP, delete mappings for attributes that you do not want to synchronize by selecting the X next to the Source Value.

Edit attribute mapping
To edit an attribute mapping:
- Select the topology on the Global Sync tab.
- Select Configure on the pipeline.
- Select the Transformation component.
- Expand below the Mappings section at the bottom.
- Select the pipeline mapping that contains the attribute mapping you want to edit and select Edit.
- Select the attribute mapping in the list and select Edit.
- When edits are finished, select Save.
Test attribute mapping
Test the attribute mappings by entering values for the source attributes.
- Select the topology on the Global Sync tab.
- Select Configure on the pipeline.
- Select the Transformation component.
- Expand below the Mappings section at the bottom.
- Select TEST.

- Select the source event type (e.g. Insert, Update, Delete) to test.
- Enter an Event ID. This is a DN that matches the location in the RadiantOne namespace for the source entries. (e.g.
uid=Aaron_Medler,ou=Accounting,o=companydirectoryassumingo=companydirectoryis the source naming context in RadiantOne). - Add source attribute names and values. Attribute names are in the left column and corresponding value in the right column. Click in the cell, type the value and select Enter. Attribute types can be simple or complex. The definitions for "simple" and "complex" are based on SCIM (http://www.simplecloud.info/specs/draft-scim-core-schema-01.html). Use the red X button next to the attribute to remove it from the test.

- Select TEST.
- The results of the Attribute Mappings are shown in the Output section.
- When you are finished testing the mappings, select CLOSE to go back to the "Configure Pipeline" screen.
Standard functions available
The default functions available for use are described in the table below.
Function | Usage & Configuration |
|---|---|
| Creates a string containing variables that will be replaced with their value at runtime. This is the function to use if you want to concatenate input values. |
| Concatenates the specified values into one value. |
| Decodes each value of the attribute in base64. |
| Decodes each value of the attribute in base64 without the |
| Encodes each value of the attribute in base64. |
| Escapes the characters in each value according to the rules specified in RFC 2253. |
| Filters a list of value(s) keeping only the value(s) that match the given regular expression. |
| Filters a list of value(s) keeping only the value(s) that do NOT match the given regular expression. |
| Removes any empty/blank/null value(s) from the list of value(s). |
| For each value, extracts the parent DN. This function assumes that each value is a DN. |
| For each value, extracts the RDN at the given index (index 0 is the deepest RDN). This function assumes that each value is a DN. |
| For each value, extracts the RDN value at the given index (index 0 is the deepest RDN). This function assumes that each value is a DN. |
| Extracts a substring from each value considering the length of the substring from the beginning of the string. |
| lookupAttribute(String dataSourceID, String baseDn, String filter, int scope, String attrName, int sizeLimit) |
| Converts each value to lowercase. |
| There are 3 different ways to use the remap function: |
| Replaces all matches of the search string with a replacement string for each value. Ignore regex. |
| Replaces all matches of the search string with a replacement string for each value. Regex sensible. |
| For each DN value, replaces the given suffix with the given replacement value. This function expects that each value is a DN. |
| Replaces the first match of the search string with a replacement string for each value. Ignore Regex. |
| Replaces the first match of the search string with a replacement string for each value. Regex sensible. |
| Replaces the value(s) if a matching key-value pair is found in the given dictionary file. Some sample dictionary files are located here: |
| Extracts a substring from each value. |
| Extracts a substring from each value. It retrieves the part after the first occurrence of the separator. |
| Extracts a substring from each value. It retrieves the part after the last occurrence of the separator. |
| Extracts a substring from each value. It retrieves the part before the first occurrence of the separator. |
| Extracts a substring from each value. It retrieves the part before the last occurrence of the separator. |
| Extracts a substring from each value considering the start position and the length of the substring. |
| Extracts a substring from each value considering the start and end positions. |
| Extracts a substring from each value considering the length of the substring from the end of the string. |
| Removes any leading and trailing whitespace from each value. |
| Converts each value to uppercase. |
Available Functions
User defined functions
User-defined functions can be created and configured from the Add Mapping Function window.
- Select
 next to User-Defined Function.

- Enter a function name.
- (Optional) Enter a Description.
- Select
to add parameters as needed.
- Select Add.
- To use the function, select it in the User-Defined Function section and select Next.
- Define values for the parameters of the function and select OK.
- Click OK to exit the function configuration.
- Click OK when you are done with the mappings.
- Click Save to save the rules and go back to the Rule Set table.
- Click
 to edit the transformation code.
 - From the classes drop-down list, select: com.rli.scripts.fidsync.pipelineName.UserDefinedFunctions

- Locate your user-defined function in the code and customize it accordingly.
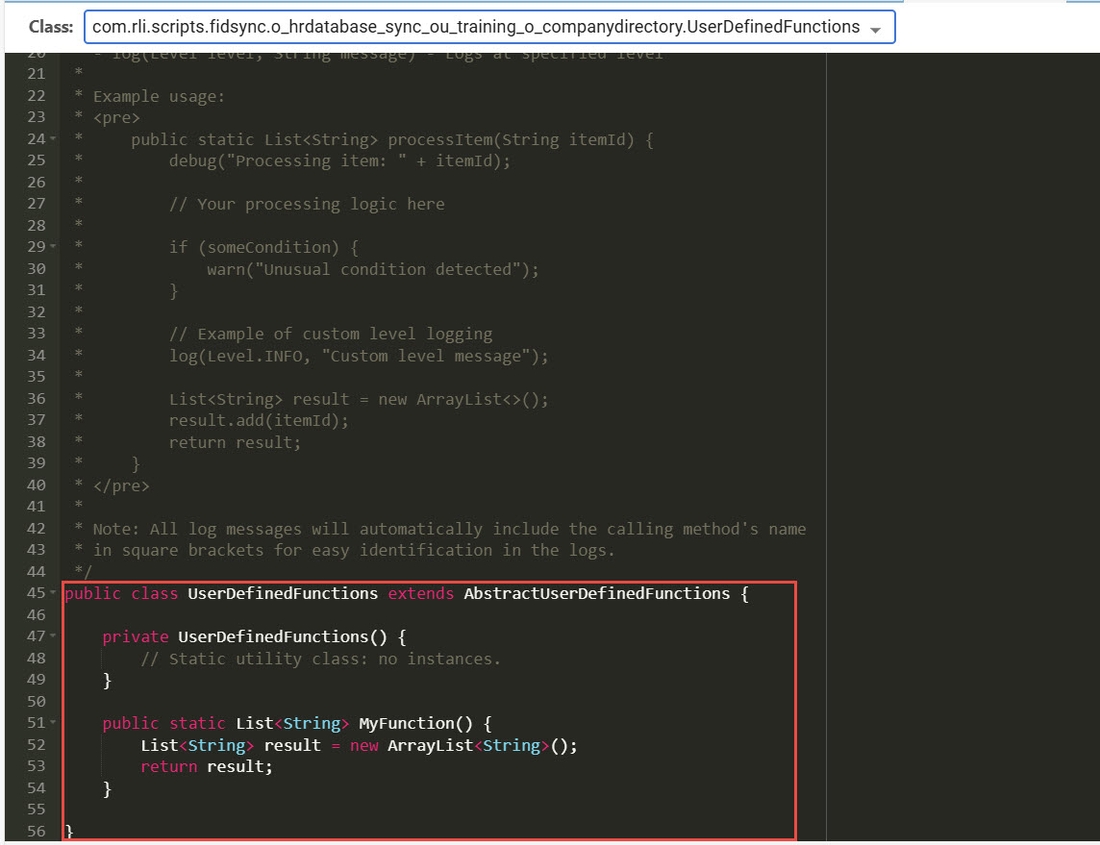
- Click Save to recompile the jar file.
Rules-based
Rules are packaged as a set and are associated with a single source entry object class. You will create a rule set for every source object class that you want to detect changes on.
Rules offer a default event-based template that allows for configuring conditions and actions for determining synchronization logic. This offers more customization for synchronization logic than simple attribute mappings without having to write code. If you choose to use Rules, a separate configuration for attribute mappings and scripts are not used.
Creating Rule Sets:
- On the Classic Control Panel > Synchronization tab, select the topology on the left.
- Select Configure next to the pipeline on the right.
- Select the Transformation component and choose Rules-based Transformation from the Transformation Type drop-down list.
- Select the button to create a new Rule Set.
- In the Basic Information section, enter a unique name to identify the rule set (e.g RulesUserSync).
- Select the object class associated with the entries in the source that you want to detect changes on from the Source ObjectClass drop-down list.
- Select the object class associated with the entries in the target that you want changes applied to from the Target ObjectClass drop-down list.
- (Optional) enter a description.

- (Optional) if you need to define variables to use in conditions, select the RULE VARIABLES section and configure them.
- Select the RULES section to configure the Rules for transformation.
- (Optional) to configure advanced options like Target Object RDN and DN generation, rules processing order and others, select the ADVANCED OPTIONS section.
- Select Save.
Creating Rule Variables
Rule variables are configured in the RULE VARIABLES section of the Rule Set.
A variable can be defined to store a temporary value and used in a rule condition to apply a computation or more advanced logic. See Variables for more information.
If you configure multiple values for a rule variable, it could be returned as a multi valued attribute (if all sources contribute a value). In the example below, the variable named VarDetails can be multi-valued with one value coming from the source carLicense attribute and one coming from source employeeNumber.

- In the Rule Variables section, select the button to create a new variable.
- Enter a variable name.
- (Optional) To add a constant value for the variable, select
 next to Values, select the Constant option from the drop-down list and enter the value. Select OK and OK again to close the Edit Rule Variable window.
 - (Optional) A value of a variable can come from another variable. This can be a source attribute value or from another variable that has been defined. Select
next to Values, select the Attribute option from the drop-down list and then select the source attribute, or variable name from the drop-down list on the right. Select OK and OK again to close the Edit Rule Variable window.
- (Optional) To apply a function on a source attribute and store the computed value in a variable, select
next to Values and select the Function option from the drop-down list. Select the Edit button, select a function from the available list and select Next. The configuration screen and options vary depending on the function selected. After the function is configured, select OK and OK again to close the Edit Rule Variable window.
- (Optional) To configure conditions that dictate how and when the rule variable is populated, select Start Condition.
- Variables can be used when defining rule conditions by selecting the Rule Variable Condition from the Condition Type drop-down list. After all variables are defined, select the RULES section.
Configure rule variable conditions
You can configure one or more conditions that dictate the context in which the variable is populated with the configured value(s).
- On the Rule Variables tab, select a variable and select Edit.
- Select Start Condition.
- If you want multiple conditions, select
ANDCondition, orORCondition. If you only need one condition, selectCondition Node. - If you selected
Condition Nodein the previous step, choose the Condition Type from the drop-down list. For a description of condition types, see Variables. Based on the condition type selected, different settings are configurable. Your conditions can be a combination of different condition types. See Configure Source Attribute condition, Configure Source Event condition, Configure Attribute Event condition, and Configure Rule Variable condition for details.
If you need another condition after selecting Condition Node (for one condition), select Add Parent Condition and choose either AND Condition or OR Condition. Then select
 to add the new condition node (
AND Condition or OR condition can be selected if you need nesting).
- If you selected
ANDCondition orORCondition in step three, select and choose Condition Node (
ANDCondition orORCondition can also be selected if you want nested conditions) and choose the Condition Type from the drop-down list. For a description of condition types, see [Variables (../../concepts-and-definitions/sync-engine-and-transformation.md#variables). Based on the condition type selected, different settings are configurable. Your conditions can be a combination of different condition types. See Configure Source Attribute condition, Configure Source Event condition, Configure Attribute Event condition, and Configure Rule Variable condition for details. - Select OK to close the Edit Rule Variable window.
- After all variables are defined, select the RULES section.
Configure Source Attribute condition
The Source Attribute condition type allows you to populate the rule variable when a source attribute contains a specific value based on a comparison operation and criteria.
- In the New Condition window, select Source Attribute Condition from the Condition Type drop-down list.
- Select the source attribute from the Source Attribute drop-down list.
- Select the operator to compare the source attribute value from the Operator drop-down list (e.g. equals, not equals, starts with, etc.).
- Depending on the operator chosen, you may have a Compare with: Constant Value setting where you can enter the value to compare with the source attribute.
- Depending on the operator chosen, you may have a Comparison Type property where you can choose how to handle the case of the attributes in the value (e.g. ignore case, numeric, regex, etc.).
- Select OK.
- Select OK to close the Edit Rule Variable window.
Configure Source Event condition
The Source Event condition type allows you to populate the rule variable when a specific type of event has occurred on the source entry.
- In the New Condition window, select Source Event Condition from the Condition Type drop-down list
- Select either equals or not equals to compare the event from the Assert Equality drop-down list.
- Select the type of event from the Event Type drop-down list (e.g. Inserted Entry, Updated Entry, etc.).
- Select OK.
- Select OK to close the Edit Rule Variable window.
Configure Attribute Event condition
The Attribute Event condition type allows you to populate the rule variable when a specific type of event has occurred on the source attribute.
- In the New Condition window, select Attribute Event Condition from the Condition Type drop-down list
- Select the type of event from the Change Event drop-down list (e.g. Value(s) was added, Value(s) was deleted, etc.).
- Select the attribute that the change event is to be checked for.
- Select OK.
- Select OK to close the Edit Rule Variable window.
Configure Rule Variable condition based on an existing rule variable
The Rule Variable condition type allows you to populate the rule variable when an existing rule variable contains a specific value based on a comparison operation and criteria.
- In the New Condition window, select Rule Variable Condition from the Condition Type drop-down list.
- Select the existing variable from the Rule Variable drop-down list.
- Select the operator to compare the existing variable value from the Operator drop-down list (e.g. equals, not equals, starts with, etc.).
- Enter the value to use for comparison in the Compare With: Constant Value property.
- Choose the Comparison Type (e.g. ignore case).
- Select OK.
- Select OK to close the Edit Rule Variable window.
Editing Rule Variables
- On the Rule Variables tab, select a variable and select Edit. Change the variable and select OK.
- If you want to delete a local variable, select the variable and select Delete.
- After all variables are defined, select the RULES section.
Creating Rules
Rules are packaged as a set that is associated with a single source object class and single target object class. If you want to synchronize source objects that are associated with different object classes (e.g. User and Group), then you need to configure multiple rule sets, one for each object class.
Rules are configured in the RULES section of the selected RULE SET. A Rule is comprised of one or more conditions and one or more actions. When the conditions are met, the actions are executed.
To automatically configure rules for insert, update and delete events, select
 . One rule is configured for each event and each rule has one condition based on the corresponding event type. You can edit an auto configured rule by selecting it and selecting the Edit button.
- Edit the Rule Set and select the Rules section.
- Select

- Enter a Rule name.
- (Optional) Enter a Description.
- Configure the identity linkage in the Identity Linkage property.
- If source events associated with this rule should be manually approved before being synchronized to the target, check to enable Require Approvals, click
 and Configure Approvers.
 - If you have selected the option to manually define the target DN in Advanced options, select the variable that contains the target DN. If you have the target DN generation set to Automatic in Advanced Option, you do not see the Target DN Variable in the Basic Information section.
- Select the Event Type that should invoke the rule from the Target Event Type drop-down list.
- Uncheck Adaptive Mode if you don't want to use it.
- Select the CONDITIONS section to define the conditions.
- Select the ACTIONS section to define the actions.
- Select OK.
- Repeat steps 1-10 to create rules for other source event types.
- Select Save.
- Create another rule set for every source object class you want to detect changes on.
Adaptive Mode
Adaptive mode is enabled for rules by default. Adaptive mode attempts to intelligently apply changes to a target by first performing a lookup to see if the entry exists. Based on this, it automatically determines the best way to handle the event: update an existing entry or insert a new entry.
Adaptive mode may change the type of operation performed on multi-valued attribute and how the modification is performed (add, replace or delete values) when the target is an LDAP directory. If you need to control the LDAP operation type for multi-valued attributes in the target, don't use adaptive mode.
If your target view is created from Okta, disable adaptive mode.
Source Event Type | Default Behavior (non-Adaptive Mode) | Adaptive Mode |
|---|---|---|
Insert New Entry | Insert the new entry into the destination without checking to first see if the entry already exists. If the entry already exists, an error is returned and no action is performed on the target. | Lookup to see if the entry exists: if it doesn’t, insert it. If the entry does exist, and the update involves a multi-valued attribute in a target LDAP directory, adaptive mode will determine the operation type to perform (e.g. add value, update value, delete value). If you need control over the operation type, disable Adaptive mode. |
Update Existing Entry | Update the entry into the destination without checking to first see if the entry already exists. If the entry does not exist, an error is returned and no action is performed on the target. | Lookup to see if the entry exists: if it exists, update it. If the update involves a multi-valued attribute in a target LDAP directory, adaptive mode will determine the operation type to perform (e.g. add value, update value, delete value). If you need control over the operation type, disable Adaptive mode. |
Delete Existing Entry | Try to delete the entry in the destination, if it doesn’t exist, an error is returned and no action is performed on the target. | Perform a lookup to see if the entry exists in the destination. If it exists, delete the entry. If it doesn’t exist, do nothing (don't return an error). |
Configuring Approvals
The Require Approvals option is located on the BASIC INFORMATION tab.
- Enable the Require Approvals checkbox.
- Click
.
- Click
.
- Select one or more members of the Approvers group and click ADD. If you select more than one approver, all must approve the action before it expires.
- Enter a length of time to indicate how long a message should be queued awaiting action (approval or rejection) before it is deleted from the queue. This can be in either minutes or days.
- Enter a meaningful description and select a source attribute to display in the Approvals experience to help provide context for the approver about the synchronization event.
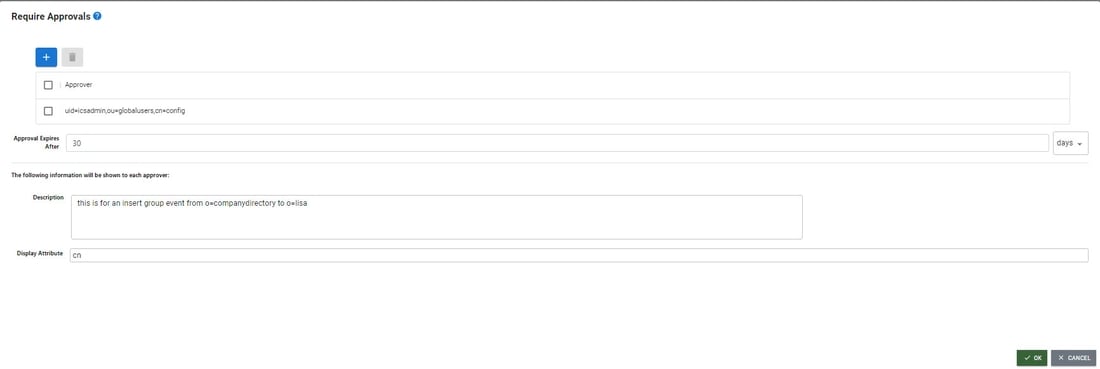 .
.
Approvers
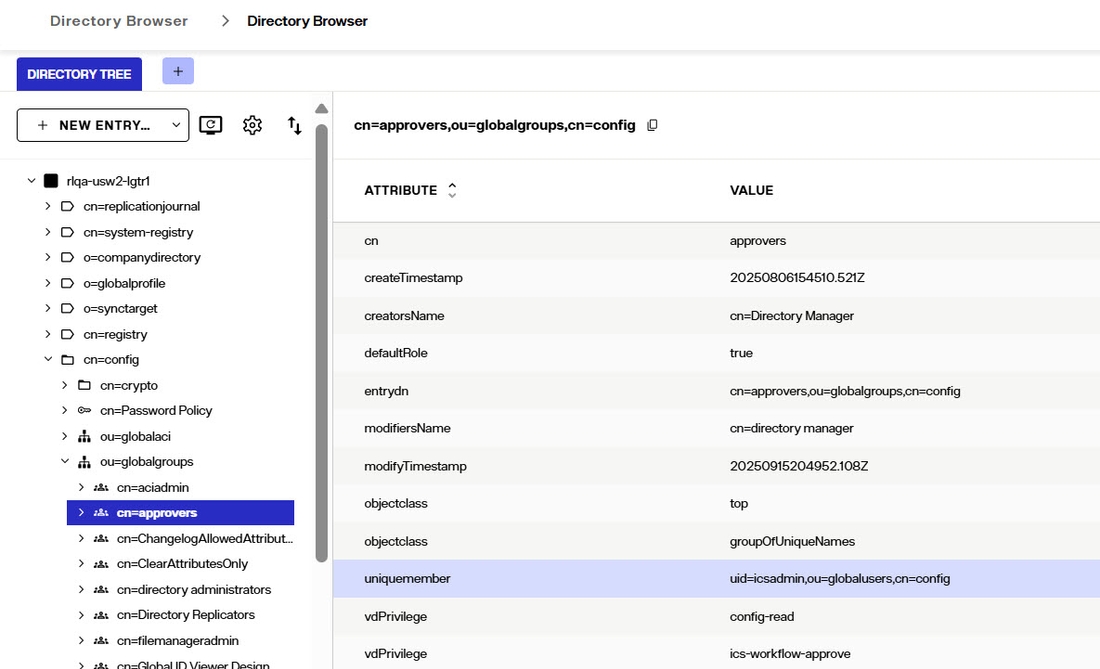
Any user located in the RadiantOne virtual namespace that is a member of the Approvers group can be an approver. In the following example, the ICS Admin user is made an approver.
To manage the Approvers group:
- In the Control Panel, in the left navigation menu, go to Manage > Directory Browser.
- Expand cn=config,ou=globalgroups.
- Select cn=approvers.
- Click the Manage Group button. The Manage Group window displays.
- In the "Find" section, click the folder button to browse to the location of the user that you want to approve events. In this example, the location ou=globalusers,cn=config is selected.
- Click the SEARCH button.
- Select the entry you want to approve events and click the "+" button. In this example, uid=icsadmin,ou=globalusers,cn=config is selected.
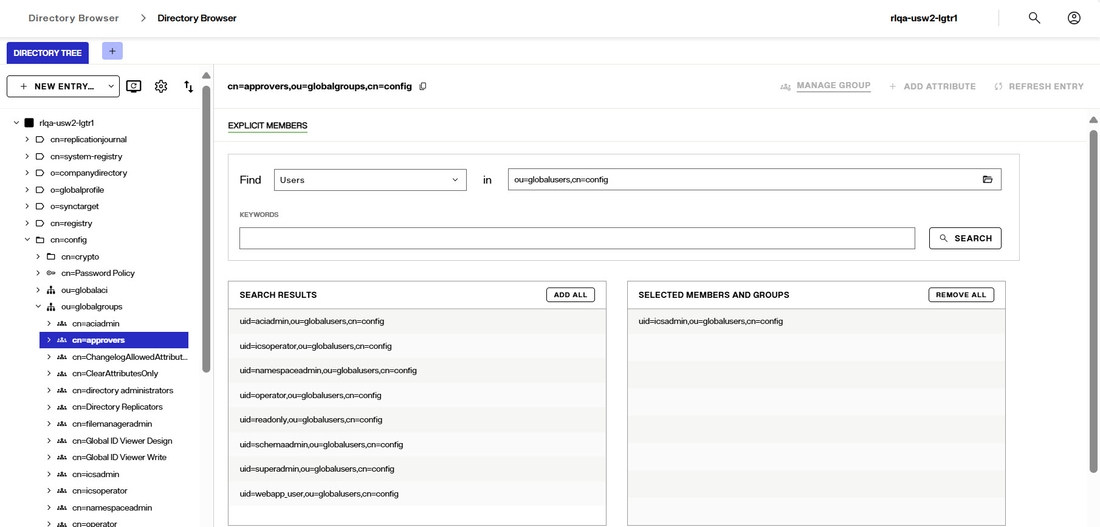
- Click the SAVE button. The member is displayed in the cn=approvers group.
If you want the approver to receive an email alert when they have pending approvals, the user account must have a valid email address (mail attribute).
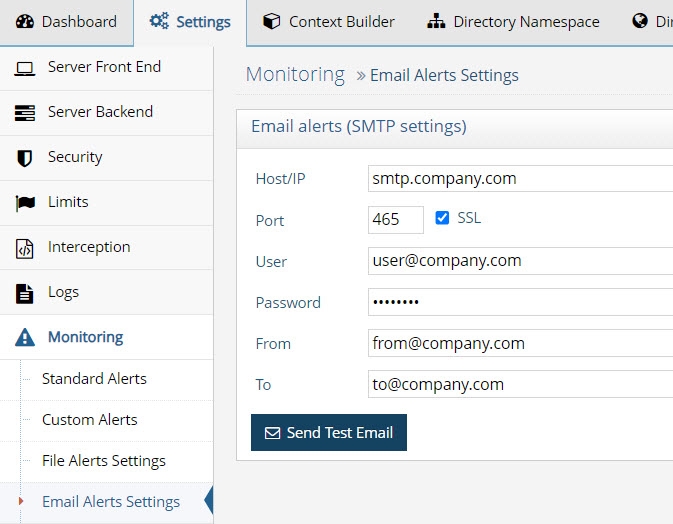
Approver Email Notifications
To enable email alerts for approvers, SMTP must be configured.
- Navigate to the Classic Control Panel > Settings tab > Monitoring > Email Alerts Settings.
- Enter your SMTP settings (host, port, user, password, from email and to email) in the Email Alerts (SMTP Settings) section.
- Click Save.
- If you would like to test your settings, click Send Test Email.
For security and audit purposes, it is not advised to connect to your mail server anonymously (leaving user and password >properties blank in the Email Alert Settings).
Performing Approvals When a change associated with a rule that requires approval is detected in a source, the instance is published into the approvals queue and awaits action. Approvers use the Approvals application to accept or reject events.
Approvers log into the Insights, Reports and Administration Portal and click the Approvals icon.

The pending events assigned to the approver are displayed.
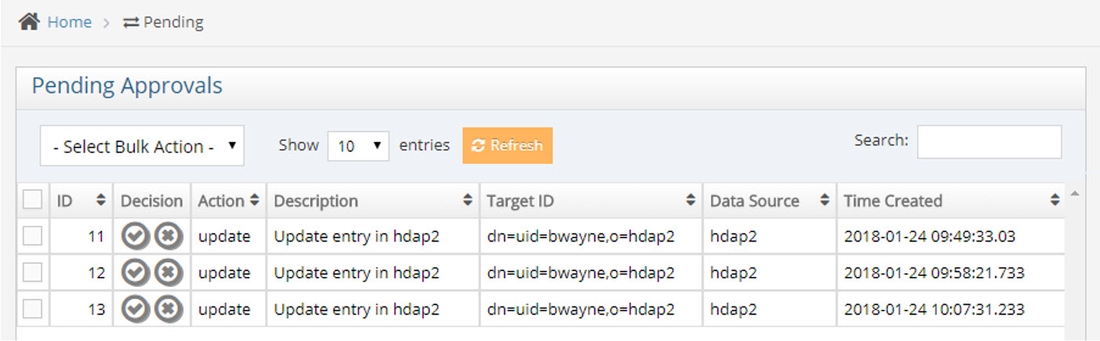
The user must approve or reject the event. This can be done using the
 to reject an event or the
 to accept an event.
Check boxes in the column on the far left can also be used. If you check the box in the column header, options include “Select Current Page”, “Select Everything”, “Unselect Current Page”, and “Unselect Everything”. Then select an option from the Select Bulk Action drop-down menu (Approve All or Reject All).
To fetch additional pending modifications, click the Refresh button.
After acting on all events, click Submit Changes and then Yes to confirm the updates.
Approved events are processed by the sync engine and applied to the target.
Approval Audit Log
The actions taken by approvers is logged. Logging is enabled by default and the log file is: <RLI_HOME>/logs/approvals_audit.log
Configuring Identity linkage
Identity linkage is used to match the target identity to the source identity. The attribute that is used in the identity linkage must uniquely identify the account in both the source and target. To configure the identity linkage:
- For a selected rule, choose the BASIC INFORMATION tab.
- Select the Edit button next to Identity Linkage.
- The target attribute used for the identity linkage is configured in the Target Object RDN property of the Advanced options for the Rule Set. You cannot change the target attribute on the identity linkage configuration page.
- In the Type drop-down list, choose Constant, Source Attribute, or Function to indicate how you want the target attribute populated. The Constant option allows you to enter a static value. The Source Attribute option lets you select a source attribute to base the target attribute value on. The Function option lets you compute the target attribute value based on a function.
- Select OK.
Configuring Advanced Options
Advanced options are configured on the ADVANCED OPTIONS section.
Advanced options are related to customizing the behavior for setting the target RDN and DN, the order for rules processing, reusing identity linkage across rules, and logging certain aspects of the rules like variable values and transformed XML messages.
Target Object RDN
The RDN used to comprise the target DN is automatically selected based on a required attribute of the objectclass associated with the target entries.
If you need to change the attribute that comprises the target RDN, select the attribute from the Target Object RDN drop-down list.
Target DN generation
The target DN can be generated automatically or manually. If the Automatic option is selected, the target DN is generated by default based on the virtual view created for the target and where it is mounted in the RadiantOne namespace. This works well if you are working with a target naming context that is relatively flat and all objects you are synchronizing are in the same container. If this is not the case, and you need to sync entries into various containers/branches in the target, then choose the Manual option. If the Manual option is selected, you have a Target DN setting in your Rule where you can select the variable that contains the logic for how the target DN is to be generated. The target DN must match the structure of the target view/hierarchy. If the Automatic option is selected, you do not have this setting for your rules.
Rules processing
The default behavior is to evaluate all rules that are configured in the order in which they are defined. If your synchronization needs dictate that once the actions associated with one rule are executed, no other rules need to be evaluated, choose the option to Stop processing other rules as soon as one rule's conditions match and select OK.
Sync identity linkage across rules
The identity linkage is the criteria that uniquely links a source identity to a target identity. This linkage may be based on a variable (source attribute or local variable), or a combination of information computed with a function. If you want the same identity linkage logic for all rules, check the Sync Identity Linkage across rules option. If this is selected, once the identity linkage is defined for one rule, all other rules are based on the same logic. If this is unchecked, each rule can have different identity linkage criteria.
Log Rule Variables
To assist with troubleshooting, it can be helpful to log the local variables. Check the Log Rule Variables option to have the variables logged in: \vds_server\logs\sync_engine\sync_engine.log on the RadiantOne node where the sync engine processor that is assigned for the pipeline is running. If RadiantOne is deployed in a cluster, a sync engine processor can be running on one or more nodes and the pipeline processing is distributed across them. Use the Global Sync tab to download the corresponding sync_engine.log file by selecting the topology and selecting Configure next to the pipeline. Select the Apply component and in the Log Viewer section, select Download.
Log transformed XML messages
To assist with troubleshooting, it can be helpful to log the transformed XML Message. Check the Log transformed XML messages option to have the message logged in:
\vds_server\logs\sync_engine\sync_engine.log on the RadiantOne node where the sync engine processor that is assigned for the pipeline is running. If RadiantOne is deployed in a cluster, a sync engine processor can be running on one or more nodes and the pipeline processing is distributed across them. Use the Global Sync tab to download the corresponding sync_engine.log file by selecting the topology and selecting Configure next to the pipeline. Select the Apply component and in the Log Viewer section, select Download. You can also view and download the sync_enginer.log from Environment Operations Center.
Configuring Conditions
Conditions dictate the circumstances that invoke the actions associated with the rule. When conditions are met, the actions are processed.
To create conditions:
- Edit the rule and select the CONDITIONS section.
- Select Start Condition.
- If you only need a single condition, select Condition Node and choose the condition type: Source Attribute condition, Source Event condition, Attribute Event condition, or Rule Variable condition. If you need multiple conditions, select either
ANDCondition orORCondition and then select to add a condition node or another (nested)
 ANDCondition or (nested)ORCondition. Once you add a new condition node, you configure the expression. - Select OK.
Configure Source Attribute condition
The Source Attribute condition type allows you to define a condition based on the value of a source attribute.
- In the New Condition window, select Source Attribute Condition from the Condition Type drop-down list.
- Select the source attribute from the Source Attribute drop-down list.
- Select operator (e.g.
equals,not equals,greater than, etc.) to use from the Operator drop-down list. - Depending on the operator chosen, you may have a Compare with: Constant Value setting where you can enter the value to compare with the source attribute.
- Depending on the operator chosen, you may have a Comparison Type property where you can choose how to handle the case of the attributes in the value (e.g. ignore case, numeric, regex, etc.).
- Select OK.
- After all conditions are added, select the ACTIONS section in the Rule Builder.
Configure Source Event condition
The Source Event condition type allows you to define a condition based on the when a specific type of event has occurred on the source entry.
- In the New Condition window, select Source Event Condition from the Condition Type drop-down list
- Select either equals or not equals to compare the event from the Assert Equality drop-down list.
- Select the type of event from the Event Type drop-down list (e.g. Inserted Entry, Updated Entry, etc.).
- Select OK.
- After all conditions are added, select the ACTIONS section in the Rule Builder.
Configure Attribute Event condition
The Attribute Event condition type allows you to configure a condition for when a specific type of event has occurred on the source attribute.
- In the New Condition window, select Attribute Event Condition from the Condition Type drop-down list
- Select the type of event from the Change Event drop-down list (e.g. Value was added, Value was deleted, etc.).
- Select the attribute that the change event is to be checked for.
- Select OK.
- After all conditions are added, select the ACTIONS section in the Rule Builder.
Configure Rule Variable condition based on an existing rule variable
The Rule Variable condition type allows you to populate the rule variable when an existing rule variable contains a specific value based on a comparison operation and criteria.
- In the New Condition window, select Rule Variable Condition from the Condition Type drop-down list.
- Select the existing variable from the Rule Variable drop-down list.
- Select the operator to compare the existing variable value from the Operator drop-down list (e.g. equals, not equals, starts with, etc.).
- Enter the value to use for comparison in the Compare With: Constant Value property.
- Choose the Comparison Type (e.g. ignore case).
- Select OK.
Configuring Actions
Actions are processed when conditions are met. There are three types of actions that can be used: Abort, Apply Target Attribute Mapping, and Custom Code/Function. Select one of these options from the Action Type drop-down list, configure any required settings and select Insert.
Abort transformation
If the Abort Action is chosen, the transformation is aborted and no action is taken on the target.
Configure target attribute mappings
If Target Attribute Mappings Action is chosen, you can use an existing mapping file, or create a new set of mappings. When you select Target Attribute Mappings Action, the window where you configure the mappings shows at the bottom of the RULES section after you select OK.
Attribute mapping can be accomplished with any combination of the following: default mapping method, mapping to a variable (source attribute or local variable), using a custom condition, setting an alternate (default) value, or defining advanced mapping leveraging IF,THEN,ELSE conditions.
To map attributes:
- Use the
 on the bottom right of the attribute table to page through and find the attribute you want to map.
 - In the Operation Type drop-down list, select the operation to perform on the target attribute (e.g. Replace Value(s), Add Value(s), etc.).
- Select
 next to the input value and select how to populate the target attribute value. You can use a Constant, Attribute (source attribute or variable), or a Function. If you choose Constant, enter the value to set. If you choose Attribute, select the source attribute or variable from the drop-down list. If you choose Function, select the function and follow the guidance to define the value.
 - (Optional) you can define an Input Condition by selecting
 . Select Insert after defining the input condition.
If you use an input condition that uses an alternative value, select (+) in the Alternate Values section and choose how to populate the value (e.g. Constant, Attribute or Function).
- Repeat steps 1-4 in this section to map all needed attributes.
- Select Insert to close the Rule Builder.
- Select Save.
Configure input conditions for target attributes
The default is "None" meaning that no special checking of the input value(s) is performed prior to setting it for the target attribute. Depending on the type of target system you are synchronizing to, you may need to treat null or empty values differently. You may also want to set a default value if the input value(s) is null or empty. The options are described in the following table.
Value(s) Checking Option | Description |
|---|---|
None | Default mode. No special checking of the input value(s) is performed prior to setting it for the target attribute. |
Set value(s) only if not null, else use alternate value(s) | If the input value(s) is null, set the target attribute to the Alternate Value (if defined). If no Alternate Value is defined, nothing is set. |
Set value(s) only if not empty, else use alternate value(s) | If the input value(s) is empty, set the target attribute to the Alternate Value (if defined). If no Alternate value is defined, nothing is set. |
Delete attribute if value(s) are empty or null | If the input value(s) is empty or null, delete the attribute in the target. This sets a NULL value (for a database target) or an empty value (for a directory target). |
Delete attribute if value(s) are empty. | If the input value(s) is empty, delete the attribute in the target. This option allows you to differentiate between empty and null. |
Set value(s) if custom condition matches, else use alternate value(s) | If the input value(s) matches a custom condition, set the target attribute to the input value(s). |

Configure custom code/function
If the Custom Function Action is chosen, you can create a new function for your transformation script, or call an existing custom function. If you have existing custom functions, the names appear in the drop-down list for you to choose from. After you select OK, select OK again and then select Save. Then select
on the Rule Set page to edit the transformation script. Locate your custom function to edit the code in the web editor. You can use an IDE like Eclipse instead of the web editor if you prefer.
If you choose to delete the custom function action in a rule, the code for this is no longer called at runtime. However, the custom function code does remain in the transformation script. You must manually remove the custom function from the transformation script if you don't want it there. Select [<>] on the Rule Set page to edit the transformation script.
Testing rules
You can test your rules by emulating changes from the source.
- On the Classic Control Panel > Synchronization tab, select the topology on the left.
- Select Configure next to the pipeline on the right.
- Select the Transformation component and choose Rules-based Transformation from the Transformation Type drop-down list.
- Expand the Rules section that appears below the Transformation Type and select
.
- Select Test in the top right corner.
- Select the source event type (e.g. Insert, Update, Delete) to test.
- Enter an Event ID. This is a DN that matches the location in the RadiantOne namespace for the source entries. (e.g.
uid=Aaron_Medler,ou=Accounting,o=companydirectoryassumingo=companydirectoryis the source naming context in RadiantOne). - Add source attribute names and values. Attribute names are in the left column and corresponding value in the right column. Select in the cell, type the value and select Enter. Attribute types can be simple or complex. The definitions for "simple" and "complex" are based on SCIM (http://www.simplecloud.info/specs/draft-scim-core-schema-01.html). Use the red X button next to the attribute to remove it from the test.
- Select Test.
- The results of the script logic are shown in the Output section.
- When you are finished testing the mappings, select CLOSE to go back to the "Configure Pipeline" screen.
