Overview
The RadiantOne Identity Data Management service acts as a virtual hub, capable of ingesting and synchronizing data from all your identity applications for administration, management, and provisioning to other applications in the required format. Building the hub requires a set of sophisticated features that can be difficult to manage without a guided process.
RadiantOne offers a set of tools that guide users through implementing best practices for these advanced features. The purpose of this guide is to provide the necessary steps to implement the RadiantOne SCIM connector for synchronizing and managing identity data from the ServiceNow ITSM platform.
The target audience includes administrators, engineers, contractors, consultants, and managers responsible for an organization’s identity management infrastructure and applications.
Capabilities
The System for Cross-domain Identity Management (SCIM) specification automates user identity management between identity domains. The RadiantOne SCIM connector supports the SCIM v2 specification and connectivity to any SCIM compliant target endpoint.
Connectivity and management of objects in ServiceNow are configured and enabled through the Identity Data Management Control Panel. This integration can allow for full CRUD (Create, Read, Update and Delete) operations against the ServiceNow SCIM endpoint objects.
Prerequisites
The following are general prerequisites for implementing and supporting the RadiantOne SCIM connector to synchronize and manage ServiceNow identity data in RadiantOne:
- Familiarity and general understanding of SCIM and LDAP protocols and standards
- Working knowledge of ServiceNow, including access and permissions to administer and configure the target ServiceNow environment for integration with RadiantOne
- Working knowledge of RadiantOne Identity Data Management, including access and permissions to administer and configure the system for integration with ServiceNow
- Networking ingress and egress enabled as needed for connectivity from RadiantOne to ServiceNow
High-level configuration steps
- Create an account in ServiceNow with the necessary permissions to connect and manage the ServiceNow identity data via SCIM, to be synchronized and managed in the RadiantOne environment.
- Have RadiantOne Identity Data Management deployed (either self-managed or through an Environment Operation Center (EOC) tenant).
- Create an account with the required access and permissions to manage RadiantOne Data Sources, Schema and Namespace configuration in the RadiantOne environment.
- Create a RadiantOne Identity Data Management Data Source.
- In the RadiantOne Identity Data Management environment, extract the Schema for desired ServiceNow endpoints and objects.
- Create a RadiantOne Identity Data Management namespace to ingest and synchronize targeted ServiceNow SCIM endpoint objects.
- Test and validate the SCIM integration and synchronization between ServiceNow and RadiantOne Identity Data Management.
The sections below outline detailed configuration steps.
ServiceNow configuration steps
1. Create a ServiceNow account
Create an account in ServiceNow to be used by the RadiantOne SCIM connector.
2. Assign required permissions to ServiceNow account
In the example included in this configuration guide, we assigned the ‘Admin’ role to the service account to be used by RadiantOne SCIM connector to ServiceNow.
- The ‘Admin’ role provides the necessary level of access to connect to associated SCIM and Web Services endpoints and ingest the ServiceNow data into a defined RadiantOne Namespace.
- The ‘Admin’ role grants full CRUD(Create, Read, Update, Delete) access to objects via the SCIM API and Web Services for the respective Endpoints.
Note that additional scoping and rights management within ServiceNow to provide more granular control in ServiceNow is beyond the scope of this document. Read the linked document for further assistance with understanding the administrative model used in ServiceNow documentation on roles.
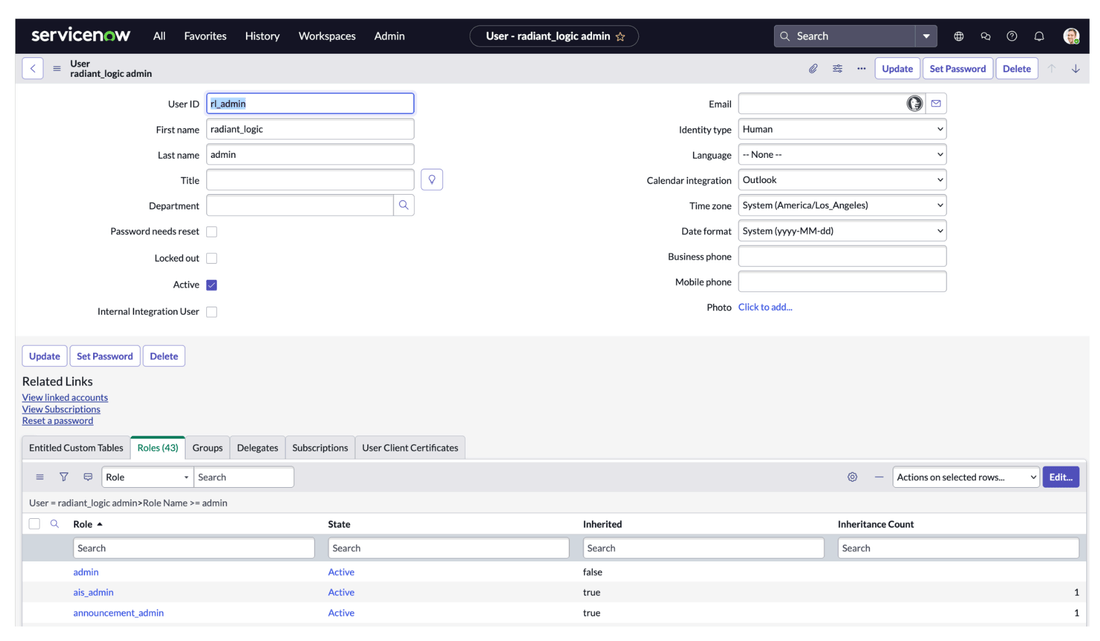
The ‘rl_admin’ user is created with the ‘admin’ role assigned. Other roles are inherited with the ‘admin’ role. If needed, more granular permissions can be established but that is beyond the scope of this document.
RadiantOne configuration steps
1. Create a Data Source
Log in to the Identity Data Management Control Panel UI using an account with sufficient privileges to manage Data Sources, Namespaces, and Schema configuration. All setup is performed through point-and-click operations in the UI.
The following sections with Media illustrate how to create a data source in Identity Data Management and also highlight any additional considerations or caveats you may need to be aware of.
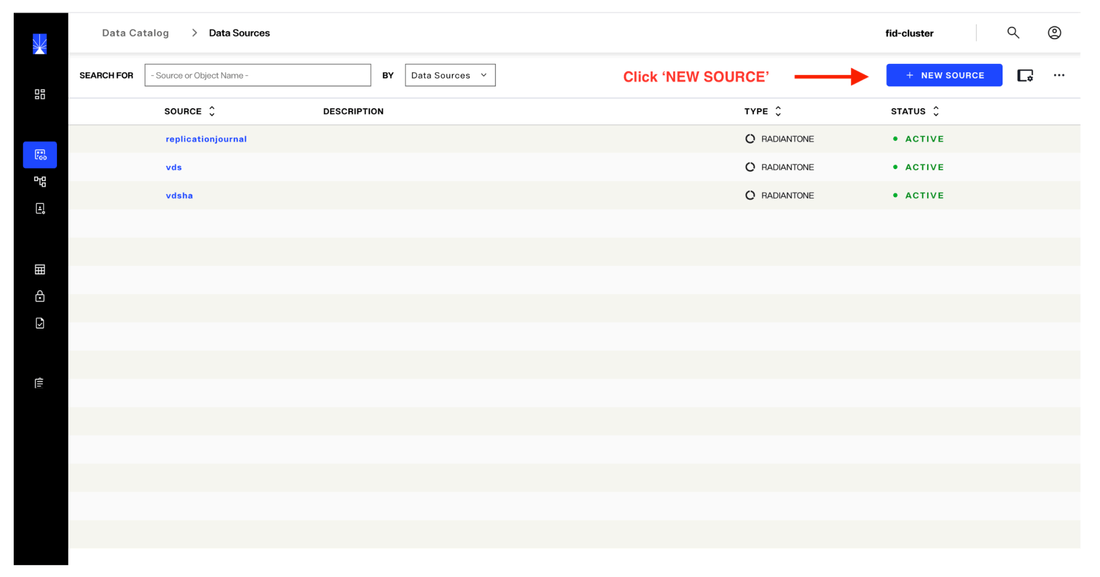
a. After logging into Identity Data Management Control Panel, select ‘Data Catalog’ > ‘Data Sources’ from the navigation pane on the left hand side and click ‘NEW SOURCE’.
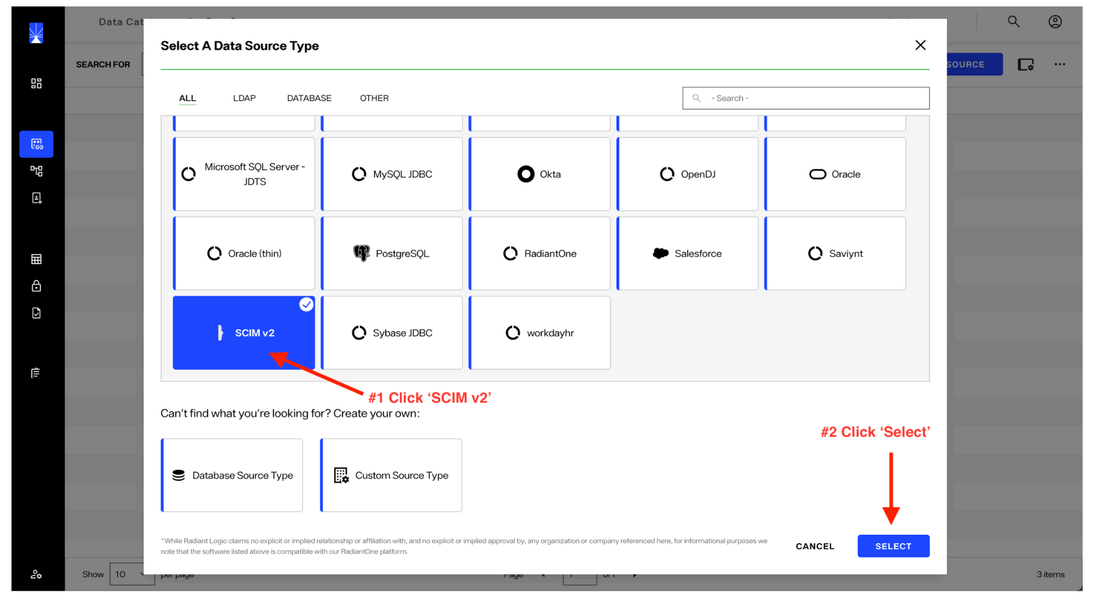
b. Click the ’SCIM v2’ tile from the list of displayed data sources and click the 'Select' button.
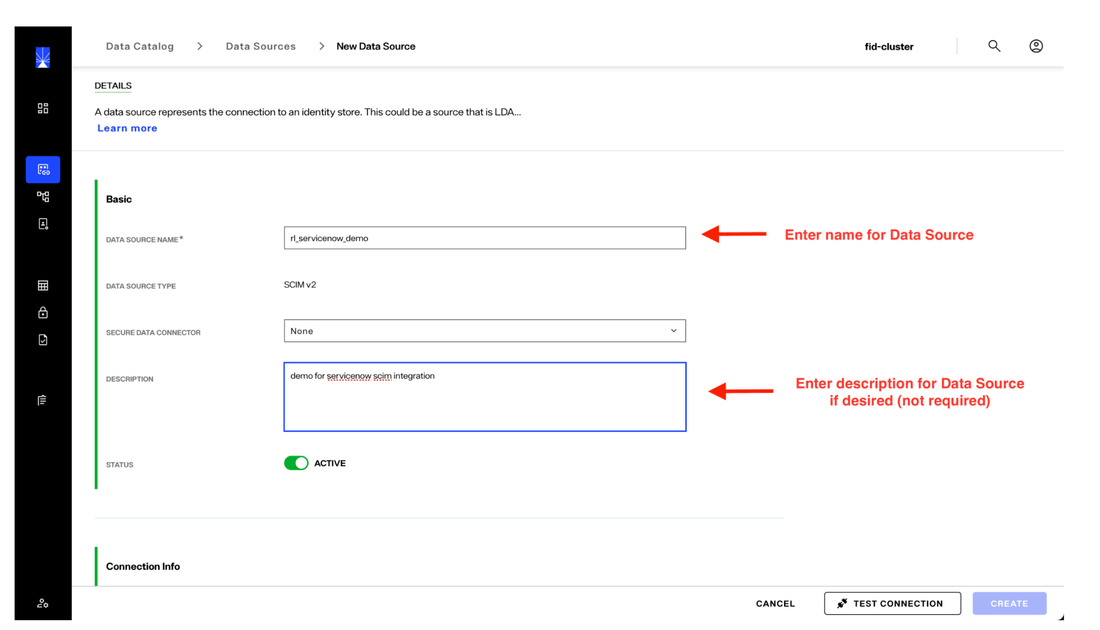
c. Enter a unique name for the Data Source, along with a description if desired. The description field is optional. The ‘ACTIVE’ toggle should be selected by default, if not, enable it. The ‘SECURE DATA CONNECTOR’ field is not part of this set up, so leave that set to ‘None’. Note that certain characters are not allowed in the Data Source Name, including dashes (-). The system will provide an error message should there be any issue with the name provided.
d. Scroll down to the ‘Connection Info’ section. Enter the required information as shown for the target IdentityIQ environment. The values shown in the screenshot are for the test environment used for building this configuration guide. The values you enter will be specific to your ServiceNow environment.
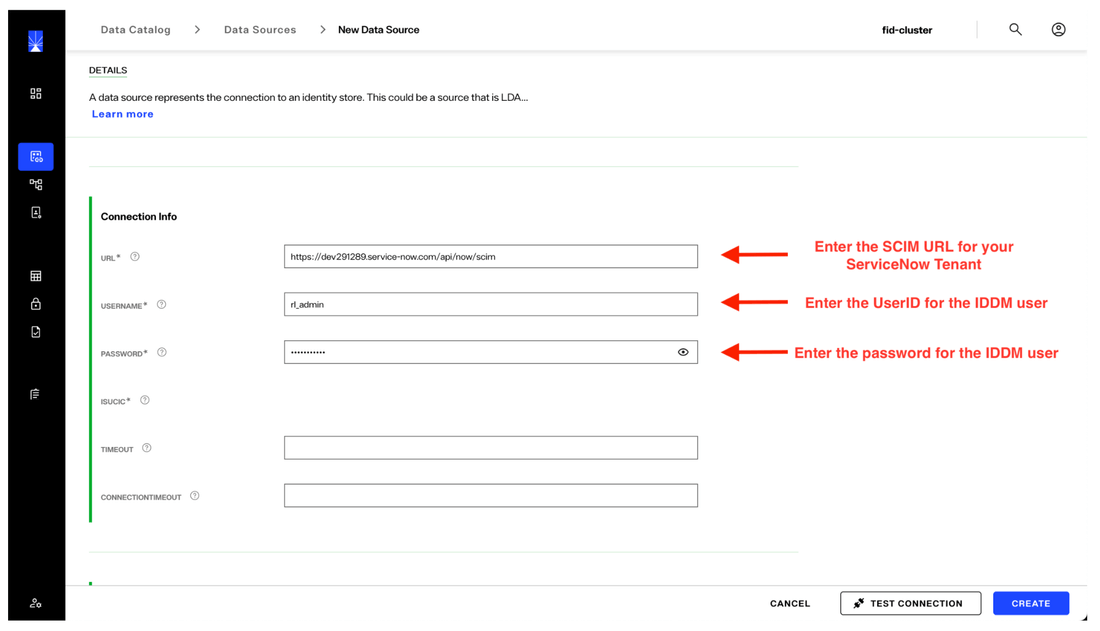
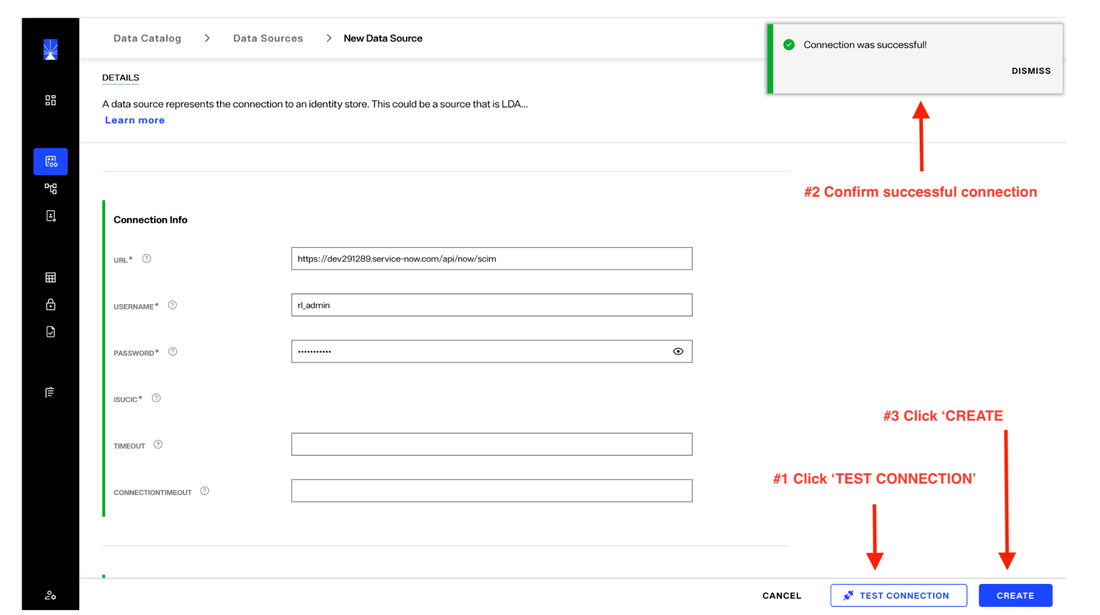
e. Click the ‘TEST CONNECTION’ button to validate the credentials and connectivity. A pop up notification will be displayed with the results of the test. If the test is not successful additional information will be displayed to assist with troubleshooting.
When done with the configuration and test, click ‘CREATE’.
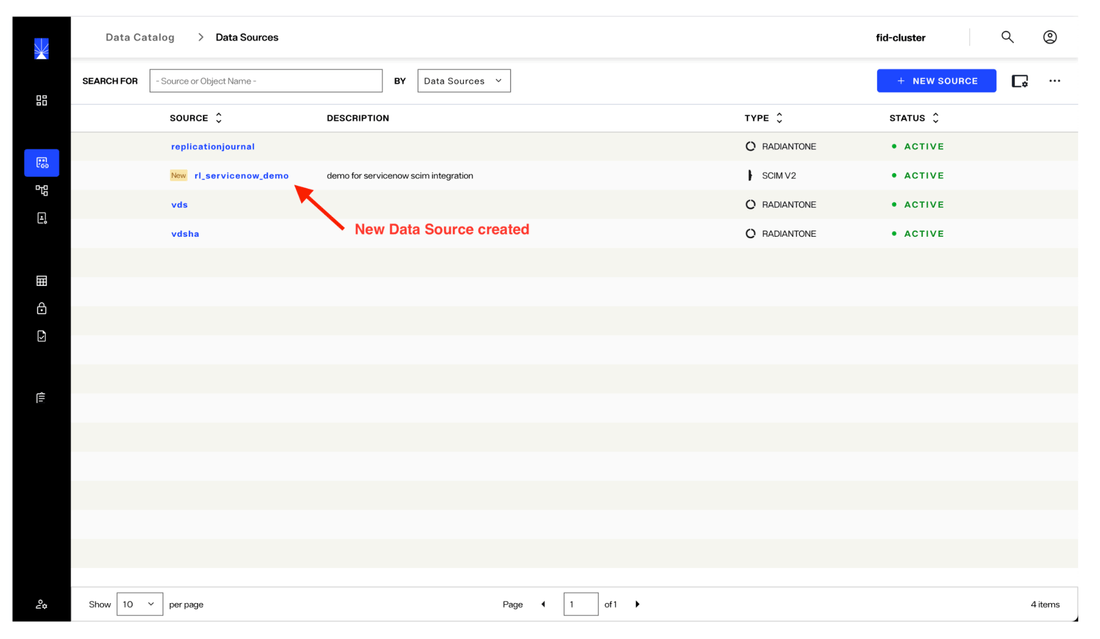
After the Data Source has been created, you will be taken back to the main Data Source page and should see the newly created Data Source, showing ‘ACTIVE’.
2. Extract Schema for Data Source
The schema for the ServiceNow data source needs to be extracted from ServiceNow to be used in RadiantOne. The schema consists of various tables and attributes that represent the Identity objects in ServiceNow, such as accounts and users.
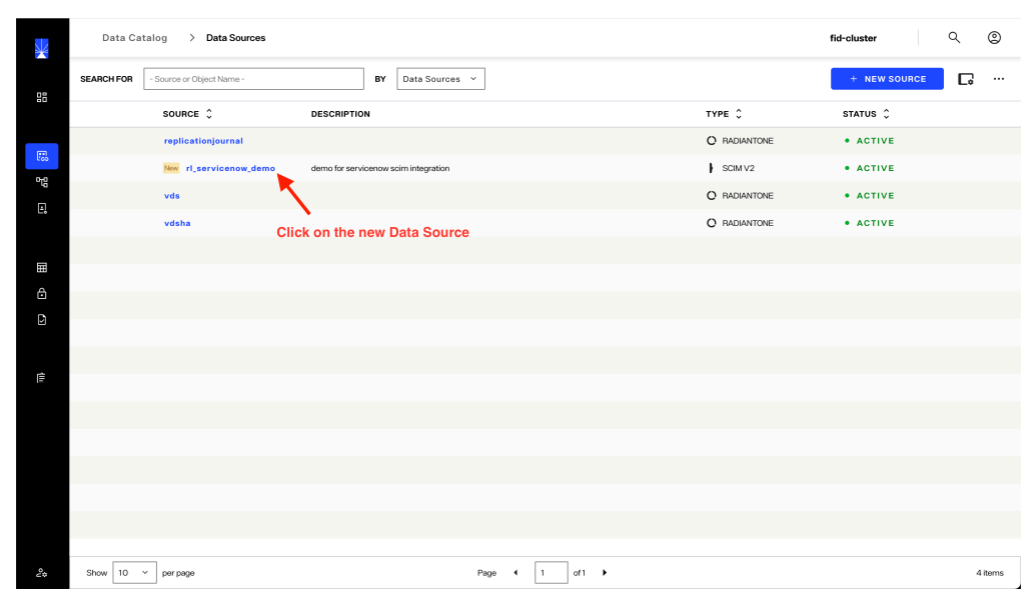
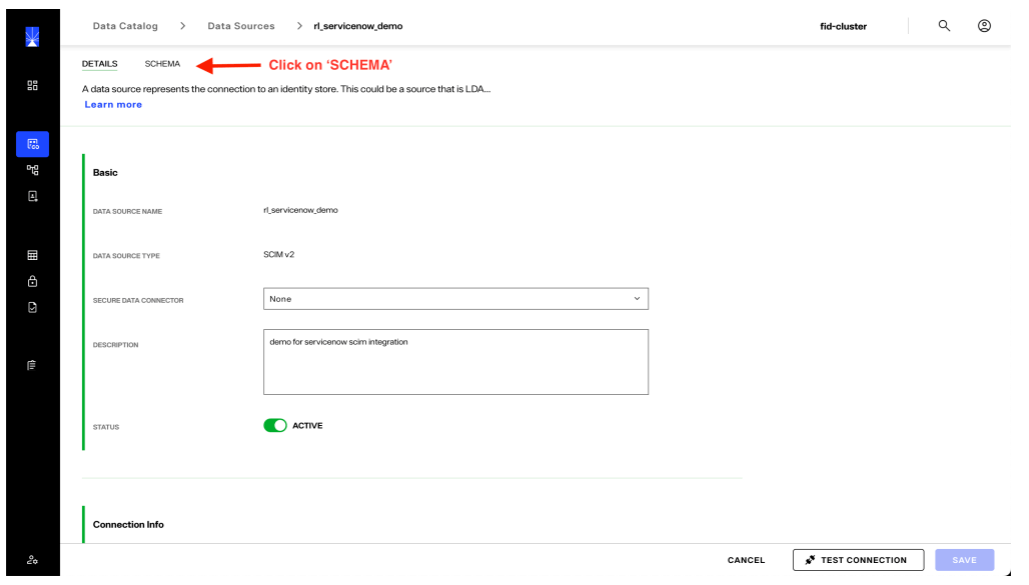
a. From the main Data Source page, click on the newly created Data Source.
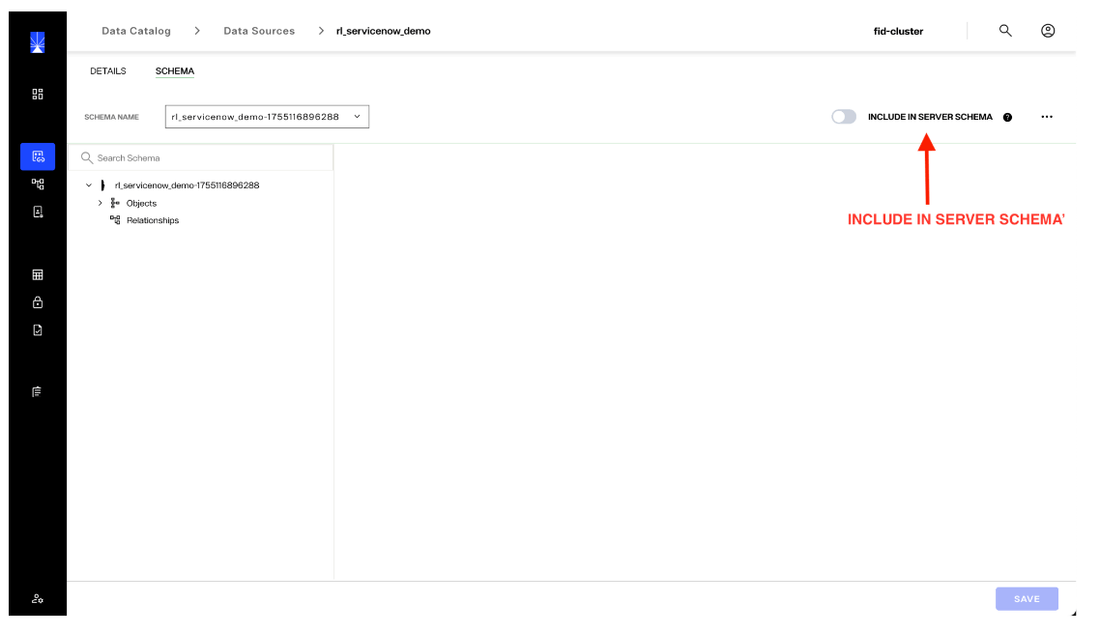
b. Click on the ’SCHEMA’ tab at the top of the Data Source page.
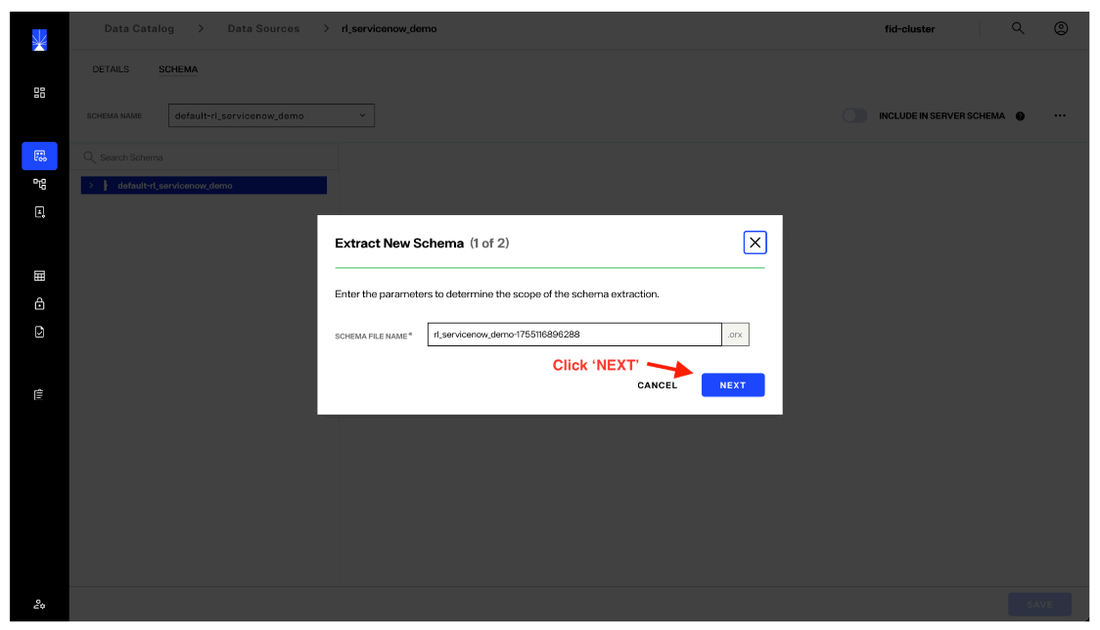
c. On the Data Source page, click the ellipsis in the top-right corner. From the menu, click "Extract New Schema". This will launch a guided workflow to extract the schema.

A 'default' schema appears in the drop-down, but for SCIM resources it is incomplete. You can ignore this, as the full schema for the ServiceNow SCIM endpoints will be extracted using the steps below.
d. A unique name is generated for the schema to be extracted and used by RadiantOne. If you prefer, you can enter your own name, as long as it is unique. Then, click ‘NEXT’.
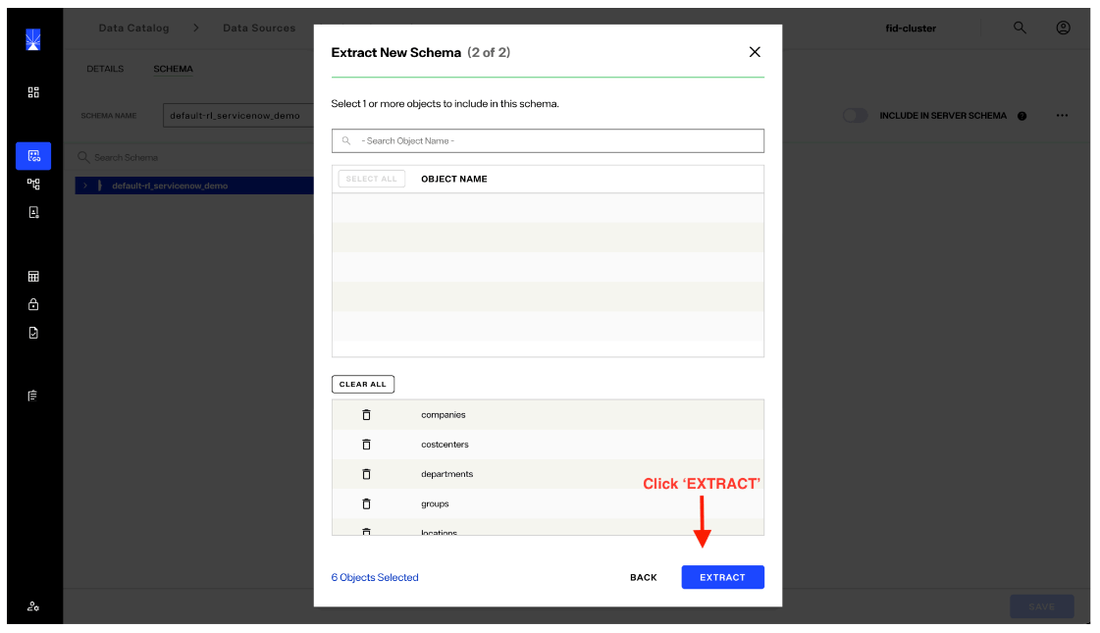
e. It may take a minute or so for the available schema objects to be displayed, depending on factors such as network bandwidth, network uilization, and the locations of the RadiantOne and ServiceNow environments.
Multiple objects are exposed through its SCIM interface. You can choose which objects to include in this Data Source by clicking the plus (+) icon next to each object name. In this walk-through, we’ll select all available objects and refine them later during Namespace configuration.
Keep in mind that multiple Data Sources can be configured for the same target system, each with different object selections. This is primarily a design and administration choice.

f. The selected objects should show in the bottom pane. After selecting your desired schema elements, click ‘EXTRACT’.
g. A pop-up notification will be displayed when the operation is complete. If there are any issues with the extraction, additional information will be displayed to assist with further troubleshooting.
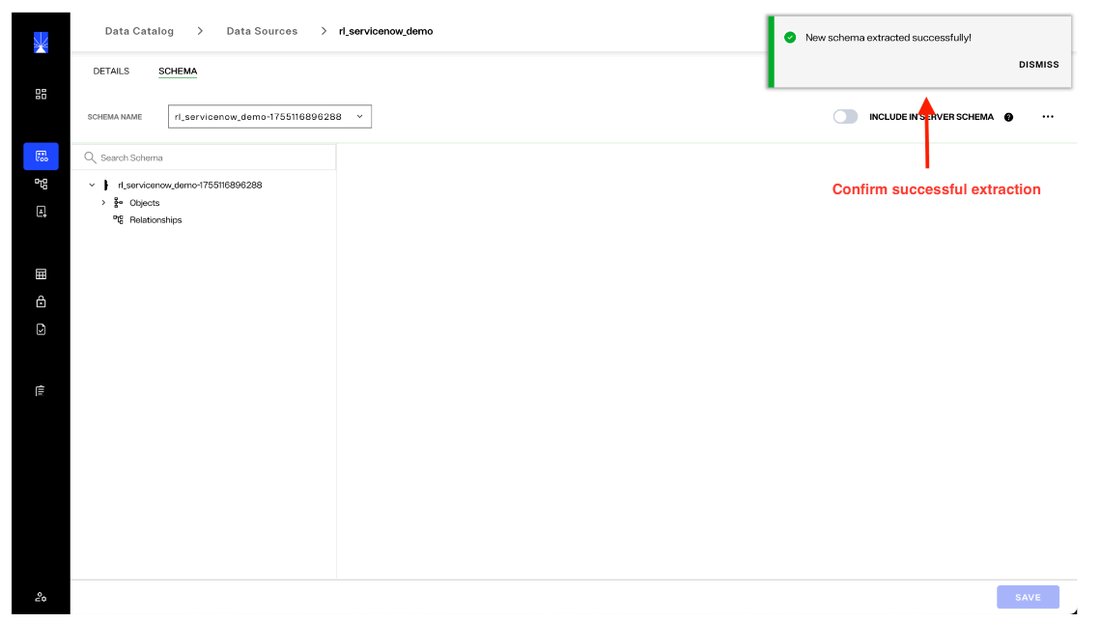
h. Including the extracted Schema in the RadiantOne Server Schema is not required to connect to, manage, or access ServiceNow data through the RadiantOne SCIM connector. If additional RadiantOne features are needed, such as Global Synchronization, which propagates updates to other data sources through RadiantOne, then the selected ServiceNow Schema must be added to the RadiantOne Server Schema. This option is noted for reference and clarity.
3. Create a Namespace
A ’Namespace’ in RadiantOne Identity Data Management is a virtualized instance of the data extracted from ServiceNow. Follow the steps below to create a Namespace.
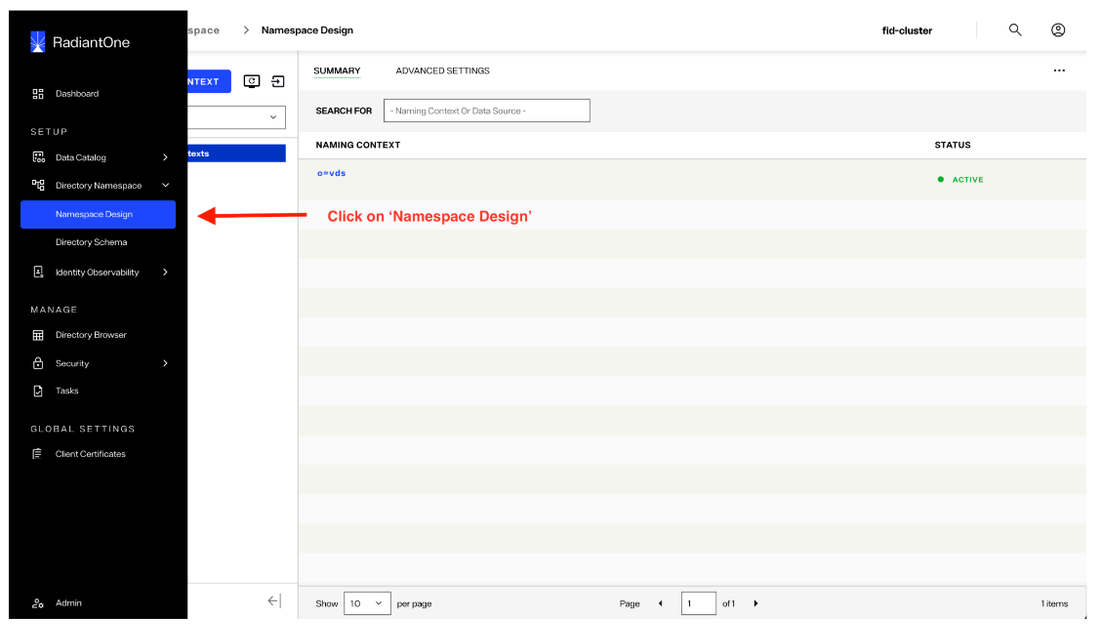
a. Click 'Namespace Design' from the navigation panel on the left side of the Control Panel. When you hover over the panel, it will expand and display the available options.
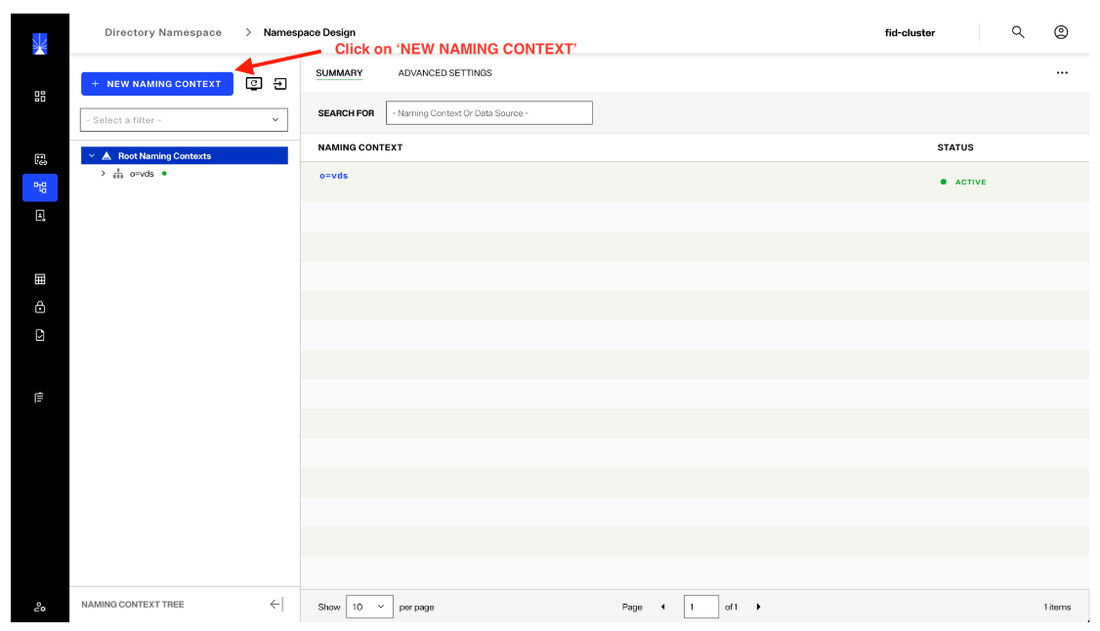
b. Click on the ‘NEW NAMING CONTEXT’ button to initiate the process and display prompts to create and initialize the Namespace.
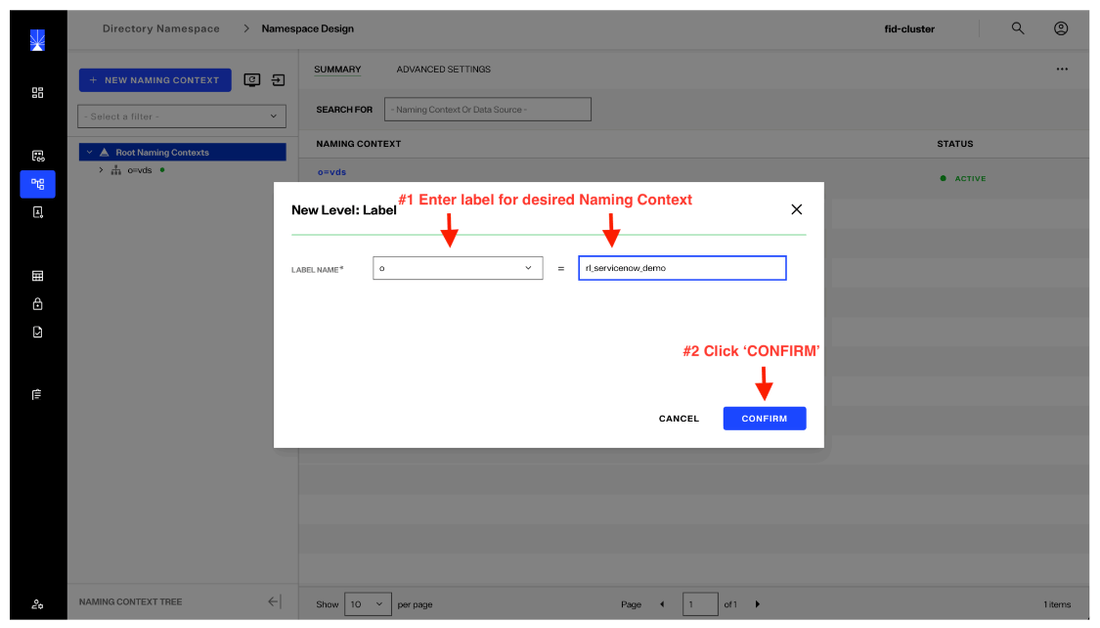
c. Labels are used to build the ‘Naming Context’. The drop-down provides additional label options, such as ‘cn’ and ‘dc’. The selection of the label name is subject to your design and desired representation of the data. For this example, we are using ‘o’ (organization’) as the root object.
Once you select a label name and value, click on ‘CONFIRM’.
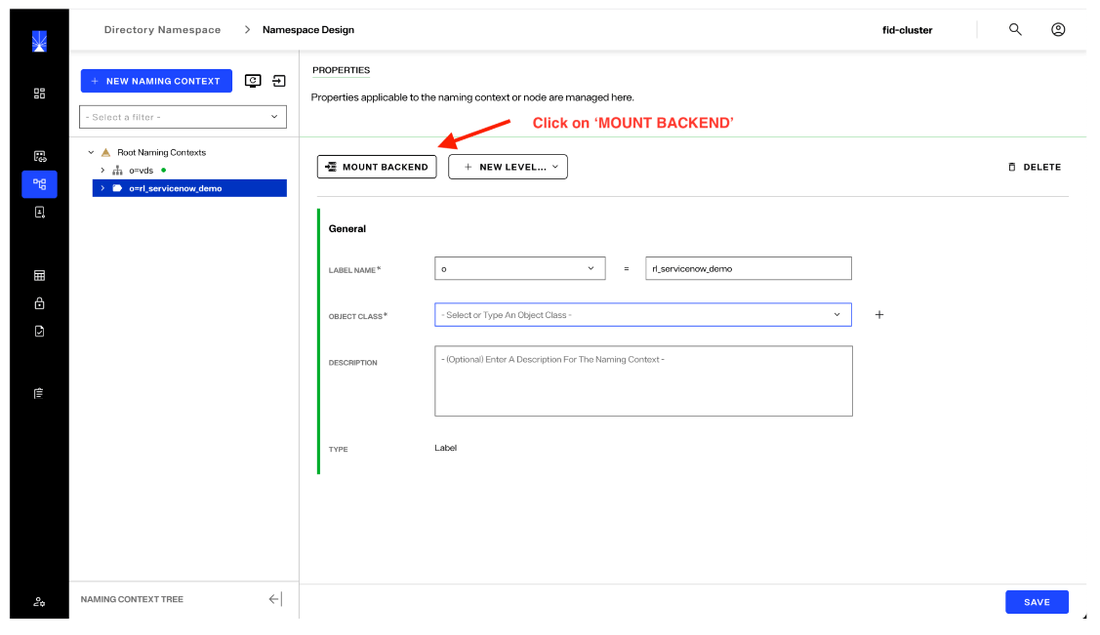
d. At the root level that was just created, select and then click ‘MOUNT BACKEND’.
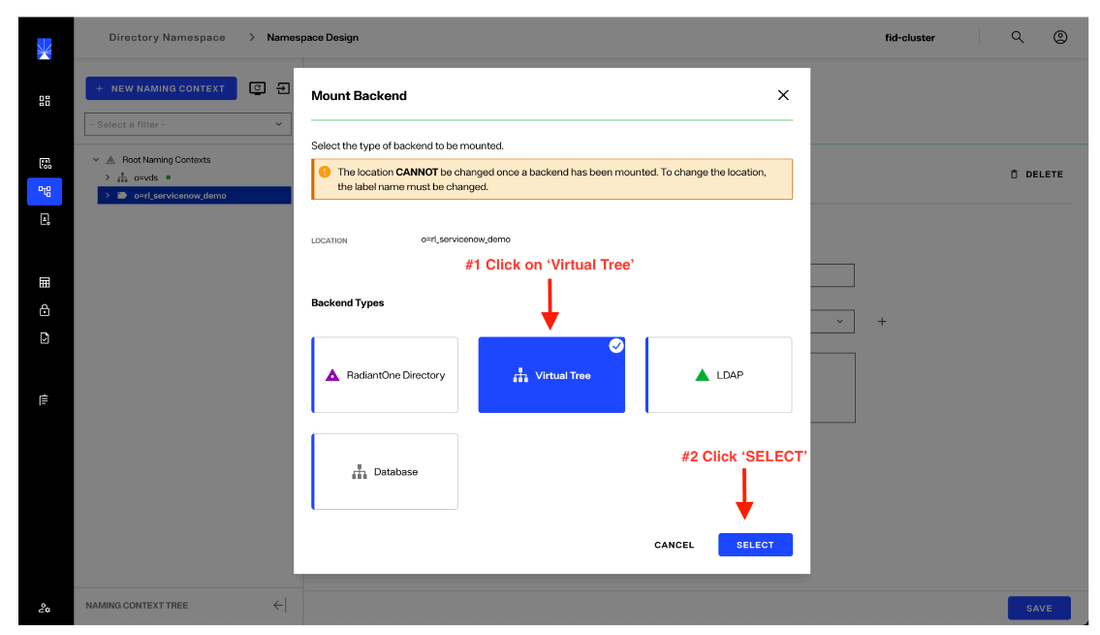
e. Click on the ‘Virtual Tree’ option, then click on ’SELECT’.
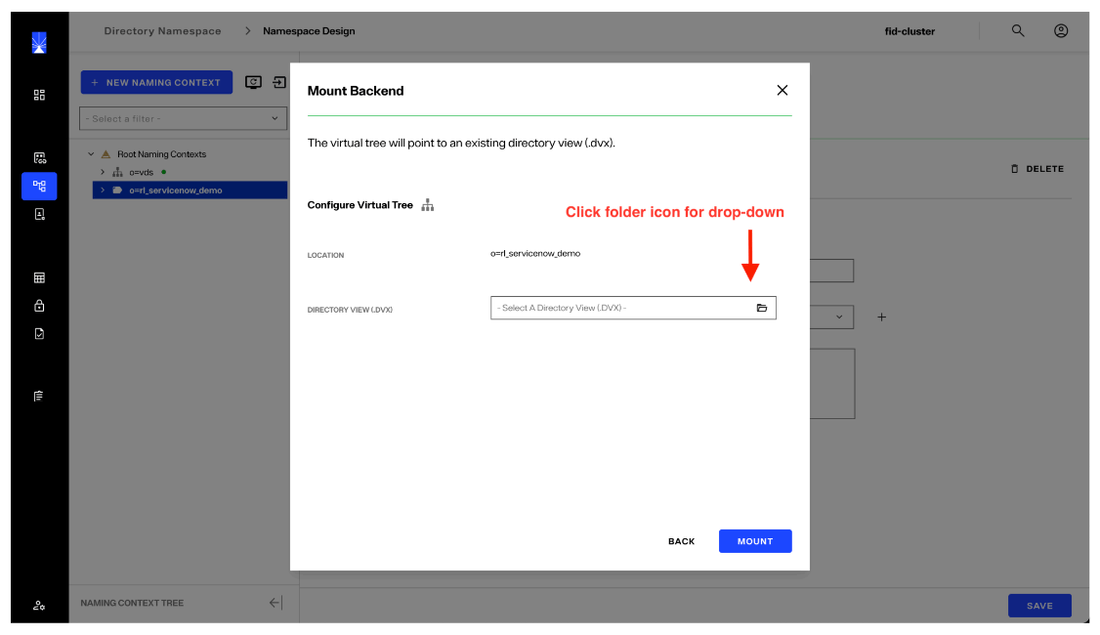
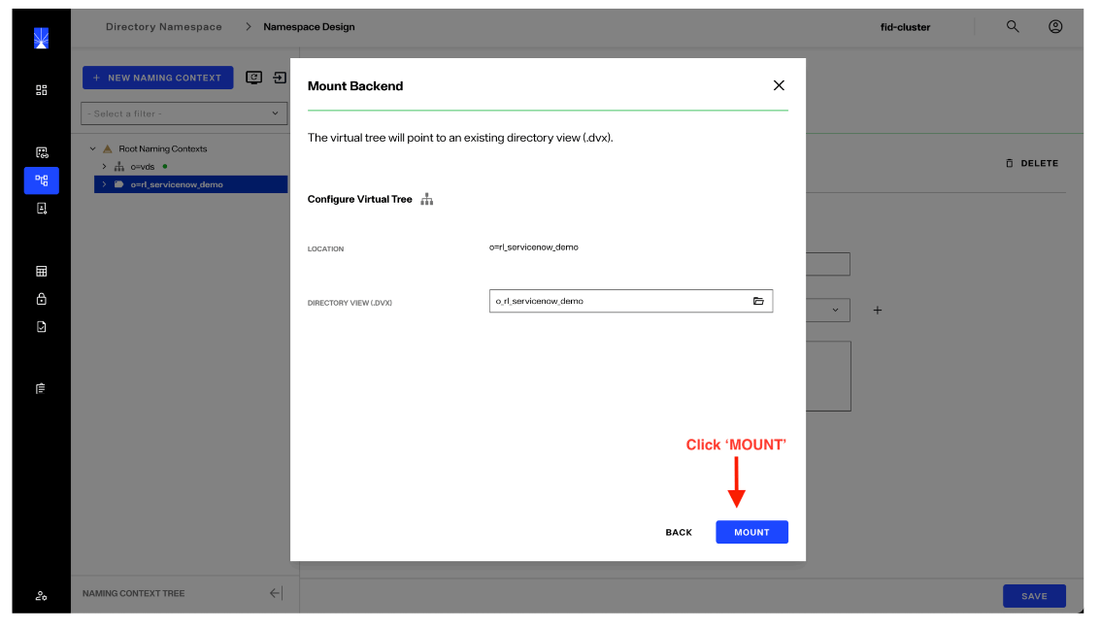
f. Click on the drop-down to see the available virtual directory views. Views are created behind the scenes during the Namespace creation for the SCIM connector. Next, click 'Mount'.
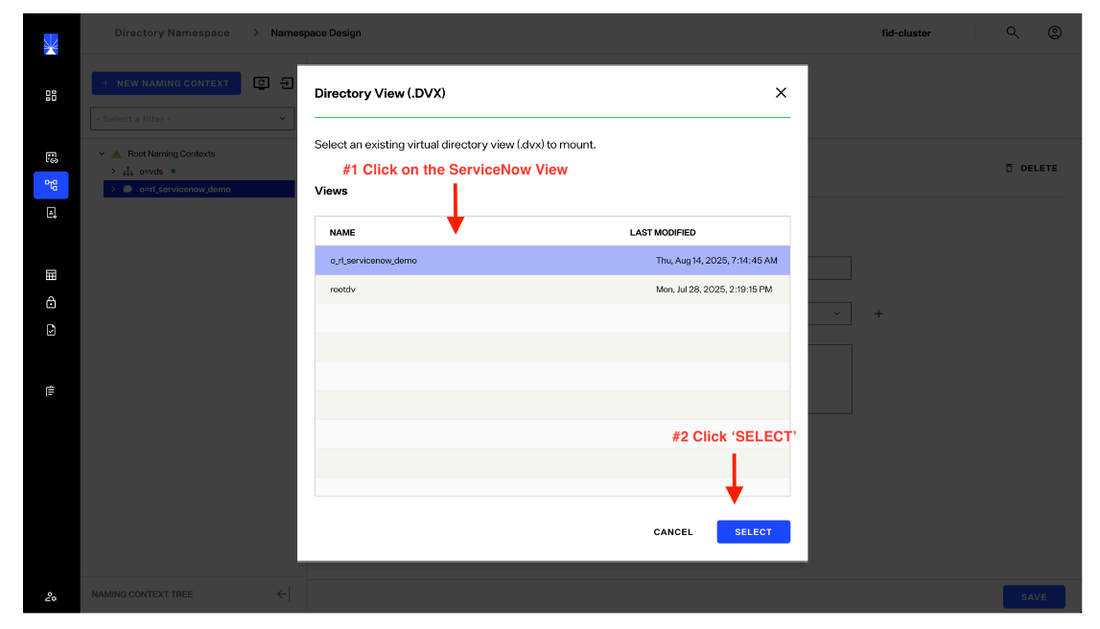
g. Select the ServiceNow object. This object is the Namespace view we created previously. The name is comprised of the selected Naming Context (in this case the “o”) and the value used (“rl_servicenow_demo”). Next, click 'Select'.
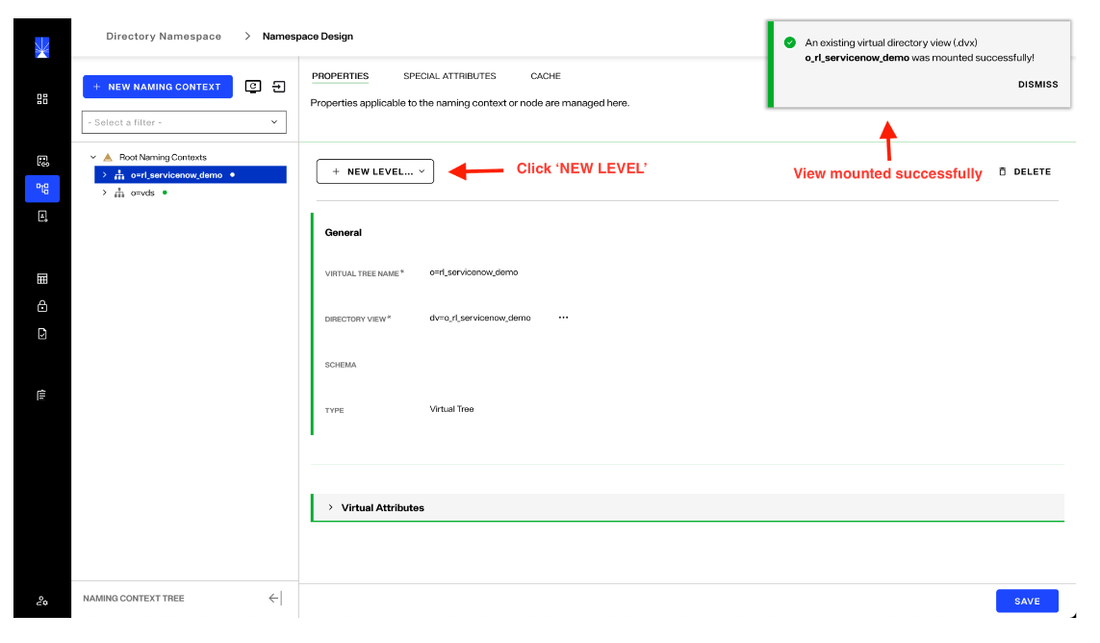
h. Click 'Mount'. Mounting this view establishes a virtual directory tree for this Namespace which will be used to synchronize, view and manage data from ServiceNow.
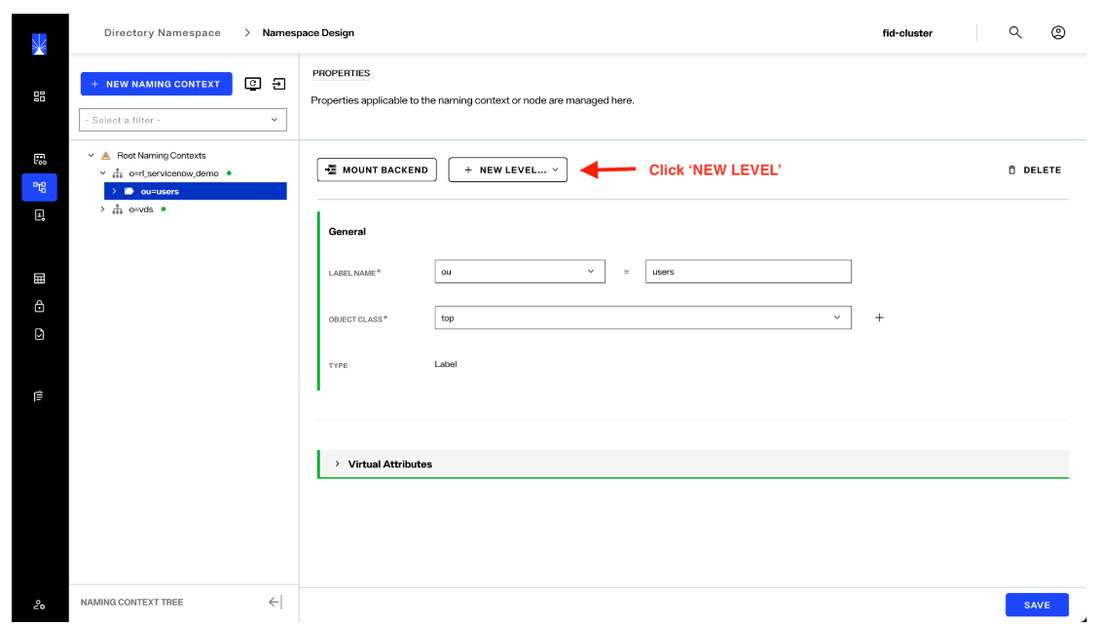
At this point, the schema that has been extracted and the associated data can be made accessible through RadiantOne. This is done through additional Namespace configuration.
For this example, we will create another level in the Namespace, which is done by clicking on the ’NEW LEVEL’ button.
i. Next, select "Label" to create a location in the Namespace to import the ServiceNow users. The structure can be fully customized to fit your organization's requirements.
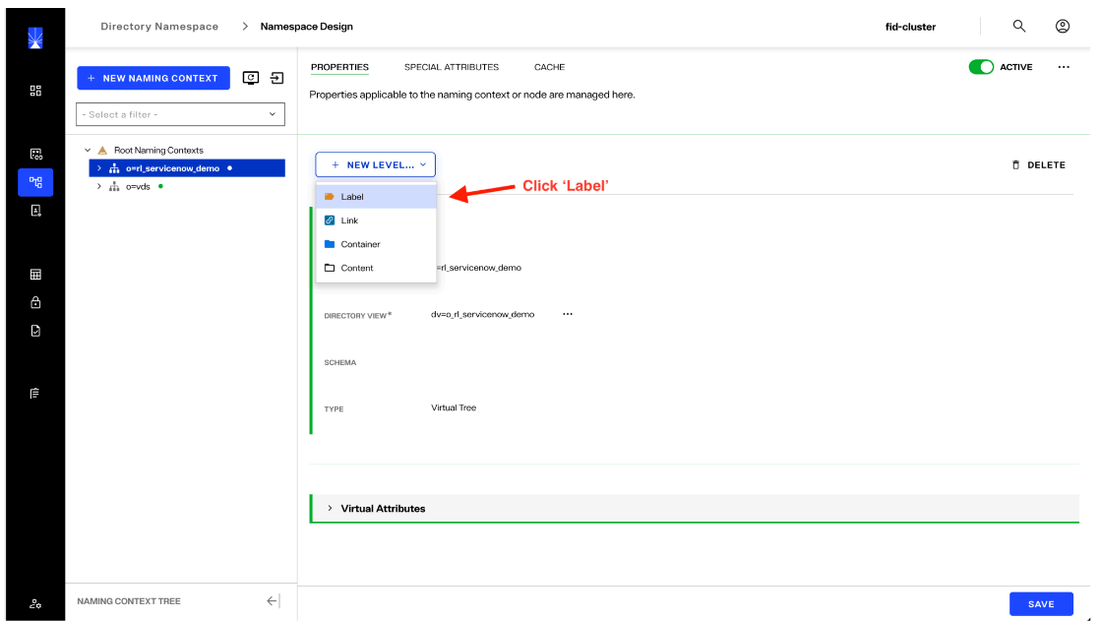
We are adding an “ou” label with the value “users”. As noted previously, this is flexible and subject to whatever structure or naming convention aligns with your organization’s requirements. For this example, we’re using ‘users’ to indicate which ServiceNow identity data we are bringing into RadiantOne.
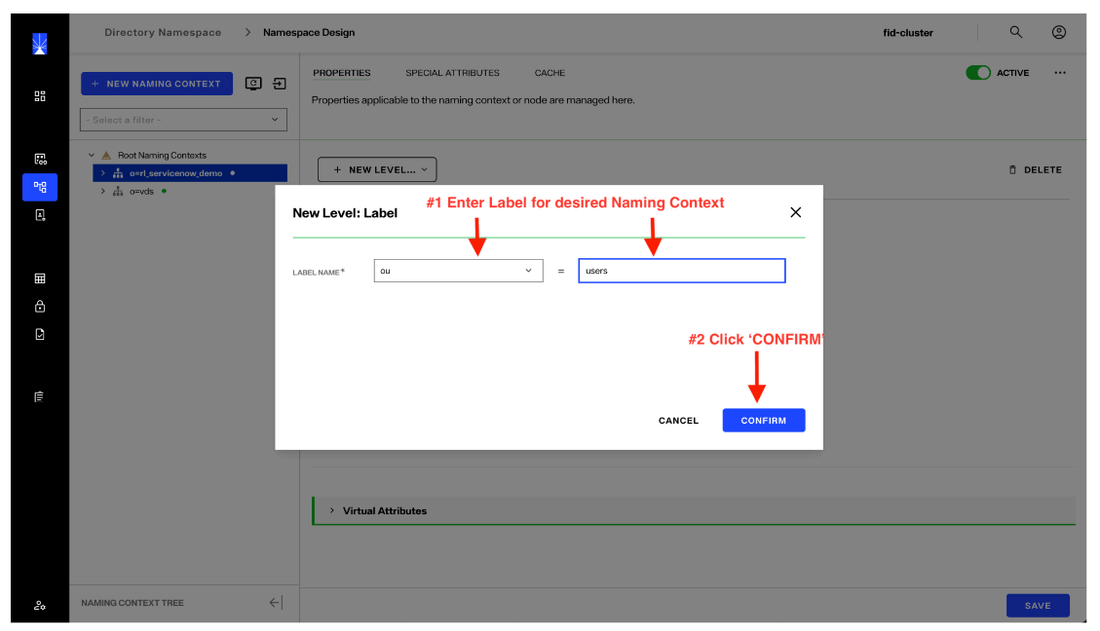
Once you enter your label information, click "CONFIRM".
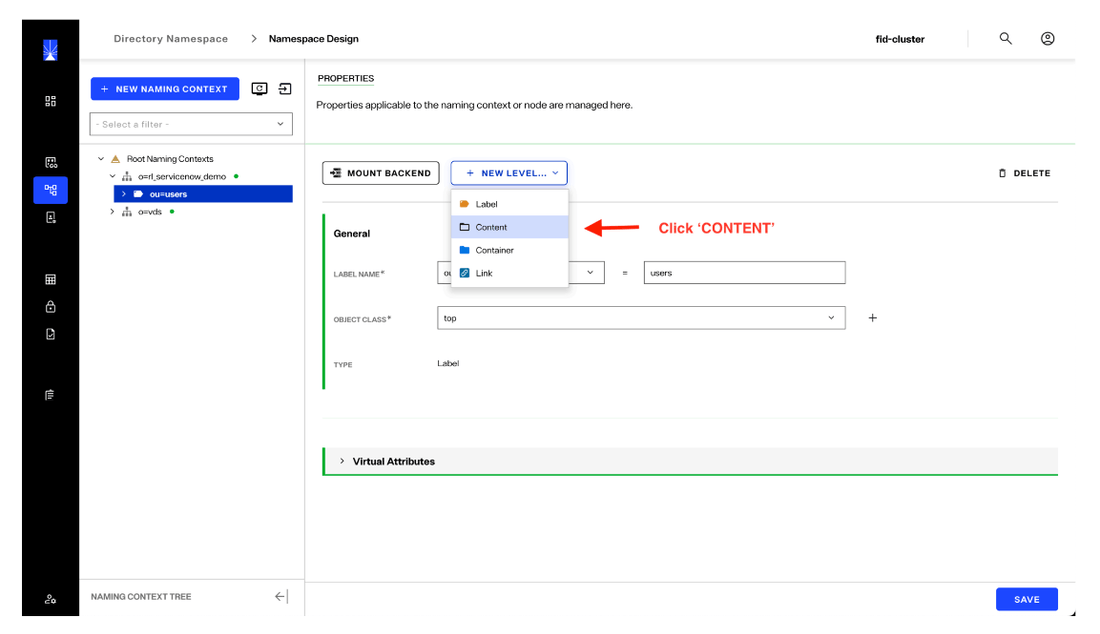
j. Click the ‘NEW LEVEL’ button to create a level that makes the ServiceNow data accessible through the Namespace view.
For this level, we will select ‘Content’ type by clicking "CONTENT". The ‘Content’ type selected for the this level is the method to contain the ServiceNow identity data we will select to be synchronized with RadiantOne.
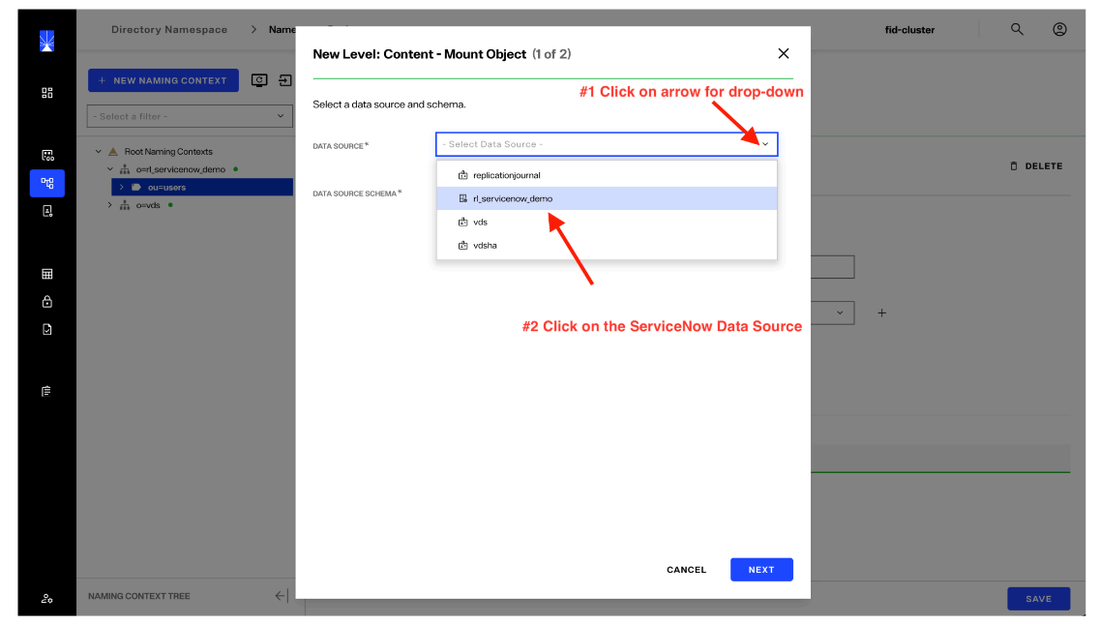
k. Click on the drop-down and select the ServiceNow Data Source.
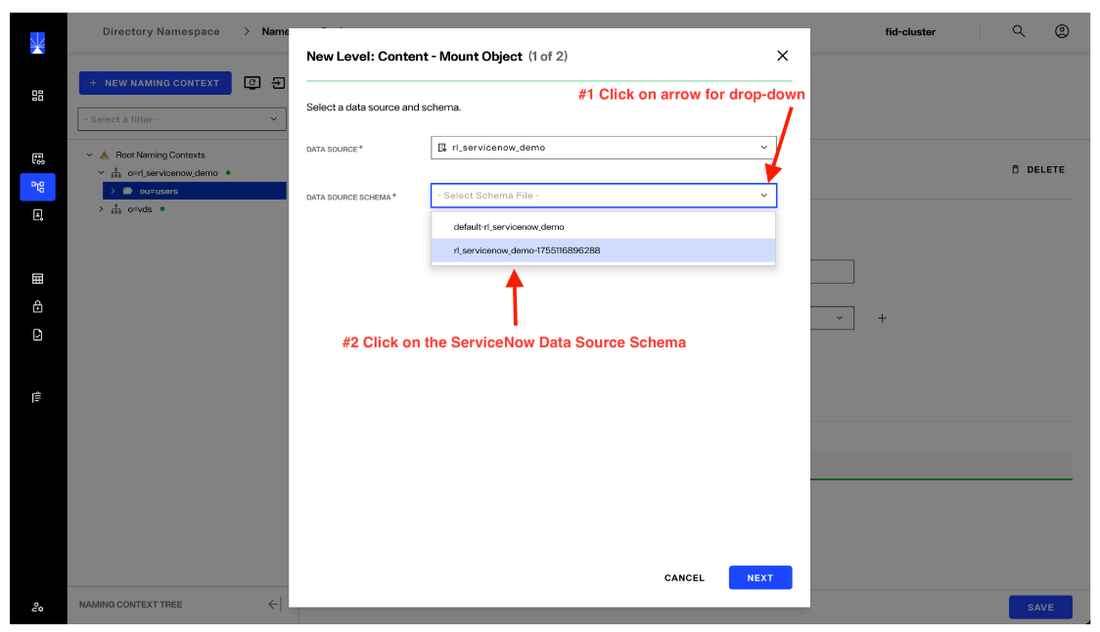
l. Click on the next drop-down to select the ServiceNow Schema that was extracted previously for the Data Source. Then, click "Next".
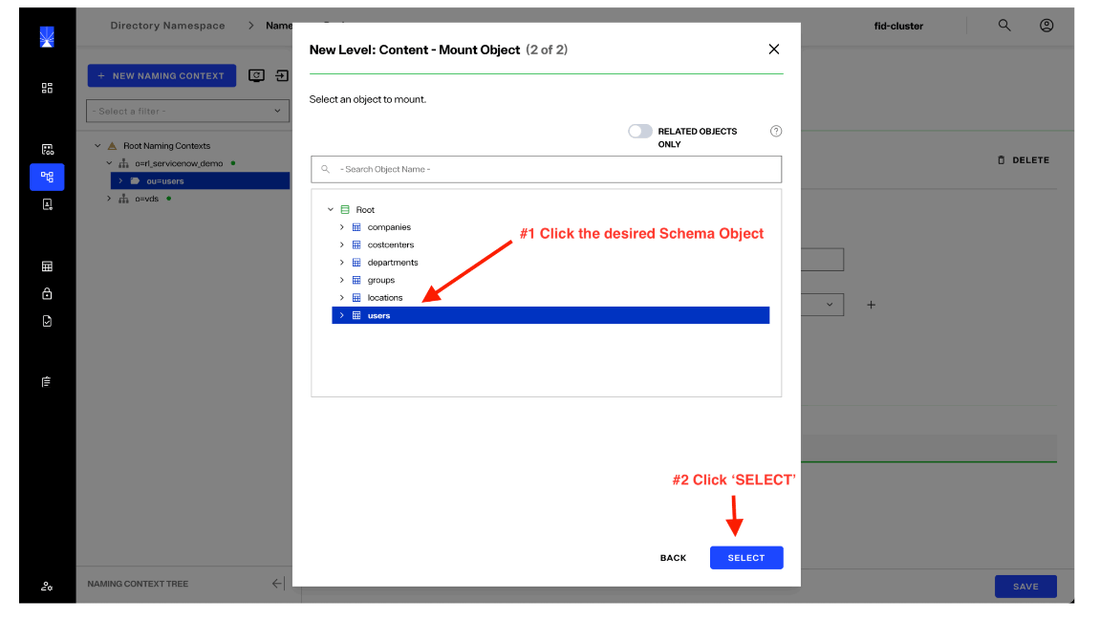
You can see ServiceNow Schema objects/tables we extracted, which included all the available objects. For this example, we are going to select the ServiceNow ‘users’ Schema object.
Select ‘users’ and then click ‘SELECT’.
m. A notification pop-up will display the status of the operation. If any issues occur, additional details will be provided to help with troubleshooting. A green status indicates success.
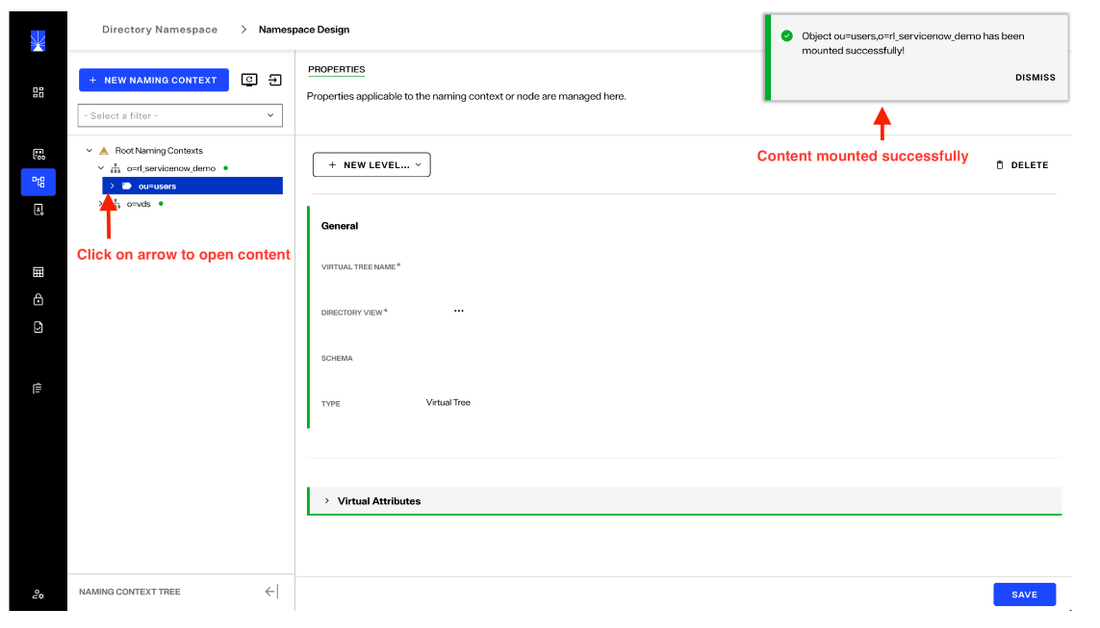
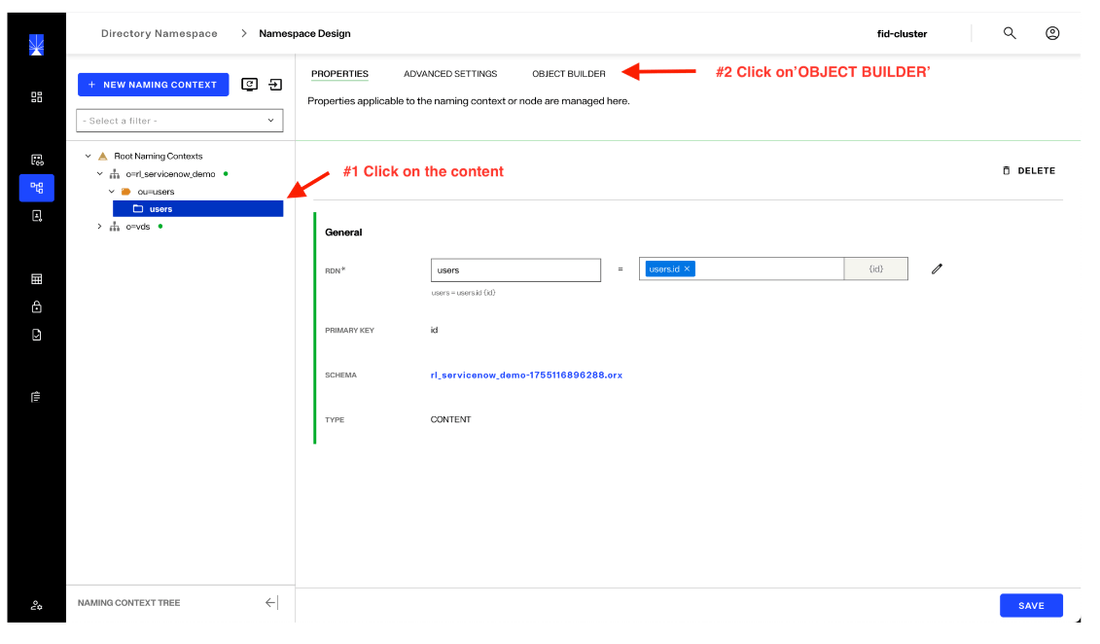
n. Click ou=users and click "users". Next, click on the ‘OBJECT BUILDER’ tab. The content in this example is the ServiceNow ‘users’ object extracted from ServiceNow. Additional content can be pulled in, either within this same Namespace or other Namespaces. As with most of the configuration and management of data in RadiantOne, there is flexibility in how to consume and manage the data subject to your design goals.
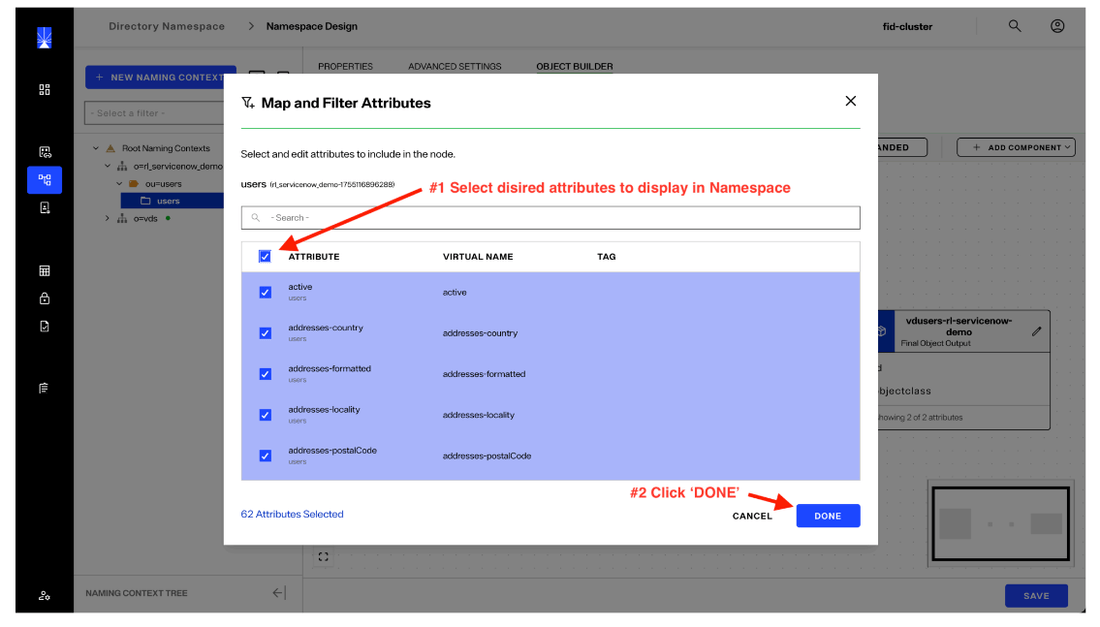
o. The Object Builder allows you to choose which attributes to display from the RadiantOne Namespace you created. The left panel shows the available attributes. Click the icon shown in the image to enable attribute selection.
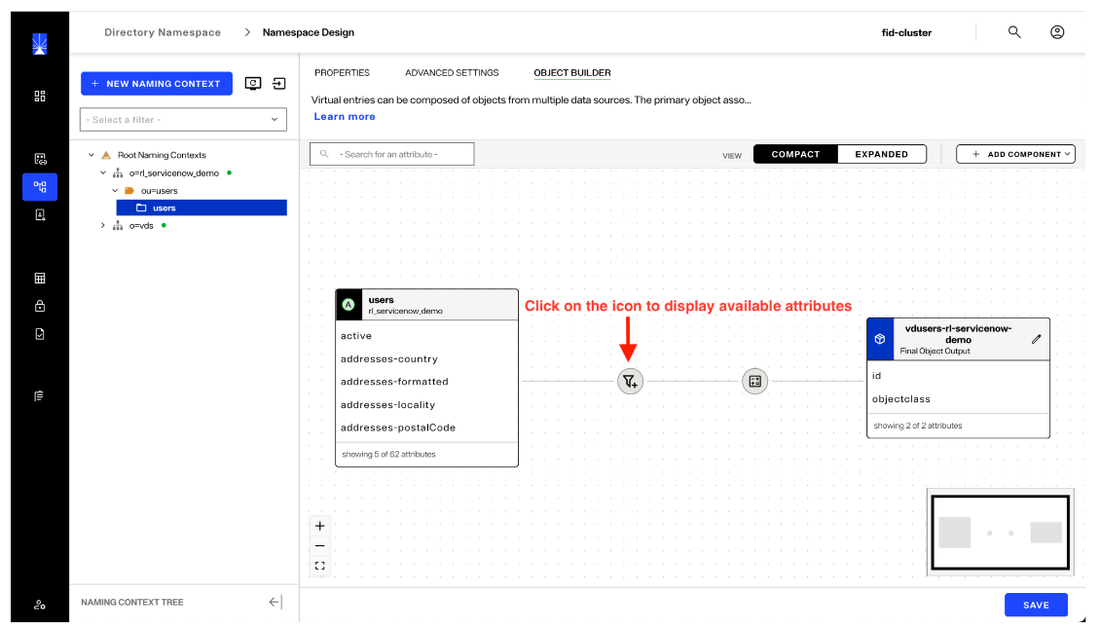
Select desired attributes. In this example, we are selecting all available attributes but this is not required and can be adjusted to the needs of your organization. After selecting the attributes, click ‘DONE’.
p. The attributes selected will show in the table on the right pane on the screen. If there are attributes that you want to remove, click on the attribute icon shown previously and unselect any attribute you want to remove. After reviewing your selection, click ‘SAVE’.
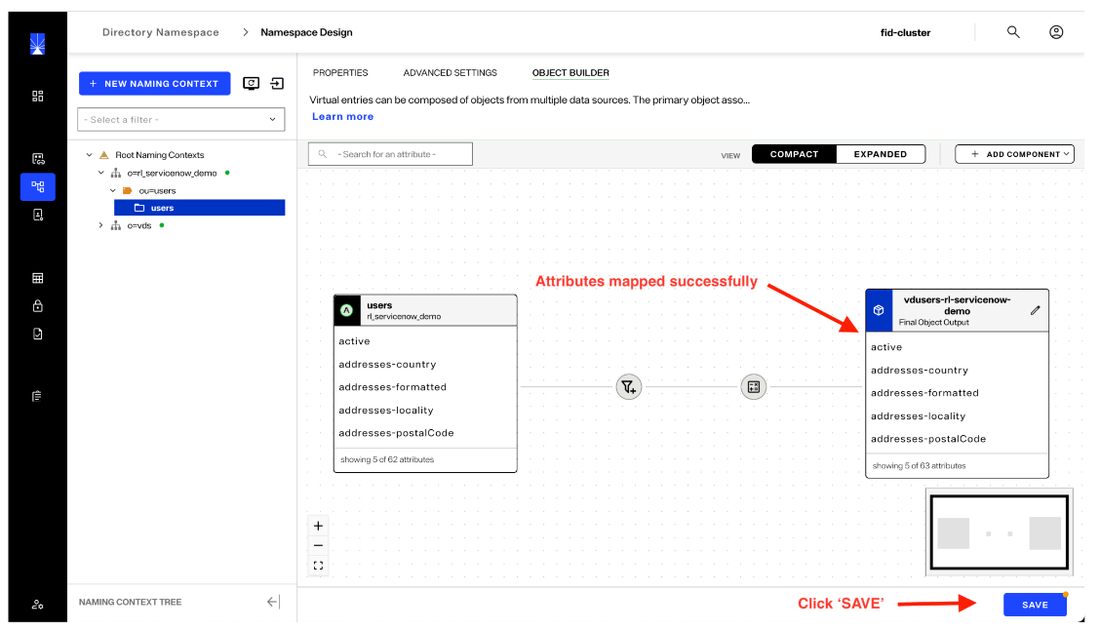
A pop-up notification will show with the status of the operation. If there are any issues, additional information will be provided to assist with troubleshooting.
4. Create a Cache for Namespace
Namespace caching is a way to detect and optimize access and changes to the target system. ServiceNow data can be accessed without a cache being created, which is referred to as a “Proxy” connection. This just means all queries and operations are run against ServiceNow directly when initiated. Depending on your organizational needs, this may be sufficient. However, implementing a cache improves performance by optimizing data access and staying synchronized with changes detected in the source (ServiceNow). Cache can be configured to update through either a 'Periodic Refresh' or in 'Real-Time.' Cached data is stored in the RadiantOne Universal Directory, known as the HDAP store.
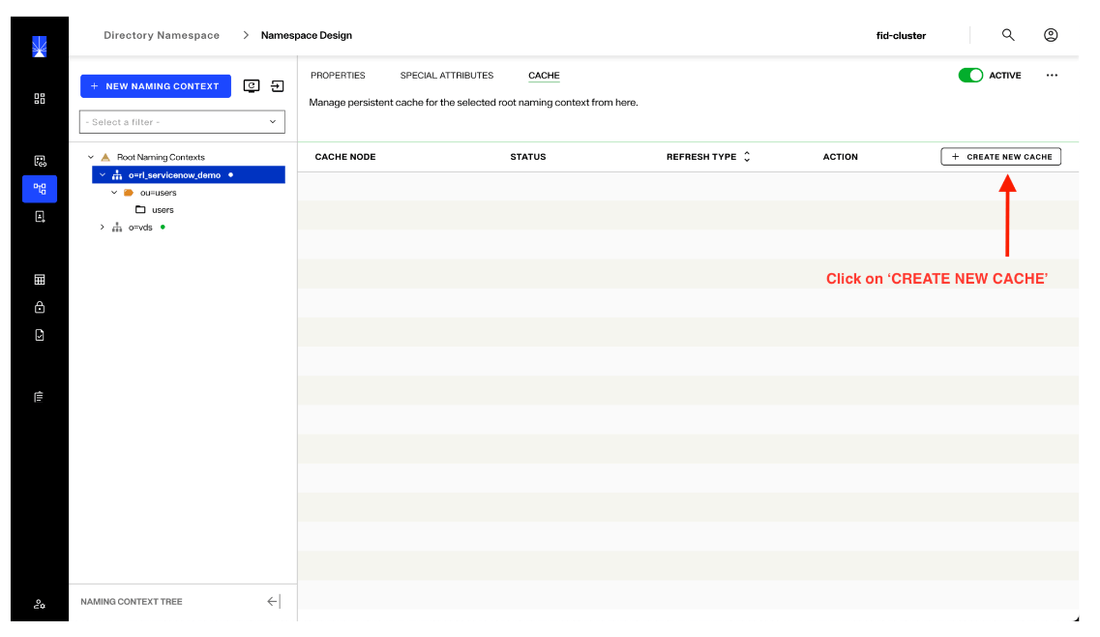
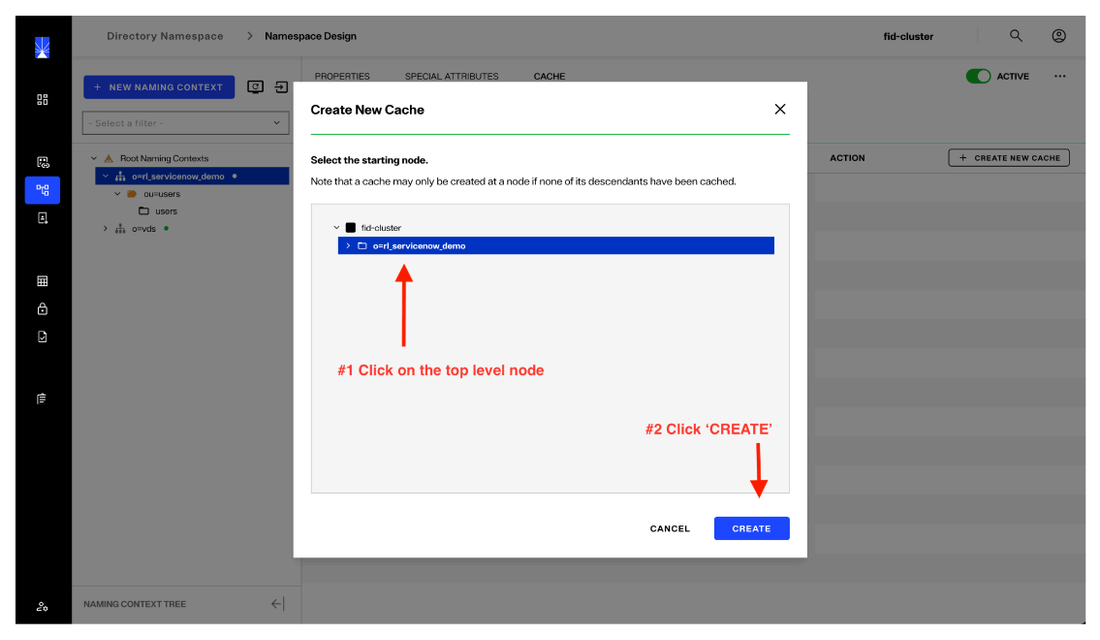
a. Cache is created through the Namespace configuration flow. To cerate it, select the Namespace at the root level, then click on ‘CACHE’.
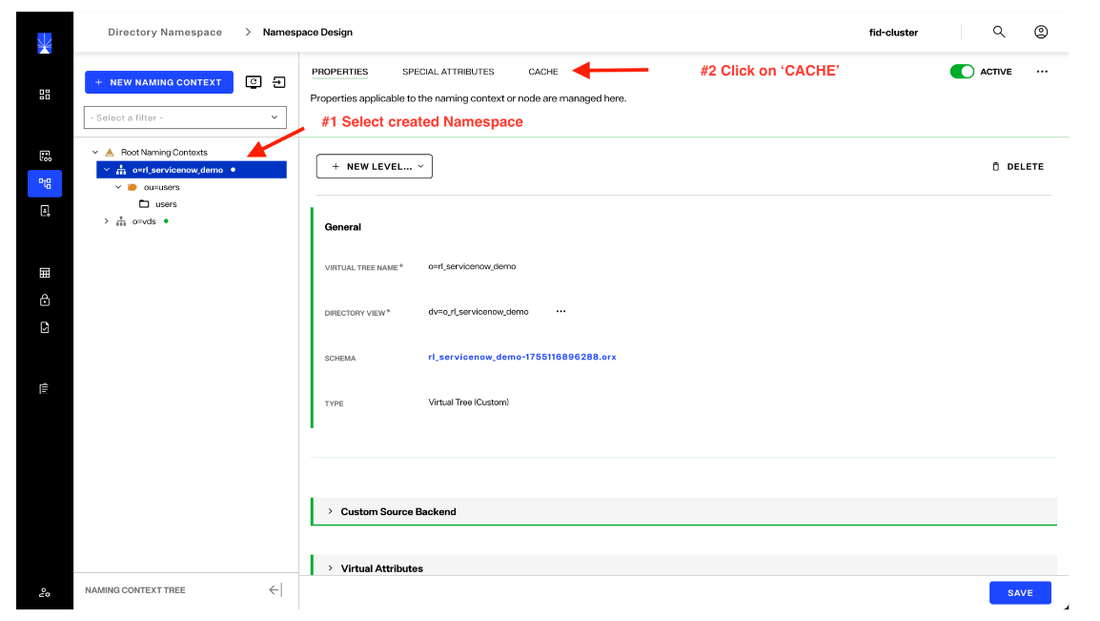
Next, click the "Create new cache" button.
b. Cache can be implemented at various levels. For our example, we are creating it at the top level. Once you select the level, click ‘CREATE’.
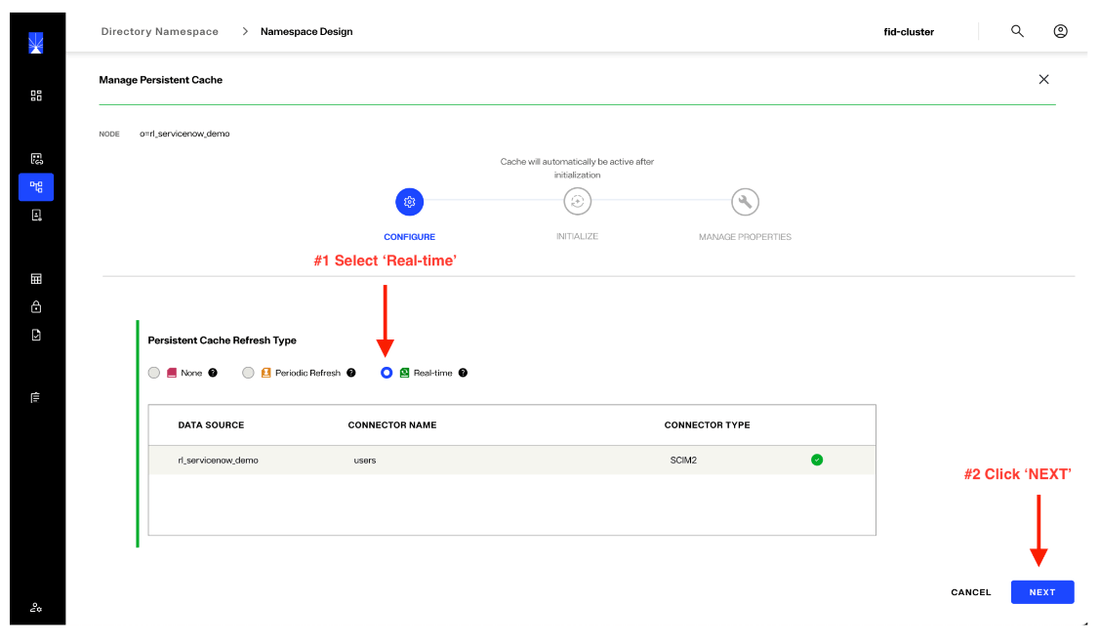
c. Periodic Refresh is a mechanism through which RadiantOne will check for changes on a scheduled basis and update the Namespace data as needed. The ‘Real-Time’ change detection is available based on the capabilities of the target system. The RadiantOne SCIM connector with ServiceNow supports ‘Real-Time’ change detection by default and that is the method we will be using.
Select ‘Real-time’ and click ‘NEXT’.
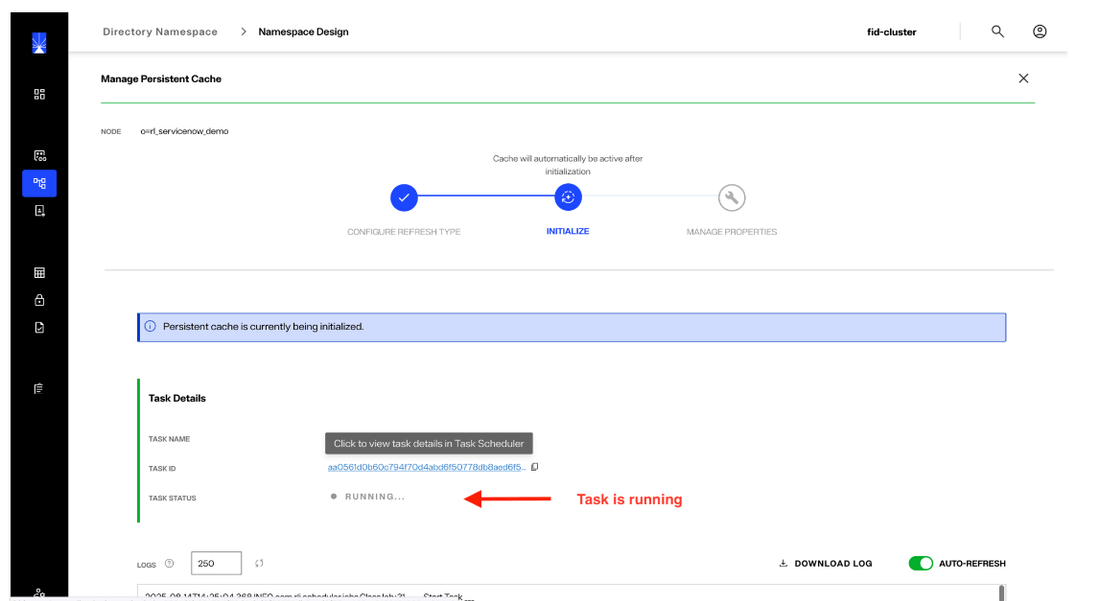
d. Click ‘INITIALIZE’.
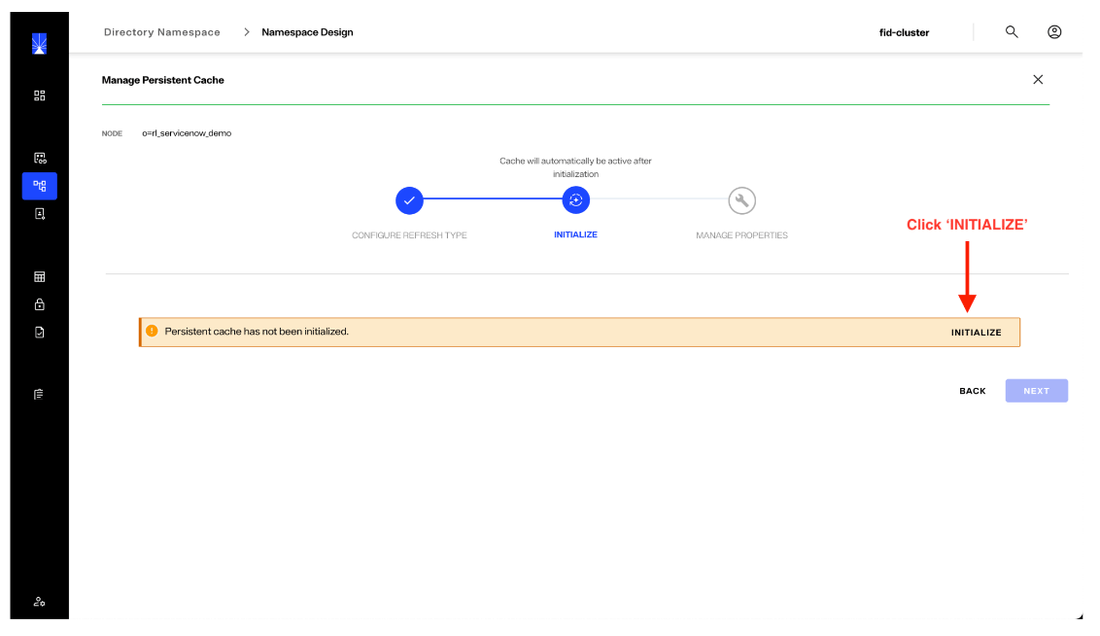
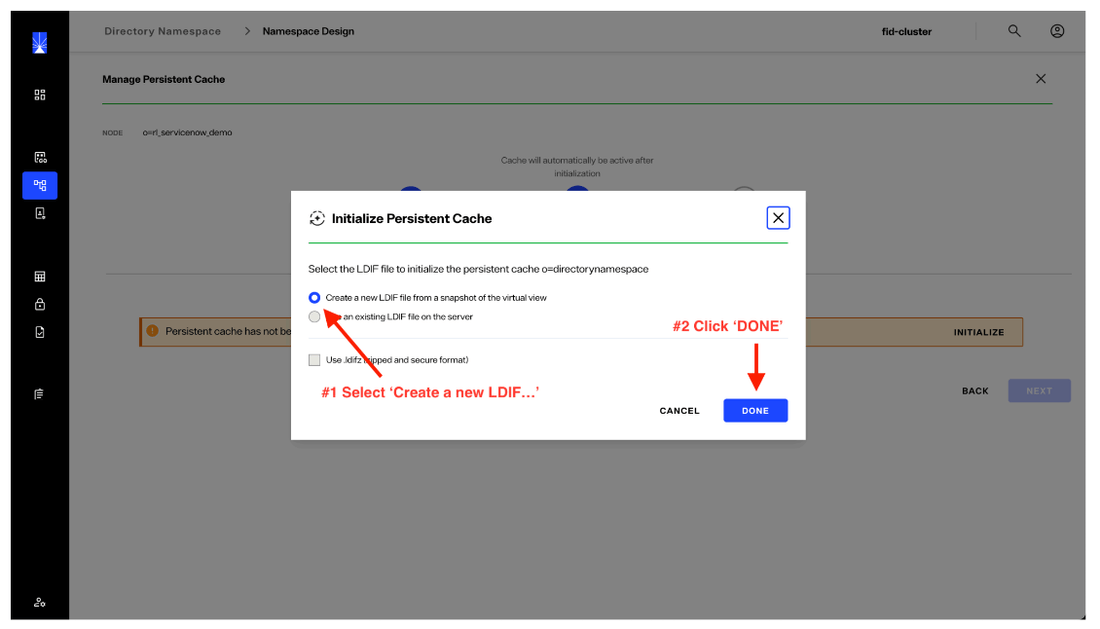
Depending on the amount of data to synchronize, this initial operation could take a few minutes to a few hours. Behind the scene, an LDIF (LDAP Data Interchange File) is being created on the RadiantOne server. This will then be automatically uploaded in the RadiantOne HDAP for high speed access and availability.
Next, select the "Create a new LDIF.." option to create a new LDIF and click "DONE".
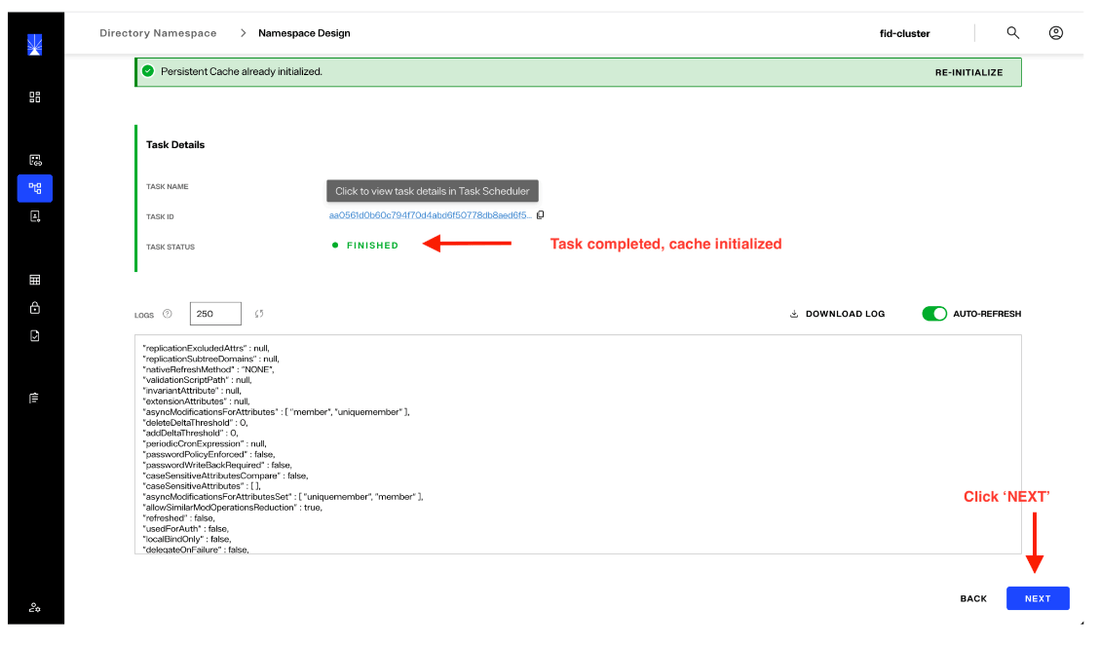
e. Once the cache is initialized, you will see the task status on the screen. A notification pop-up will be presented with the status of the operation.
If there are any issues, additional information will be provided. That information and the information provided in the operation log can be used to assist with troubleshooting. Once the task status indicates "FINISHED", click "NEXT".
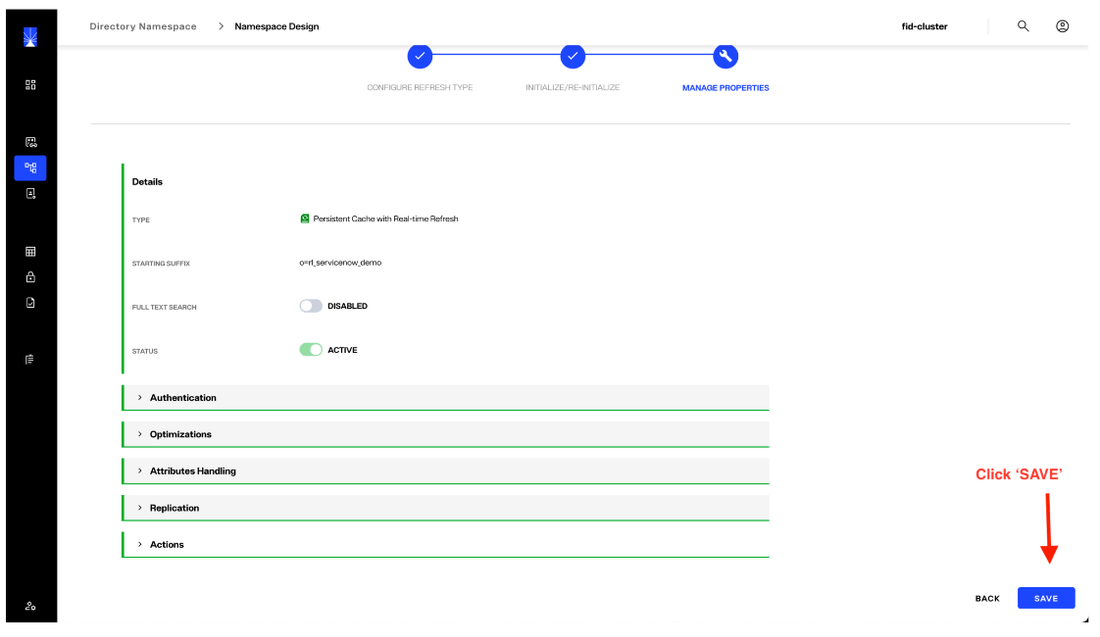
f. Click ‘SAVE’ to finalize the operation after the Cache has been successfully created.
After successful creation, the status of the cache shows "Active".
5. Review and Validate the Data
There are various ways to view and manage the synchronized data from ServiceNow, including the RadiantOne Directory browser which is accessible in the Identity Data Management Control Panel. You can also refer to following examples of 3rd party tools to access the data over standard protocols (LDAP, Web Services/REST) supported by RadiantOne. These examples are provided as a point of reference to assist in determing the method(s) that best serve your organizational needs.
RadiantOne Directory Browser
The ‘Directory Browser’ in the RadiantOne Control Panel is similar to other LDAP browsers and administrative tools you may be familiar with. It is a convenient way to view and manage data synchronized to RadiantOne. Other LDAP clients may also be used based on your preference and needs.
a. Expand the Navigation Pane on the left-hand side of the RadiantOne control panel by hovering over the icons. To view the ServiceNow data that has been synchronized the RadiantOne created Namespace, click on the ‘Directory Browser’ tab in the navigation pane.
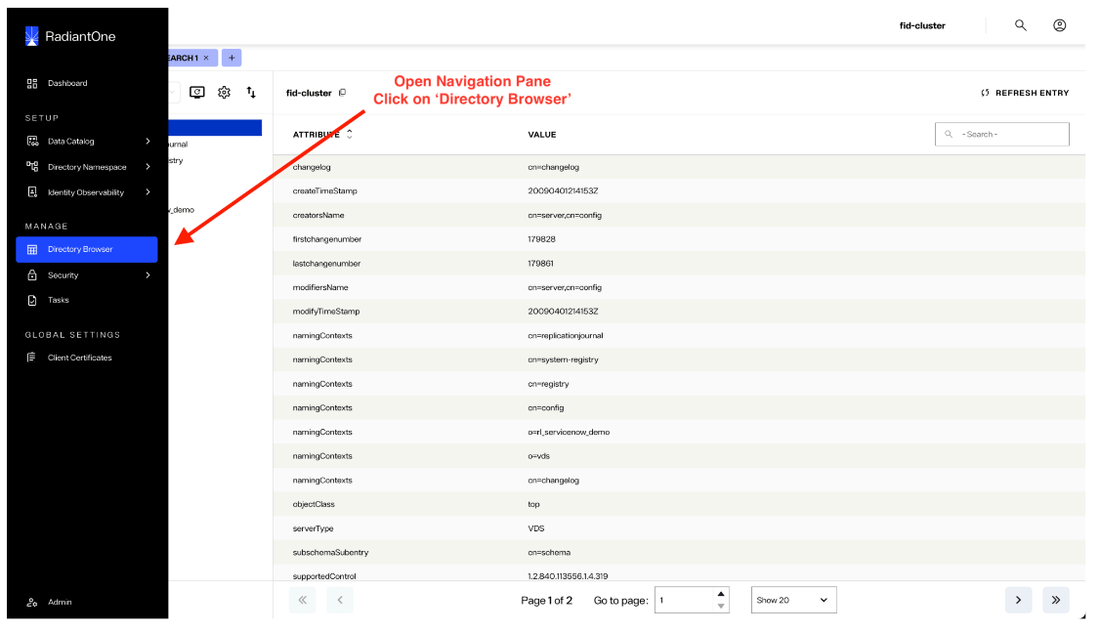
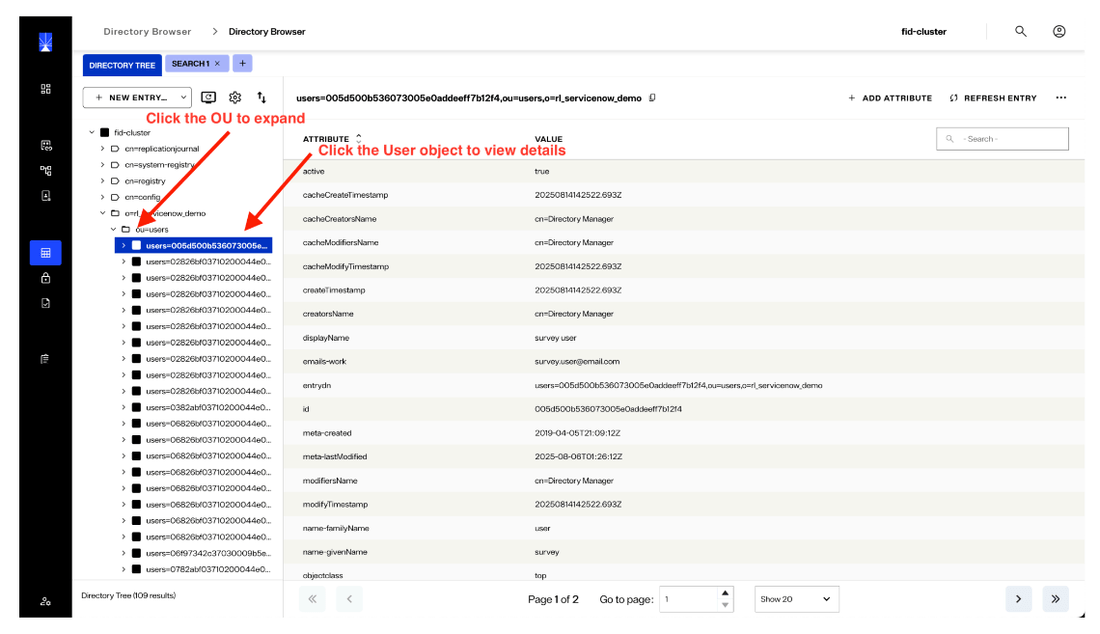
b. Click on the arrow next to the Namespace that was previously created.
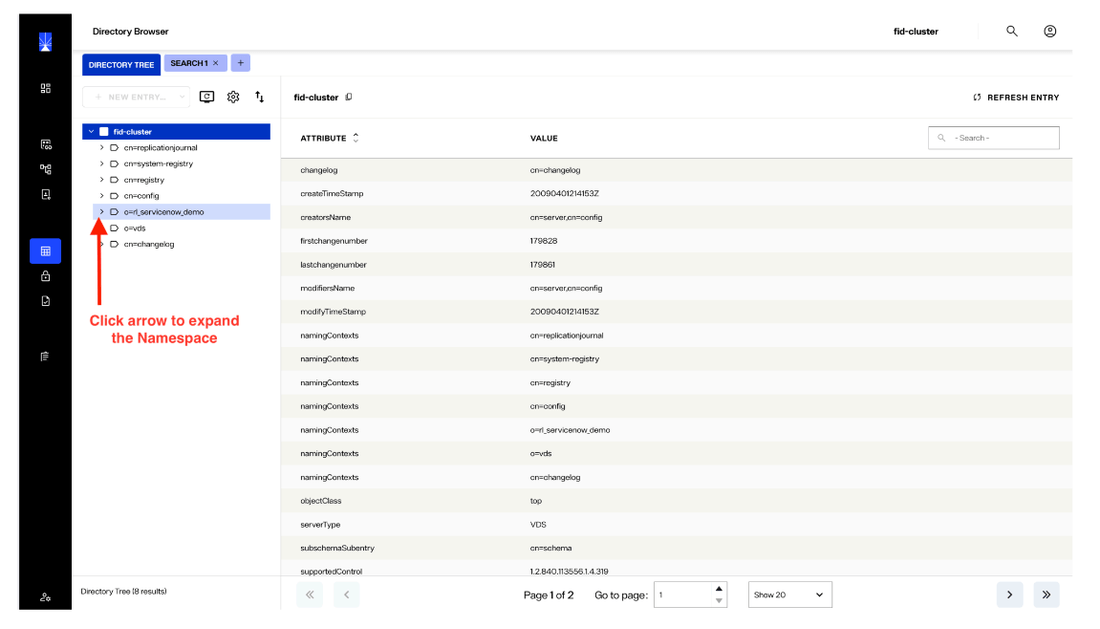
The objects are accessible through this UI. You can select and view the attributes that were mapped for the relevant object. In this case, we'll click on the 'user' object to review its attributes that were mapped into the Namespace.
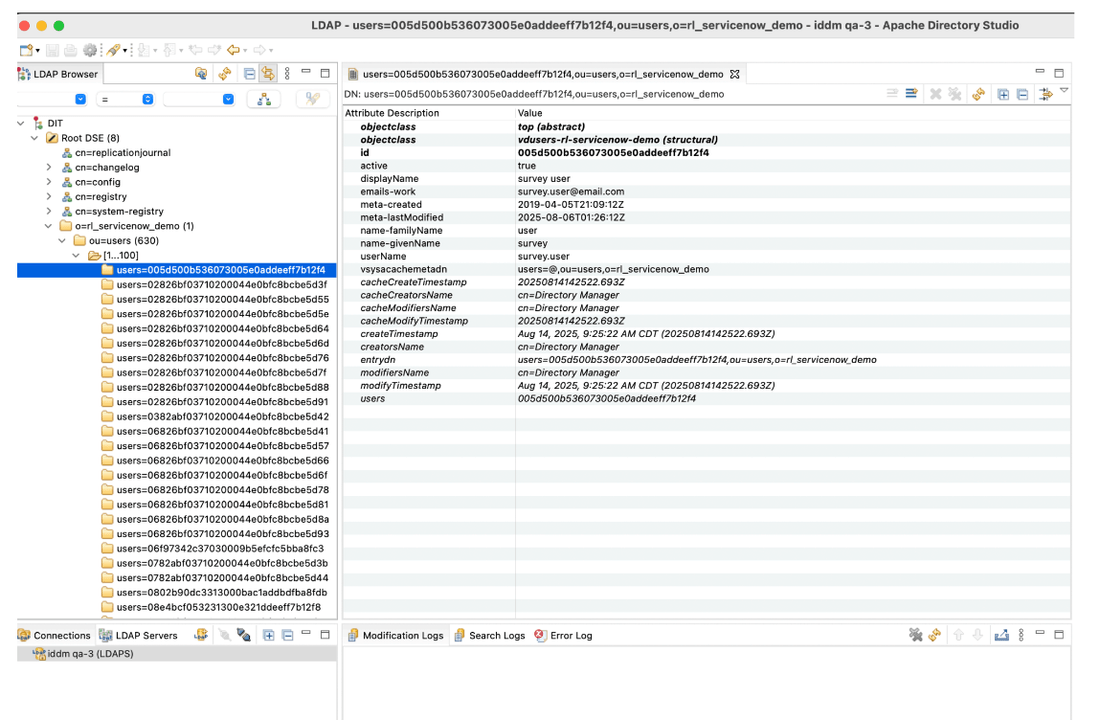
External Connection to RadiantOne via LDAP
Here's an example of connecting to and viewing ServiceNow data in the RadiantOne Namespace using a third-party tool named Apache Directory Studio LDAP browser.
External connection to RadiantOne via REST API
Access to RadiantOne Namespaces via the REST API is enabled by default, with support for all LDAP operations over REST. The example below is shown using Postman as the external client, issuing the API query.

Similar to the LDAP configuration, these settings as well as granular access controls can be adjusted to meet the organization’s requirements. The REST Endpoint URL is https://hostname:8090/adap/namespace_baseDN.
